shell开发
学习了linux系统命令操作之后,为了提升运维效率,我们得学习shell脚本开发。
使用多个命令
shell脚本的关键是在于处理多个命令,且处理每个命令的结果,或者将不同的命令结果进行传递,再次加工。
shell支持多个命令连接起来执行。
恭喜你,铁子,你已经会了第一个shell脚本。这个脚本简单到只有2个命令,这种形式,命令少还好说,如果命令较长,较多,那就很难在命令行敲打了。
我们可以把命令组合成一个文本文件,然后执行这个文件即可。
shell脚本文件
shell脚本文件,第一行必须指定想要用的shell。
shell脚本里,#号是注释行,shell不会处理脚本中的注释行,然而第一行例外,该写法会通知shell用哪个解释器来运行脚本。
shell脚本中可以书写你想要执行的命令,且可以添加注释行。
执行脚本
用解释器读取脚本
[root@web01 ~]# sh test.sh
Mon Sep 28 09:34:28 CST 2020
root
It's Over.
[root@web01 ~]# bash test.sh
Mon Sep 28 09:34:36 CST 2020
root
It's Over.
直接运行文件,需要赋予权限
[root@web01 ~]# ./test.sh
-bash: ./test.sh: Permission denied
[root@web01 ~]# ll test.sh
-rw-r--r-- 1 root root 64 Sep 28 09:34 test.sh
[root@web01 ~]# chmod +x test.sh
[root@web01 ~]#
[root@web01 ~]# ll test.sh
-rwxr-xr-x 1 root root 64 Sep 28 09:34 test.sh
# 执行
[root@web01 ~]# ./test.sh
Mon Sep 28 09:35:35 CST 2020
root
It's Over.
当以./test.sh该形式执行脚本,则以文件第一行的shebang指定的解释器执行文件。
常用echo
在shell脚本里,shell命令会有自己的输出,若是你想要自定义内容打印,以告知用户,当前脚本在做什么事。
可以通过echo命令来实现,注意单引号、双引号。
[root@web01 ~]# cat test.sh
#!/bin/bash
# This script displays the date and who's logged on
echo "The time and date are:"
date
echo ''
echo "Let's see who's logged into the system:"
who
[root@web01 ~]# ./test.sh
The time and date are:
Mon Sep 28 09:45:20 CST 2020
Let's see who's logged into the system:
root     tty1         2020-09-27 11:01
root     pts/0        2020-09-27 17:57 (10.0.1.1)
使用变量与echo
脚本里,可以在环境变量名称前加上$来使用环境变量。
[root@web01 ~]# cat test.sh
#!/bin/bash
# display user information from the system
echo "User info for userid: $USER"
echo UID: $UID
echo HOME: $HOME
[root@web01 ~]# ./test.sh
User info for userid: root
UID: 0
HOME: /root
转义符
当一些情况,我们不希望shell解析一些符号,可以使用单引号和转义符对符号不做解析。
echo识别变量的情况
这显然不是超哥想要的,改成如下写法
方法二
现在允许shell解读$只是一个普通的美元符了。
变量应用
[root@web01 ~]# cat test.sh
#!/bin/bash
# test variables
days=10
guest="超哥"
echo "$guest checked in $days days ago"
[root@web01 ~]# ./test.sh
超哥 checked in 10 days ago
变量被引用时会输出赋予给它的值,变量会在shell脚本退出后消失。
变量再赋值
变量每次被引用的时候,都会输出赋予的值,需要加上$符
[root@web01 ~]#
[root@web01 ~]# cat test.sh
#!/bin/bash
# assigning a variable value to another variable
value1=10
value2=$value1
echo "The resulting value is $value2"
[root@web01 ~]# ./test.sh
The resulting value is 10
[root@web01 ~]#
若是忘记用美元符,则结果就错误了。
[root@web01 ~]# cat test.sh
#!/bin/bash
# assigning a variable value to another variable
value1=10
value2=value1
echo "The resulting value is $value2"
[root@web01 ~]#
[root@web01 ~]#
[root@web01 ~]# ./test.sh
The resulting value is value1
命令替换
shell一大特性就是可以从命令中提取结果,再赋予给变量,这样处理脚本数据特别方便。
有两个方式将命令输出赋予给变量
反引号 ``
$() 格式
来看超哥的用法
[root@web01 ~]# cat test.sh
#!/bin/bash
testing=$(date)
echo "The date and time are:" $testing
# 结果
[root@web01 ~]# ./test.sh
The date and time are: Mon Sep 28 10:31:39 CST 2020
再来看案例
[root@web01 ~]# cat test.sh
#!/bin/bash
# copy the /usr/bin directory listing to a log file
today=$(date +%y%m%d)
ls /usr/bin -al > log.$today
today变量是取出命令的值,也就是提取了日期,然后在结合到文件名里使用
[root@web01 ~]# ./test.sh
[root@web01 ~]# cat log.200928 |wc -l
1240
反引号
反引号和$()的作用相同,用于命令替换(command substitution),即完成引用的命令的执行,将其结果替换出来,与变量替换差不多。比如:
[root@web01 ~]# echo `date '--date=1 hour ago' +%Y-%m-%d-%H`
2020-09-28-10
等同于
[root@web01 ~]# echo $(date '--date=1 hour ago' +%Y-%m-%d-%H)
2020-09-28-10
数值计算
编程语言都支持数字计算,但是对于shell来说,数值计算稍微麻烦点。
expr命令
expr命令允许在命令行处理数学表达式,简单的计算器命令
案例
注意必须有空格
[root@web01 ~]# expr 1 + 5
6
# expr并不是很好用,比较麻烦
# 很多符号在shell里有特殊含义因此必须得转义使用
[root@web01 ~]# expr 5 * 2
expr: syntax error
[root@web01 ~]# expr 5 \* 2
10
# 求长度
[root@web01 ~]# expr length 123132134524asdqweqweqewqfgdfgdfgdf
35
# 逻辑判断,必须加上引号
[root@web01 ~]# expr 33 '>'  3
1
[root@web01 ~]# expr 33 '>'  333
0
# 除法
[root@web01 ~]# expr 50 / 5
10
# 逻辑判断,是否是数字
[root@web01 ~]# cat test.sh
#!/bin/bash
NUM=4
expr $NUM + 3 > /dev/null 2>&1
echo $?
STR="chaoge"
expr $STR + 3 > /dev/null 2>&1
echo $?
[root@web01 ~]# sh test.sh
0
2
方括号
bash提供了更简单的方式进行数学表达式计算
超哥提示:保持良好的shell书写习惯,注意空格,语法
案例
[root@web01 ~]# cat test.sh
#!/bin/bash
var1=$[ 1 + 5 ]
echo $var1
var2=$[ $var1 * 2 ]
echo $var2
# 执行
[root@web01 ~]# bash test.sh
6
12
再来一个
[root@web01 ~]# cat test.sh
#!/bin/bash
var1=100
var2=50
var3=45
var4=$[ $var1 * ($var2-$var3) ]
echo "The final result is $var4"
[root@web01 ~]# bash test.sh
The final result is 500
方括号的写法,就不用担心shell会误解*号,因为写在了[]中括号里面。
bash计算的能力还是较弱,更多实际的数学运算,还是得借助其他工具。
bc命令
bc是bash计算器,允许在命令行中进行浮点数计算,返回结果。
bc能够识别:
- 整数、浮点数
- 变量、数组
- 注释、#号或/**/
- 表达式
- 编程语句
- 函数
[root@web01 ~]# bc
bc 1.06.95
Copyright 1991-1994, 1997, 1998, 2000, 2004, 2006 Free Software Foundation, Inc.
This is free software with ABSOLUTELY NO WARRANTY.
For details type `warranty'.
3*2.2
6.6
3*(1.1+2.2)
9.9
quit
脚本中用bc
可以使用命令替换结合bc命令使用,也就是反引号或者$()
[root@web01 ~]# cat test.sh
#!/bin/bash
var1=$(echo "3.44*2"|bc)
echo "The answer is $var1"
[root@web01 ~]#
[root@web01 ~]#
[root@web01 ~]#
[root@web01 ~]# sh test.sh
The answer is 6.88
可以结合变量替换再使用
[root@web01 ~]# cat test.sh
#!/bin/bash
var1=20
var2=2.32
var3=$(echo "$var1 * $var1"|bc)
var4=$(echo "$var3 * $var2"|bc)
echo "The final result is $var4"
[root@web01 ~]# bash test.sh
The final result is 928.00
退出脚本
刚才我们的所有操作都是命令结束自动退出的,其实还可以选择其他优雅的方式,为脚本画上句号。
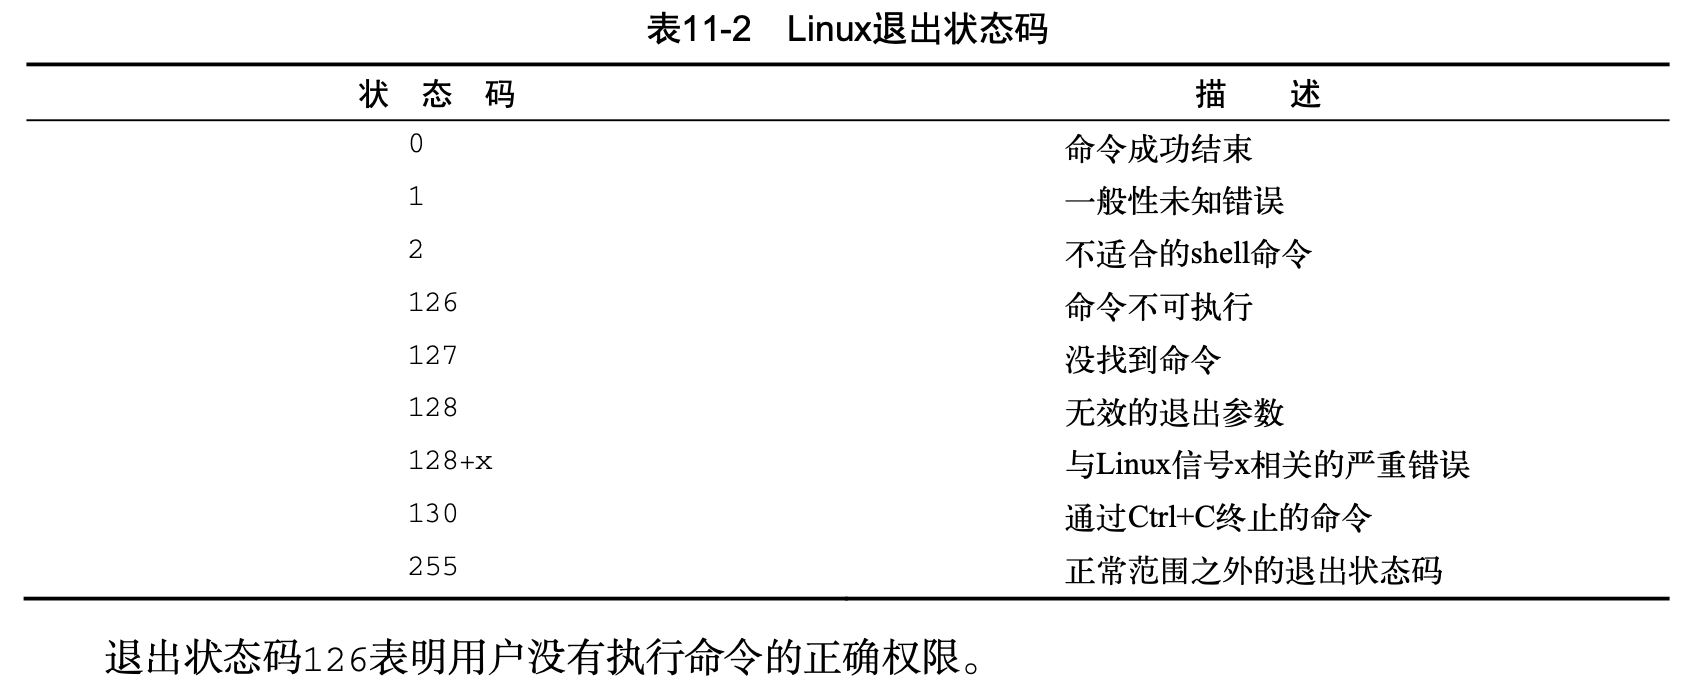
shell运行的每个命令都有退出状态码 exit status
exit status是一个0~255的整数值
状态码
linux提供变量存储上一个命令执行结果状态。
$? 变量
[root@web01 ~]# date
Mon Sep 28 14:19:54 CST 2020
[root@web01 ~]#
[root@web01 ~]# echo $?
0
退出码是0则表示命令执行无误。
[root@web01 ~]# datee
-bash: datee: command not found
[root@web01 ~]#
[root@web01 ~]# echo $?
127
退出码非0则表示有误
# 例如没有权限的状态码
[root@web01 ~]# chmod -x test.sh
[root@web01 ~]#
[root@web01 ~]# ./test.sh
-bash: ./test.sh: Permission denied
[root@web01 ~]#
[root@web01 ~]# echo $?
126
exit命令
正常情况下,shell脚本会以最后一个命令的状态码退出。
# 注意超哥这里的最后一行,故意写错
[root@web01 ~]# cat test.sh
#!/bin/bash
var1=20
var2=2.32
var3=$(echo "$var1 * $var1"|bc)
var4=$(echo "$var3 * $var2"|bc)
echoo "The final result is $var4"
# 查看状态码
[root@web01 ~]# bash test.sh
test.sh: line 6: echoo: command not found
[root@web01 ~]# echo $?
127
可以改变默认的状态码行为,使用exit
[root@web01 ~]# cat test.sh
#!/bin/bash
# test the exit status
var1=10
var2=30
var3=$[ $var1 + $var2 ]
echo "The answer is $var3"
exit 5
[root@web01 ~]#
[root@web01 ~]#
[root@web01 ~]#
[root@web01 ~]# bash test.sh
The answer is 40
[root@web01 ~]# echo $?
5
shell逻辑控制
先前我们的shell脚本都是按照顺序,自上而下的依次处理。但是许多程序要求对于shell脚本可以进行逻辑流程控制,这类命令称之为结构化命令(structured command)
结构化命令允许你修改程序执行的顺序。
if-then语句
语法
如果你之前学过其他编程语言,if语句后面要求语句的结果得是True或False。
但是bash的if语句并不然。
bash的if语句会直接运行if后面的命令,如果该命令执行正确(状态码为0),处于then的命令就会被执行。否则就不会执行,或者执行其他逻辑的语句,最后到fi结束逻辑控制。
[root@web01 ~]# cat test.sh
#!/bin/bash
# testing the if statement
if pwd
then
    echo "It worked"
fi
[root@web01 ~]#
[root@web01 ~]# bash test.sh
/root
It worked
另一个案例
[root@web01 ~]# cat test.sh
#!/bin/bash
# testing a bad command
if badcommand
then
    echo "It worked."
fi
echo "We are outside the if statement."
[root@web01 ~]#
[root@web01 ~]#
[root@web01 ~]# bash test.sh
test.sh: line 3: badcommand: command not found
We are outside the if statement.
这个案例就演示了if后面的命令非正确时,bash会跳过then的语句。
if-then-else语句
在这里,就增加了一个逻辑的选择
案例
[root@web01 ~]# cat test.sh
#!/bin/bash
# testing the else section
testuser=someone
if grep $testuser /etc/passwd
then
    echo "The bash file for user $testuser are:"
    ls -a /home/$testuser/.b*
    echo
else
    echo "The user $testuser does not exist on this system."
    echo
fi
# 结果
[root@web01 ~]# bash test.sh
The user someone does not exist on this system.
可以看出语句翻译是
嵌套if
其实就是比刚才多几个判断,来看超哥怎么写
1.创建一个测试的目录
[root@web01 ~]# mkdir /home/cccc
2.脚本
[root@web01 ~]# cat test.sh
#!/bin/bash
testuser=cccc
if grep $testuser /etc/passwd
then
    echo "The user $testuser exists on this system."
else
    echo "The user $testuser does not exist on this system."
    if ls -d /home/$testuser/
        then
            echo "However,$testuser has a directory."
    fi
fi
3.执行
[root@web01 ~]# bash test.sh
The user cccc does not exist on this system.
/home/cccc/
However,cccc has a directory.
这种写法问题在于代码不易阅读,很难理清逻辑。
elif
语法
if command1
then
    commands
elif command2
then
    more commands
fi
# 超哥翻译
如果 ...
    那么
        执行..
又如果...
    那么
        执行...
结束
案例,这样的逻辑,更适合阅读。
[root@web01 ~]# cat test.sh
#!/bin/bash
testuser=cccc
if grep $testuser /etc/passwd
then
    "The user $testuser exists on this system."
elif ls -d /home/$testuser
then
    echo "The user $testuser does not exist on this system."
    echo "However,$testuser has a directory."
fi
[root@web01 ~]# bash test.sh
/home/cccc
The user cccc does not exist on this system.
However,cccc has a directory.
再来一个案例,用于判断cccc用户的两种情况
- 有家目录,用户信息被删除
- 没有家目录,用户也不存在
[root@web01 ~]# cat test.sh
#!/bin/bash
testuser=cccc
if grep $testuser /etc/passwd
then
    echo "The user $testuser exists on this system."
elif ls -d /home/$testuser
then
    echo "The user $testuser does not exist on this system."
    echo "However,$testuser has a directory."
else
    echo "The user $testuser does not exist on this system."
    echo "And $testuser does not have a directory."
fi
# 执行分别看结果
[root@web01 ~]# bash test.sh
/home/cccc
The user cccc does not exist on this system.
However,cccc has a directory.
# 删除家目录,再执行
[root@web01 ~]# rmdir /home/cccc/
[root@web01 ~]# bash test.sh
ls: cannot access /home/cccc: No such file or directory
The user cccc does not exist on this system.
And cccc does not have a directory.
test命令
test 命令最短的定义可能是评估一个表达式;如果条件为真,则返回一个 0 值。如果表达式不为真,则返回一个大于 0 的值 — 也可以将其称为假值。检查最后所执行命令的状态的最简便方法是使用 $? 值。
参数:
1. 关于某个文件名的『类型』侦测(存在与否),如 test -e filename
-e 该『文件名』是否存在?(常用)
-f 该『文件名』是否为文件(file)?(常用)
-d 该『文件名』是否为目录(directory)?(常用)
-b 该『文件名』是否为一个 block device 装置?
-c 该『文件名』是否为一个 character device 装置?
-S 该『文件名』是否为一个 Socket 文件?
-p 该『文件名』是否为一个 FIFO (pipe) 文件?
-L 该『文件名』是否为一个连结档?
2. 关于文件的权限侦测,如 test -r filename
-r 侦测该文件名是否具有『可读』的属性?
-w 侦测该文件名是否具有『可写』的属性?
-x 侦测该文件名是否具有『可执行』的属性?
-u 侦测该文件名是否具有『SUID』的属性?
-g 侦测该文件名是否具有『SGID』的属性?
-k 侦测该文件名是否具有『Sticky bit』的属性?
-s 侦测该文件名是否为『非空白文件』?
3. 两个文件之间的比较,如: test file1 -nt file2
-nt (newer than)判断 file1 是否比 file2 新
-ot (older than)判断 file1 是否比 file2 旧
-ef 判断 file2 与 file2 是否为同一文件,可用在判断 hard link 的判定上。 主要意义在判定,两个文件是否均指向同一个 inode 哩!
4. 关于两个整数之间的判定,例如 test n1 -eq n2
-eq 两数值相等 (equal)
-ne 两数值不等 (not equal)
-gt n1 大于 n2 (greater than)
-lt n1 小于 n2 (less than)
-ge n1 大于等于 n2 (greater than or equal)
-le n1 小于等于 n2 (less than or equal)
5. 判定字符串的数据
test -z string 判定字符串是否为 0 ?若 string 为空字符串,则为 true
test -n string 判定字符串是否非为 0 ?若 string 为空字符串,则为 false。
注: -n 亦可省略
test str1 = str2 判定 str1 是否等于 str2 ,若相等,则回传 true
test str1 != str2 判定 str1 是否不等于 str2 ,若相等,则回传 false
6. 多重条件判定,例如: test -r filename -a -x filename
-a (and)两状况同时成立!例如 test -r file -a -x file,则 file 同时具有 r 与 x 权限时,才回传 true。
-o (or)两状况任何一个成立!例如 test -r file -o -x file,则 file 具有 r 或 x 权限时,就可回传 true。
! 反相状态,如 test ! -x file ,当 file 不具有 x 时,回传 true
test命令对于shell脚本是重要的命令,提供了在if-then语句里测试不同条件的路径。
我们来看用法,条件为真,返回0,条件不成立,返回大于0的值。
1.判断文件存在
[root@web01 ~]# test hello.sh
[root@web01 ~]# echo $?
0
2.判断目录
[root@web01 ~]# test -d data
[root@web01 ~]# echo $?
0
3.测试可写权限
[root@web01 ~]# test -w hello.sh
[root@web01 ~]# echo $?
0
4.测试执行权限
[root@web01 ~]# test -x hello.sh
[root@web01 ~]#
[root@web01 ~]#
[root@web01 ~]# echo $?
1
5.测试文件是否有内容,有则0,无则1
[root@web01 ~]# cat hello.sh
#!/bin/bash
echo 'hello 超哥,你讲的课真有意思'
[root@web01 ~]#
[root@web01 ~]# test -s hello.sh
[root@web01 ~]#
[root@web01 ~]# echo $?
0
结合控制语句
[root@web01 ~]# cat test.sh
#!/bin/bash
# Testing the test command
my_var="Full"
if test $my_var
then
    echo "The $my_var expression returns a True."
else
    echo "The $my_var expression returns a False."
fi
[root@web01 ~]#
[root@web01 ~]#
[root@web01 ~]# bash test.sh
The Full expression returns a True.
若是删除my_var变量,该脚本,就False了。
简洁的测试方法
bash提供了可以不用test命令的写法,进行判断
数值比较
test命令常见用法是数值比较。
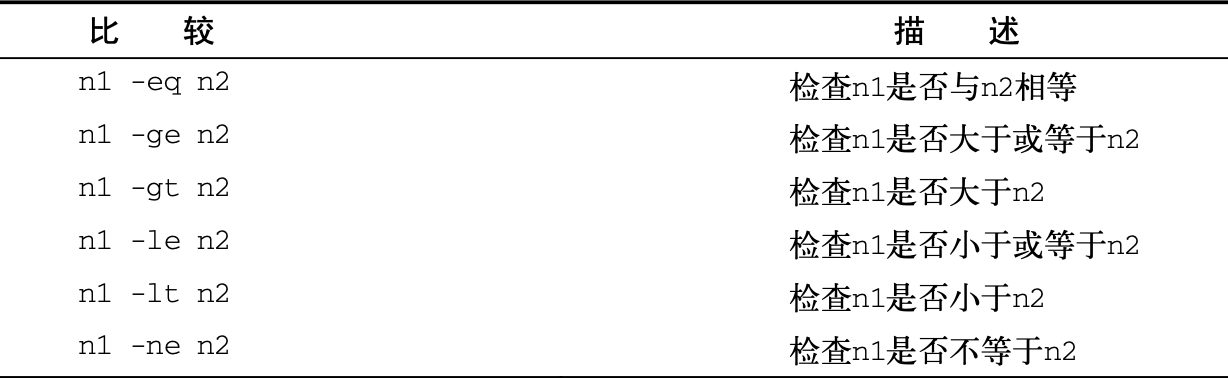
[root@web01 ~]# cat test.sh
#!/bin/bash
# Using numeric test evaluations
value1=10
value2=11
if [ $value1 -gt 5 ]
then
    echo "The test value $value1 is greater than 5"
fi
if [ $value1 -eq $value2 ]
then
    echo "The values are equal."
else
    echo "The values are different."
fi
[root@web01 ~]#
[root@web01 ~]#
[root@web01 ~]# bash test.sh
The test value 10 is greater than 5
The values are different.
注意bash只能处理整数。
案例
-d 测试目录是否存在,在目录操作时,判断下是否存在是个好习惯。
[root@web01 ~]# cat test.sh
#!/bin/bash
jump_directory=/home/cccc
if [ -d $jump_directory ]
then
    echo "The $jump_directory exists."
    cd $jump_directory
    ls
else
    echo "The $jump_directory does not exist."
fi
符合条件测试
[ 条件 ] && [ 条件2 ]
[ 条件 ] || [ 条件2 ]
布尔运算符
案例
[root@web01 ~]# cat test.sh
#!/bin/bash
# 超哥带你学shell
if [ -d $HOME ] && [ -w $HOME/testing ]
then
    echo "The file exists and you can write to it."
else
    echo "I cannot wirte to the file."
fi
[root@web01 ~]#
[root@web01 ~]#
[root@web01 ~]# bash test.sh
I cannot wirte to the file.
# 对文件创建,修改权限测试
双括号特性
双小括号
bash支持双括号,写入高级数学表达式。
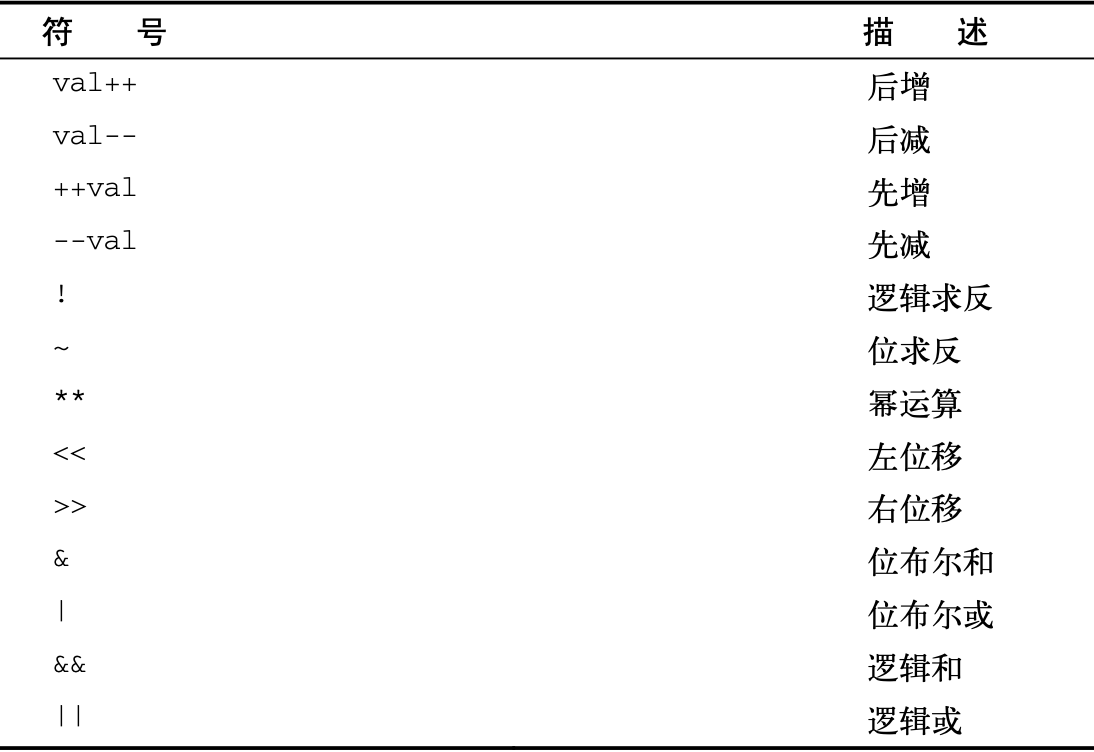
可以在if语句里使用双括号,可以用在普通的命令。
# 10的平方是100,脚本
[root@web01 ~]# cat test.sh
#!/bin/bash
# 超哥带你学shell
val1=10
if (( $val1 ** 2 > 90 ))
then
    (( val2 = $val1**2 ))
    echo "The square of $val1 is $val2"
fi
[root@web01 ~]#
[root@web01 ~]#
[root@web01 ~]# bash test.sh
The square of 10 is 100
# 注意双括号里不需要转义,val2语句是赋值语句
双方括号
双方括号提供了针对字符串的高级特性,模式匹配,正则表达式的匹配。
[root@web01 ~]# cat test.sh
#!/bin/bash
# 超哥带你学shell
if [[ $USER == r* ]]
then
    echo "Hello $USER"
else
    echo "Sorry,I do not know you."
fi
[root@web01 ~]#
[root@web01 ~]#
[root@web01 ~]# bash test.sh
Hello root
[root@web01 ~]#
在双中括号里,进行了==双等号,进行字符串匹配r*,也就找到了root。
case语句
当我们有一个场景,在计算后,要进行多个组的值判断,用一个low的办法写。
[root@web01 ~]# cat test.sh
#!/bin/bash
# 超哥带你学shell
if [[ $USER = "root" ]]
then
    echo "Welcome $USER"
    echo "Please enjoy your visit"
elif [ $USER = "chaoge" ]
then
    echo "Welcome $USER"
    echo "Please enjoy your visit"
elif [ $USER = "testing" ]
then
    echo "Special testing account"
elif [ $USER = "cc" ]
then
    echo "Do not forget to logout when you're done."
else
    echo "Sorry,you are not allowed here."
fi
[root@web01 ~]#
# 执行
[root@web01 ~]# bash test.sh
Welcome root
Please enjoy your visit
我们会发现,这样的写法,重复性太高,有点太啰嗦了。
有了case语句你就会发现,再也不需要写那么多elif不停的检查同一个变量$USER。
不low的写法
语法:
#! /bin/sh -
name=`basename $0 .sh`
case $1 in
 s|start)
        echo "start..."
        ;;
 stop)
        echo "stop ..."
        ;;
 reload)
        echo "reload..."
        ;;
 *)
        echo "Usage: $name [start|stop|reload]"
        exit 1
        ;;
esac
exit 0
# 语法
case "变量" in
值1)
    命令
    ;;
值2)
    命令2
    ;;
*)
    命令3
esac
案例
[root@web01 ~]# cat test.sh
#!/bin/bash
# 超哥带你学shell
case $USER in
root | chaoge)
    echo "Welcome,$USER"
    echo "Please enjoy your visit"
;;
cc)
    echo "Welcome cc"
;;
yuchao)
    echo "Welcome yuchao"
;;
*)
    echo "Sorry,you are not allowed here"
;;
esac
[root@web01 ~]# bash test.sh
Welcome,root
Please enjoy your visit
这样的case语句,比起写多个if-elif是简单的多了。
for命令
for语句提供了重复一些过程的作用,也就是循环执行一组命令,直到某个特定条件结束。
for循环在list变量值里,反复迭代,第一次迭代,使用第一个值,第二次用第二个值,以此类推,直到所有元素都过一遍。
案例
[root@web01 ~]# cat test.sh
#!/bin/bash
# 超哥带你学shell
for test in yuchao apple orange potato
do
    echo "The next is $test"
done
[root@web01 ~]#
[root@web01 ~]#
[root@web01 ~]#
[root@web01 ~]# bash test.sh
The next is yuchao
The next is apple
The next is orange
The next is potato
for循环的坑
1.看案例
[root@web01 ~]# cat test.sh
#!/bin/bash
# 超哥带你学shell
for test in I don't know if this'll work
do
    echo "word: $test"
done
[root@web01 ~]#
[root@web01 ~]#
[root@web01 ~]# bash test.sh
word: I
word: dont know if thisll
word: work
本意我们是想以空格区分,循环出每个单词,这里shell被单引号给误导了,这里得进行转义,解决办法
- 转义符
- 双引号
# 双引号
[root@web01 ~]# cat test.sh
#!/bin/bash
# 超哥带你学shell
for test in I "don't" know if "this'll" work
do
    echo "word: $test"
done
# 转义符
[root@web01 ~]# cat test.sh
#!/bin/bash
# 超哥带你学shell
for test in I don\'t  know if this\'ll work
do
    echo "word: $test"
done
空格坑
for默认循环是以空格区分,如果你的数据包含了空格,那又该怎么办
[root@web01 ~]# cat test.sh
#!/bin/bash
# 超哥带你学shell
for test in China New York
do
    echo "Now going to $test"
done
[root@web01 ~]#
[root@web01 ~]#
[root@web01 ~]#
[root@web01 ~]# bash test.sh
Now going to China
Now going to New
Now going to York
这不是我们要的结果,用双引号解决这个问题
[root@web01 ~]# cat test.sh
#!/bin/bash
# 超哥带你学shell
for test in China "New York"
do
    echo "Now going to $test"
done
[root@web01 ~]#
[root@web01 ~]#
[root@web01 ~]# bash test.sh
Now going to China
Now going to New York
从变量遍历
[root@web01 ~]# cat test.sh
#!/bin/bash
# 超哥带你学shell
list="yuchao apple orange potato"
for state in $list
do
    echo "Hello $state?"
done
[root@web01 ~]#
[root@web01 ~]#
[root@web01 ~]#
[root@web01 ~]# bash test.sh
Hello yuchao?
Hello apple?
Hello orange?
Hello potato?
从文件里遍历
1.准备文件
[root@web01 ~]# cat test.txt
yuchao
apple
orange
potato
2.for脚本
[root@web01 ~]# cat test.sh
#!/bin/bash
# 超哥带你学shell
file="./test.txt"
for state in $(cat $file)
do
    echo "Hello $state"
done
[root@web01 ~]#
[root@web01 ~]#
[root@web01 ~]#
[root@web01 ~]# bash test.sh
Hello yuchao
Hello apple
Hello orange
Hello potato
通配符遍历
可以使用for命令自动遍历目录中的文件,得使用通配符支持匹配。
遍历判断文件/目录
[root@web01 ~]# cat test.sh
#!/bin/bash
# 超哥带你学shell
for file in /opt/*
do
    if [ -d "$file" ]
    then
        echo "$file is a directory"
    elif [ -f "$file" ]
    then
        echo "$file is a file"
    fi
done
[root@web01 ~]#
[root@web01 ~]#
[root@web01 ~]# bash test.sh
/opt/2020-07-22-16-48-00-docker-guacamole-v2.1.0.tar.gz is a file
/opt/apache-tomcat-9.0.36.tar.gz is a file
/opt/guacamole is a directory
/opt/jumpserver is a directory
for循环在/opt目录下挨个遍历,因为*就已经匹配了所有的内容,然后-d参数进行判断目录,以此进行逻辑判断,到底是目录或是其他。
遍历多个目录
[root@web01 ~]# cat test.sh
#!/bin/bash
# 超哥带你学shell
for file in /home/* /root/*.txt
do
    if [ -d "$file" ]
    then
        echo "$file is a directory"
    elif [ -f "$file" ]
    then
        echo "$file is a file"
    fi
done
While循环
while循环命令可以理解是if-then和for循环的混杂体。
while语句的test command和if-then语句格式一样,可以使用任何的普通bash shell命令。
注意的是while的test command的退出状态码,必须随着循环里的命令改变,否则状态码如果不变化,循环会不停止的继续下去。
[root@web01 ~]# cat test.sh
#!/bin/bash
# 超哥带你学shell
var1=10
while [ $var1 -gt 0 ]
do
    echo $var1
    var1=$[ $var1 -1 ]
done
[root@web01 ~]#
[root@web01 ~]#
[root@web01 ~]#
[root@web01 ~]# bash test.sh
10
9
8
7
6
5
4
3
2
1
只要条件成立,while命令就会不断的循环下去,直到条件不成立,结束循环。
多个测试命令
while可以写入多个测试命令,只有最后一个测试命令的退出状态码会被决定是否退出循环。
[root@web01 ~]# cat test.sh
#!/bin/bash
# 超哥带你学shell
var1=10
while echo $var1
    [ $var1 -ge 0 ]
do
    echo "This is inside the loop"
    var1=$[ $var1 -1 ]
done
注意写法,换行,多个测试命令要单独的出现在一行。
这里是先显示var1变量的值,第二个测试是方括号里判断var1是否大于0
在循环体内部,先打印消息,然后进行变量计算。
因此脚本执行结果是
[root@web01 ~]# bash test.sh
10
This is inside the loop
9
This is inside the loop
8
This is inside the loop
7
This is inside the loop
6
This is inside the loop
5
This is inside the loop
4
This is inside the loop
3
This is inside the loop
2
This is inside the loop
1
This is inside the loop
0
This is inside the loop
-1
unitl命令
until和while是相反的语意,until命令要求你指定一个返回非零退出码的测试命令。
只有退出状态码不是0,bash才会执行循环的命令。
until也支持多个测试命令,只有最后一个决定bash是否执行其他命令。
[root@web01 ~]# cat test.sh
#!/bin/bash
# 超哥带你学shell
var1=100
until [ $var1 -eq 0 ]
do
    echo $var1
    var1=$[ $var1 -25 ]
done
[root@web01 ~]#
[root@web01 ~]#
[root@web01 ~]#
[root@web01 ~]# bash test.sh
100
75
50
25
多条件until
[root@web01 ~]# cat test.sh
#!/bin/bash
# 超哥带你学shell
var1=100
until echo $var1
    [ $var1 -eq 0 ]
do
    echo "Inside the loop:$var1"
    var1=$[ $var1 - 25 ]
done
[root@web01 ~]#
[root@web01 ~]#
[root@web01 ~]# bash test.sh
100
Inside the loop:100
75
Inside the loop:75
50
Inside the loop:50
25
Inside the loop:25
0
嵌套循环
也就是在循环体内,再写上循环语句命令,使用嵌套循环要小心了。
C语言风格的for循环
案例
[root@chaogelinux shell]# cat test.sh
#!/bin/bash
for (( i=1;i<=10;i++ ))
do
    echo "The next number is $i"
done
[root@chaogelinux shell]#
[root@chaogelinux shell]#
[root@chaogelinux shell]# bash test.sh
The next number is 1
The next number is 2
The next number is 3
The next number is 4
The next number is 5
The next number is 6
The next number is 7
The next number is 8
The next number is 9
The next number is 10
for循环通过定义好的变量i,进行迭代的使用。
for使用多个变量
C语言风格的for循环允许迭代多个变量,循环会单独的处理每个变量,可以为每个变量定义不同的迭代过程。
[root@chaogelinux shell]# cat test.sh
#!/bin/bash
for (( a=1,b=10;a<=10;a++,b-- ))
do
    echo "$a - $b"
done
[root@chaogelinux shell]#
[root@chaogelinux shell]#
[root@chaogelinux shell]#
[root@chaogelinux shell]# bash test.sh
1 - 10
2 - 9
3 - 8
4 - 7
5 - 6
6 - 5
7 - 4
8 - 3
9 - 2
10 - 1
每次迭代,a在增加的同时,减小了b变量。
嵌套循环案例
[root@chaogelinux shell]# cat test.sh
#!/bin/bash
for (( a = 1;a <=3;a++ ))
do
    echo "Starting loop $a:"
    for (( b = 1; b <=3; b++ ))
    do
        echo "    Inside loop:$b"
    done
done
[root@chaogelinux shell]#
[root@chaogelinux shell]#
[root@chaogelinux shell]# bash test.sh
Starting loop 1:
    Inside loop:1
    Inside loop:2
    Inside loop:3
Starting loop 2:
    Inside loop:1
    Inside loop:2
    Inside loop:3
Starting loop 3:
    Inside loop:1
    Inside loop:2
    Inside loop:3
循环处理文件数据
遍历读取文件内的数据,一般用到两个知识点:
- 嵌套循环
- 修改IFS环境变量
修改IFS环境变量,是因为文件里的数据都是单独的每一行
IFS字段分隔符
IFS是一个特殊的环境变量,叫做内部字段分隔符,IFS环境变量定义了bash shell用作字段分隔符的一系列字符,bash shell将如下字段当作分隔符
- 空格
- 制表符
- 换行符
案例
[root@chaogelinux shell]# cat test.sh
#!/bin/bash
IFS.OLD=$IFS
IFS=$'\n'
for entry in $(cat /etc/passwd)
do
    echo "Value in $entry ."
    IFS=:
    for value in $entry
    do
        echo "    $value"
    done
done
这里修改了两个不同的IFS变量,来进行解析文件数据
- 第一个IFS=$'\n',用于解析文件的每一行
- 第二个IFS=: ,是修改IFS的值为冒号,然后解析每一行单独的值。
控制循环
刚才我们学习的都是循环后自动结束,也是有办法手动结束的。
- break
- continue
break用于强制退出任意类型的循环。
[root@chaogelinux shell]# cat test.sh
#!/bin/bash
# 超哥带你学shell
for var1 in `seq 10`
do
    if [ $var1 -eq 5 ]
    then
        break
    fi
    echo "Iteration number: $var1"
done
echo "The for loop is completed"
[root@chaogelinux shell]#
[root@chaogelinux shell]#
[root@chaogelinux shell]# bash test.sh
Iteration number: 1
Iteration number: 2
Iteration number: 3
Iteration number: 4
The for loop is completed
break也适用于while,untile循环。
终止内部循环break
跳出多个循环时,break会自动终止你在的最内层循环。
[root@chaogelinux shell]# cat test.sh
#!/bin/bash
# 超哥带你学shell
for (( a = 1; a < 4 ; a++ ))
do
    echo "Outer loop: $a"
    for (( b = 1; b < 100; b++ ))
    do
        if [ $b -eq 5 ]
        then
            break
        fi
        echo "    Inner loop: $b"
    done
done
[root@chaogelinux shell]#
[root@chaogelinux shell]#
[root@chaogelinux shell]#
[root@chaogelinux shell]# bash test.sh
Outer loop: 1
    Inner loop: 1
    Inner loop: 2
    Inner loop: 3
    Inner loop: 4
Outer loop: 2
    Inner loop: 1
    Inner loop: 2
    Inner loop: 3
    Inner loop: 4
Outer loop: 3
    Inner loop: 1
    Inner loop: 2
    Inner loop: 3
    Inner loop: 4
外层循环是执行结束了,内部循环到了5立即结束了。
终止外层循环break
语法
案例
[root@chaogelinux shell]# cat test.sh
#!/bin/bash
# 超哥带你学shell
for (( a = 1; a < 4; a++ ))
do
    echo "Outer loop: $a"
    for (( b = 1;b < 100; b++ ))
    do
        if [ $b -gt 4 ]
        then
            break 2
        fi
        echo "    Inner loop: $b"
    done
done
[root@chaogelinux shell]# bash test.sh
Outer loop: 1
    Inner loop: 1
    Inner loop: 2
    Inner loop: 3
    Inner loop: 4
当内层$b等于4的时候,立即停止外层,也就结束了。
continue
continue用于跳过某次循环,当条件满足时,然后继续循环。
[root@chaogelinux shell]# cat test.sh
#!/bin/bash
# 超哥带你学shell
for (( var1 = 1;var1<15;var1++ ))
do
    if [ $var1 -gt 5 ] && [ $var1 -lt 10 ]
    then
        continue
    fi
    echo "Iteration number: $var1"
done
[root@chaogelinux shell]#
[root@chaogelinux shell]#
[root@chaogelinux shell]# bash test.sh
Iteration number: 1
Iteration number: 2
Iteration number: 3
Iteration number: 4
Iteration number: 5
Iteration number: 10
Iteration number: 11
Iteration number: 12
Iteration number: 13
Iteration number: 14
当条件是大于5且小于10的时候,shell会执行continue命令,跳过此阶段的循环条件。
处理循环的输出
在shell脚本里,循环输出后的结果,可以进行重定向输出
[root@chaogelinux shell]# cat test.sh
#!/bin/bash
# 超哥带你学shell
for (( a = 1;a<10;a++ ))
do
    echo "The number is $a"
done > test.txt
echo "Finished"
[root@chaogelinux shell]#
[root@chaogelinux shell]#
[root@chaogelinux shell]#
[root@chaogelinux shell]# bash test.sh
Finished
[root@chaogelinux shell]#
[root@chaogelinux shell]# cat test.txt
The number is 1
The number is 2
The number is 3
The number is 4
The number is 5
The number is 6
The number is 7
The number is 8
The number is 9
Shell高级篇
函数的作用与在于,当你需要重复的使用一段代码,如果是一小段代码重复还好,若是大段重复代码就太麻烦了。函数就可以解决这个问题。
函数是定义一个代码块,且命名,然后可以在脚本里任何位置调用。
创建函数
案例
[root@chaogelinux shell]# cat test.sh
#!/bin/bash
# 超哥带你学shell
function func1 {
    echo "This is an example of a function"
}
count=1
while [ $count -le 5 ]
do
    func1
    count=$[ $count + 1 ]
done
echo "This is the end of the loop"
func1
echo "Now this is the end of the script"
[root@chaogelinux shell]#
[root@chaogelinux shell]#
[root@chaogelinux shell]# bash test.sh
This is an example of a function
This is an example of a function
This is an example of a function
This is an example of a function
This is an example of a function
This is the end of the loop
This is an example of a function
Now this is the end of the script
每次应用函数名func1,shell就会执行func1里定义好的命令。
函数简写
[root@chaogelinux shell]# cat test.sh
#!/bin/bash
# 超哥带你学shell
demoFunc(){
    echo "This is a shell function."
}
echo "start.."
demoFunc
echo "end.."
[root@chaogelinux shell]#
[root@chaogelinux shell]#
[root@chaogelinux shell]# bash test.sh
start..
This is a shell function.
end..
函数常见的坑
要注意代码的上下路径,要先定义函数,再执行函数。
[root@chaogelinux shell]# cat test.sh
#!/bin/bash
# 超哥带你学shell
count=1
echo "This line comes befor the function definition."
function func1 {
    echo "This is an example of a function"
}
while [ $count -le 5 ]
do
    func1
    count=$[ $count + 1 ]
done
echo "This is the end of the loop."
func2
echo "Now this is the end of the script"
function func2 {
    echo "This is an example of a function"
}
[root@chaogelinux shell]#
[root@chaogelinux shell]#
[root@chaogelinux shell]#
[root@chaogelinux shell]# bash test.sh
This line comes befor the function definition.
This is an example of a function
This is an example of a function
This is an example of a function
This is an example of a function
This is an example of a function
This is the end of the loop.
test.sh:行17: func2: 未找到命令
Now this is the end of the script
这里就有代码报错了,就因为func2函数还未定义就调用了,所以报错。
坑2
注意函数名唯一,重复定义则会覆盖函数体的代码。
[root@chaogelinux shell]# cat test.sh
#!/bin/bash
# 超哥带你学shell
function func1 {
    echo "This is the first definition of the function name"
}
func1
function func1 {
    echo "This is the repeat definition of the function name"
}
func1
echo "This is the end of the script"
[root@chaogelinux shell]#
[root@chaogelinux shell]#
[root@chaogelinux shell]#
[root@chaogelinux shell]# bash test.sh
This is the first definition of the function name
This is the repeat definition of the function name
This is the end of the script
[root@chaogelinux shell]#
func2还是能够正常工作,但是就覆盖了func1的内容,这就很容易产生错误了。
返回值
bash脚本在退出的时候会有状态码,前面已经和大家说过了。
函数结束后,也会有退出码,来看
[root@chaogelinux shell]# cat test.sh
#!/bin/bash
# 超哥带你学shell
func1() {
    echo "trying to display a non-existent file"
    ls -l chaoge666
}
echo "testing the function:"
func1
echo "The exit status is :$?"
[root@chaogelinux shell]#
[root@chaogelinux shell]#
[root@chaogelinux shell]# bash test.sh
testing the function:
trying to display a non-existent file
ls: 无法访问chaoge666: 没有那个文件或目录
The exit status is :2
[root@chaogelinux shell]# echo $?
0
这个脚本特点是,函数执行报错了,退出状态码是2,脚本应该会报错,但是最后一行命令,确实正确执行的,那么整个脚本的执行退出码,就是0,那这就是有隐藏问题的了。
函数使用return
使用$?
函数可以用return命令来制定特定的退出状态码。
[root@chaogelinux shell]# cat test.sh
#!/bin/bash
# 超哥带你学shell
funcWithReturn(){
    read -p "Enter a value: " value
    read -p "Enter another value:" value2
    return $(($value*$value2))
}
funcWithReturn
echo "The final answer is $?"
[root@chaogelinux shell]#
[root@chaogelinux shell]#
[root@chaogelinux shell]#
[root@chaogelinux shell]# bash test.sh
Enter a value: 8
Enter another value:7
The final answer is 56
函数返回值是在调用函数之后,通过&?来获得。
但是这种方式会有坑,记住
- 函数结束后会立即取返回值
- 退出状态码在0~255
如果在提取函数返回值之前执行了其他的命令,函数的返回值会丢失。
例如
[root@chaogelinux shell]# cat test.sh
#!/bin/bash
# 超哥带你学shell
funcWithReturn(){
    read -p "Enter a value: " value
    read -p "Enter another value:" value2
    return $(($value*$value2))
}
funcWithReturn
ls /tt
echo "The final answer is $?"
因此,记住,$?取得的是脚本最后一条命令的状态码。
还有就是超出0~255的范围。
使用返回值变量
可以吧函数的执行结果,保存到变量里。
[root@chaogelinux shell]# cat test.sh
#!/bin/bash
# 超哥带你学shell
function db1 {
    read -p "Enter a value: " value
    echo $[ $value * 2 ]
}
result=$(db1)
echo "The new value is $result"
[root@chaogelinux shell]#
[root@chaogelinux shell]#
[root@chaogelinux shell]# bash test.sh
Enter a value: 5
The new value is 10
函数中处理变量
作用域指的就是变量可见的区域,函数里定义的变量和普通变量作用域不同,函数里的变量属于是局部的。
函数可以使用两种变量
- 全局变量
- 局部变量
全局变量
全局变量是在整个shell脚本里都有效的变量。可以在函数哪读取全局变量的值。
默认情况下,脚本里定义的任何变量都是全局变量,只要不是写在函数体内。
[root@chaogelinux shell]# cat test.sh
#!/bin/bash
# 超哥带你学shell
db1() {
    value=$[ $value * 2 ]
}
read -p "Enter a value: " value
db1
echo "The new value is : $value"
[root@chaogelinux shell]#
[root@chaogelinux shell]#
[root@chaogelinux shell]#
[root@chaogelinux shell]# bash test.sh
Enter a value: 9
The new value is : 18
这里即使value是在函数外赋值,在db1函数执行后,也会计算value值,重新赋值。
局部变量
无需在函数中使用全局变量,函数内部使用的任何变量都可以被声明为局部变量,为了实现这一点,只需要加上local关键字即可。
local关键字保证了变量局限在函数中,即使函数外也有同名的变量,shell也会保持该变量的值是分离的。
[root@jenkins01 shell]# cat test.sh
#!/bin/bash
func1(){
    local temp=$[ $value + 5 ]
    result=$[ $temp * 2 ]
}
temp=4
value=6
func1
echo "The result is $result"
if [ $temp -gt $value ]
then
    echo "temp is larger"
else
    echo "temp is smaller"
fi
执行结果
我们会发现,即使函数里的temp数值发生了变化,也不会影响到函数体外层的temp变量。
sed和awk进阶
sed进阶
正则表达式练习题
计算PATH目录下的文件数
PATH目录下的都是二进制命令文件
1.查看PATH值
[root@gitlab01 ~]# echo $PATH
/usr/local/sbin:/usr/local/bin:/usr/sbin:/usr/bin
2.获取每个目录的字符串,利用sed替换功能
[root@node02 ~]# echo $PATH|sed 's/:/ /g'
/usr/local/sbin /usr/local/bin /usr/sbin /usr/bin /root/bin
3.分离目录后,可以for循环遍历取值了
[root@node02 ~]# my_path=$(echo $PATH|sed 's/:/ /g')
[root@node02 ~]# for dir in $my_path;do echo $dir;done
/usr/local/sbin
/usr/local/bin
/usr/sbin
/usr/bin
/root/bin
4.最终计算文件脚本
[root@node02 tmp]# cat test.sh
#!/bin/bash
# 超哥带你学shell编程
my_path=$(echo $PATH|sed 's/:/ /g')
count=0
for dir in $my_path
do
    check_dir=$(ls $dir)
    for item in $check_dir
    do
        count=$[ $count + 1 ]
    done
    echo "$dir ---- $count"
    count=0 # 归零,否则影响全局的count数量
done
[root@node02 tmp]# bash test.sh
/usr/local/sbin ---- 0
/usr/local/bin ---- 0
/usr/sbin ---- 540
/usr/bin ---- 1139
/root/bin ---- 0
验证电话号码
# 对于一些数据表单的输入,例如电话号码,输入错误,需要进行检测
以下是美国电话号码格式
(123)456-7890
(123) 456-7890
123-456-7890
123.456.7890
这也就表明了电话输入的格式,可以有四种,因此你的正则必须完美的校验上述电话形式。
1.正则构建,最好从左边开始,先判断是否有空格
^\(?   脱字符后面跟着转义符和括号,问号表示括号,可有可无
2.紧接着是三位区号,美国区号从2开始,没有0或1,最大到9结束
[2-9][0-9]{2}  这表示第一个数字是2-9,第二个是0-9,第三个同样
3.区号后面的括号,也是可有可无的,因此
\)?
4.从上述的电话看出,区号后面,可能有单破折线,或者空格,或者什么都没有,或者小数点,可以这么写
(| |-|\.)
如此的写法表示,首先括号分组,后面也是同样的规则
然后用管道符进行表示,四种状态,空,空格,横杠,小数点
5.再接着是三位电话交换机号码,数字即可
[0-9]{3}
6.在电话交换机号码后面,必须有一个空格,一个单破折现,或者一个点。(这次不存在没有空格的情况),因此
( |-|\.)
7.最后就是尾部匹配4位本地电话分机号
[0-9]{4}$
总结
此时可以集合sed,awk进行对电话号码过滤验证。
[root@node02 tmp]# cat phone_list
000-000-0000
123-456-7890
212-555-1234
(317)555-1234
(202) 555-9876
33523
1234567890
234.123.4567
[root@node02 tmp]#
[root@node02 tmp]#
[root@node02 tmp]#
[root@node02 tmp]# cat phone_list | awk '/^\(?[2-9][0-9]{2}\)?(| |-|\.)[0-9]{3}( |-|\.)[0-9]{4}$/{print $0}'
212-555-1234
(317)555-1234
(202) 555-9876
234.123.4567
解析邮件地址
邮件地址是手机号之外的另一大通信方式,也存在千奇百怪的格式。
username@hostname
点号
单破折线
加号
下划线
有效的邮件用户名里,这些字符都有可能存在组合。
邮件地址hostname格式是 一个或多个域名和一个服务器名字组成,也有一定的规则。
点号
下划线
1.左侧的用户名正则,用户名里可以有多个有效字符
^([a-zA-Z0-9_\-\.\+]+)@. 中括号里的字符,匹配一次或者任意多次
这个分组指定了用户名中允许出现的字符,正则加号,确保至少有一个字符
2.hostname的匹配规则
([a-zA-Z0-9_\-\.]+)
这样的模式,可以匹配,例如
server
server.subdomain
server.subdomain.subdomain
3.顶级域名的匹配规则,也就是例如.cn .com .org此类
顶级域名只能是字母,不少于二个字符,长度不搞过五个字符。
\.([a-zA-Z]{2,5})$
4.因此整个的匹配邮箱的规则,可以是
^([a-zA-Z0-9_\-\.\+]+)@([a-zA-Z0-9_\-\.]+)\.([a-zA-Z]{2,5})$
案例
使用该正则,就可以过滤掉不正确的邮件地址
[root@node02 tmp]# cat email_list
yuchao@163.com
yy@163.com.
yy@ee.n
yy.city@163.now
yy_city@163.cn
yy#city@163.cc
yy+city@163.cc
yy*city@163.org
[root@node02 tmp]#
[root@node02 tmp]#
[root@node02 tmp]# cat email_list | awk '/^([a-zA-Z0-9_\-\.\+]+)@([a-zA-Z0-9_\-\.]+)\.([a-zA-Z]{2,5})$/{print $0}'
yuchao@163.com
yy.city@163.now
yy_city@163.cn
yy+city@163.cc
sed进阶
sed编辑器可以满足大多数日常文本需求,这里超哥在给大家讲讲些高级用法。
多行命令
sed命令的特点是单行数据操作,基于换行符的位置吧数据分成行。然后sed一行一行的处理,重复过程。
如果需要跨行对数据处理,这就麻烦了。
比如文本里找一个短语Linux System Administrators Group,这个长语句可能出现在两行,默认的sed就无法识别这种短语。
sed开发者也考虑到了这个情况,提供了处理方案。
sed特殊指令
N: 将数据流中的下一行加进来,创建一个多行组处理,multiline group
D:删除多行组的一行
P:打印多行组的一行
next命令
sed小写的n命令会告诉sed编辑器移动到数据流中的下一行文本。
sed编辑器再移动到下一行文本前,会在当前行执行完毕所有定义好的命令。单行next命令改变了这个流程。
看下案例。
# 数据文件
[root@node02 tmp]# cat data.txt
This is an apple.
This is a boy.
This is a gril.
[root@node02 tmp]#
[root@node02 tmp]#
[root@node02 tmp]#
[root@node02 tmp]# sed '/^$/d' data.txt
This is an apple.
This is a boy.
This is a gril.
这种写法是删除空行
若是我们想要指定删除某个语句后面的空行,可以用n指令。
# 删除apple下一行的空格
[root@node02 tmp]# cat data.txt
This is an apple.
This is a boy.
This is a gril.
[root@node02 tmp]#
[root@node02 tmp]#
[root@node02 tmp]# sed '/apple/{n;d}' data.txt
This is an apple.
This is a boy.
This is a gril.
此时sed编辑器匹配到apple这一行后,通过n指令,让sed编辑器移动到文本的下一行,也就是空行,然后通过d指令,删除了该行。
此时sed执行完毕命令后,继续重复查找apple,然后尝试删除apple的下一行。
如果找不到apple字符串,也就不会执行任何动作了。
合并文本行
刚才使用小写的n将文本的下一行移动到sed的模式空间,属于是单行处理。
大写的N指令将下一行文本添加到模式空间中已经有的文本的后面,实现多行文本处理。
这个作用是将数据流的两个文本行合并在同一个模式空间里处理。
[root@node02 tmp]# cat data2.txt
This is the header line.
This is the first data line.
This is the second data line.
This is the last line.
[root@node02 tmp]#
[root@node02 tmp]#
[root@node02 tmp]# sed '/first/{N;s/\n/ /}' data2.txt
This is the header line.
This is the first data line. This is the second data line.
This is the last line.
这里sed找到first一行后,用N指令把下一行合并到first该行,并且执行s替换指令,结果是如上合并了一行。
案例:在数据文件里,查找替换一个可能分散两行的文本短语
[root@node02 tmp]# cat data.txt
On Tuesday, the Linux System
Administrator's group meeting will be held.
All System Administrators should attend.
Thank you for your attendance.
[root@node02 tmp]#
[root@node02 tmp]#
[root@node02 tmp]# sed 's/System Administrator/Desktop User/' data.txt
On Tuesday, the Linux System
Administrator's group meeting will be held.
All Desktop Users should attend.
Thank you for your attendance.
[root@node02 tmp]#
这里发现没有变化,是因为该短语出现在了两行,替换命令无法识别
用N命令解决
[root@node02 tmp]# sed 'N;s/System.Administrator/Desktop User/' data.txt
On Tuesday, the Linux Desktop User's group meeting will be held.
All Desktop Users should attend.
Thank you for your attendance.
这里注意,是使用了两个点,一是N指令,二是通配符.来匹配空格和换行符的情况。
当匹配出现了换行符,它就从字符串里删除了换行符,缺导致了两行合并
想要解决这个办法,可以如此:
[root@node02 tmp]# cat data.txt
On Tuesday, the Linux System
Administrator's group meeting will be held.
All System Administrators should attend.
Thank you for your attendance.
[root@node02 tmp]#
[root@node02 tmp]#
[root@node02 tmp]# sed '
> s/System Administrator/Desktop User/
> N
> s/System\nAdministrator/Desktop\nUser/
> ' data.txt
On Tuesday, the Linux Desktop
User's group meeting will be held.
All Desktop Users should attend.
Thank you for your attendance.
用这种写法,可以保证,先进行单行替换处理,即使在最后一行也可以工作,因为N指令在最后一行时会停止工作。
多行删除
sed基础中说了删除命令(d),sed编辑器用于删除模式空间里的当前行,和N一起使用的时候,要小心点了。
#这里是坑了
[root@node02 tmp]# cat data.txt
On Tuesday, the Linux System
Administrator's group meeting will be held.
All System Administrators should attend.
Thank you for your attendance.
[root@node02 tmp]#
[root@node02 tmp]#
[root@node02 tmp]#
[root@node02 tmp]# sed 'N;/System\nAdministrator/d' data.txt
All System Administrators should attend.
Thank you for your attendance.
这里会发现直接在模式空间里删除了两行。
sed提供了大写的D,只删除模式空间里的第一行,该指令会删除到换行符位置的所有字符。
[root@node02 tmp]# sed 'N;/System\nAdministrator/D' data.txt
Administrator's group meeting will be held.
All System Administrators should attend.
Thank you for your attendance.
这里就只删除了第一行。
用这个方式可以删除文件的开头空白行。
[root@node02 tmp]# cat data2.txt
This is the header line.
This is the first data line.
This is the second data line.
This is the last line.
[root@node02 tmp]#
[root@node02 tmp]#
[root@node02 tmp]# sed '/^$/{N;/header/D}' data2.txt
This is the header line.
This is the first data line.
This is the second data line.
This is the last line.
[root@node02 tmp]#
sed编辑器会查找空白行,然后用N命令把下一行的文本添加到模式空间,如果新的模式空间里有单词header,D指令就删除模式空间的第一行,也就删除了空白行。
记住sed是按行处理,如果不结合N和D指令,很难做到不删除其他空白行情况下,只删除第一个空白行。
保持空间
sed我们已知有一块模式空间(pattern space)用于sed编辑器执行命令的时候,保存待检查的文本。
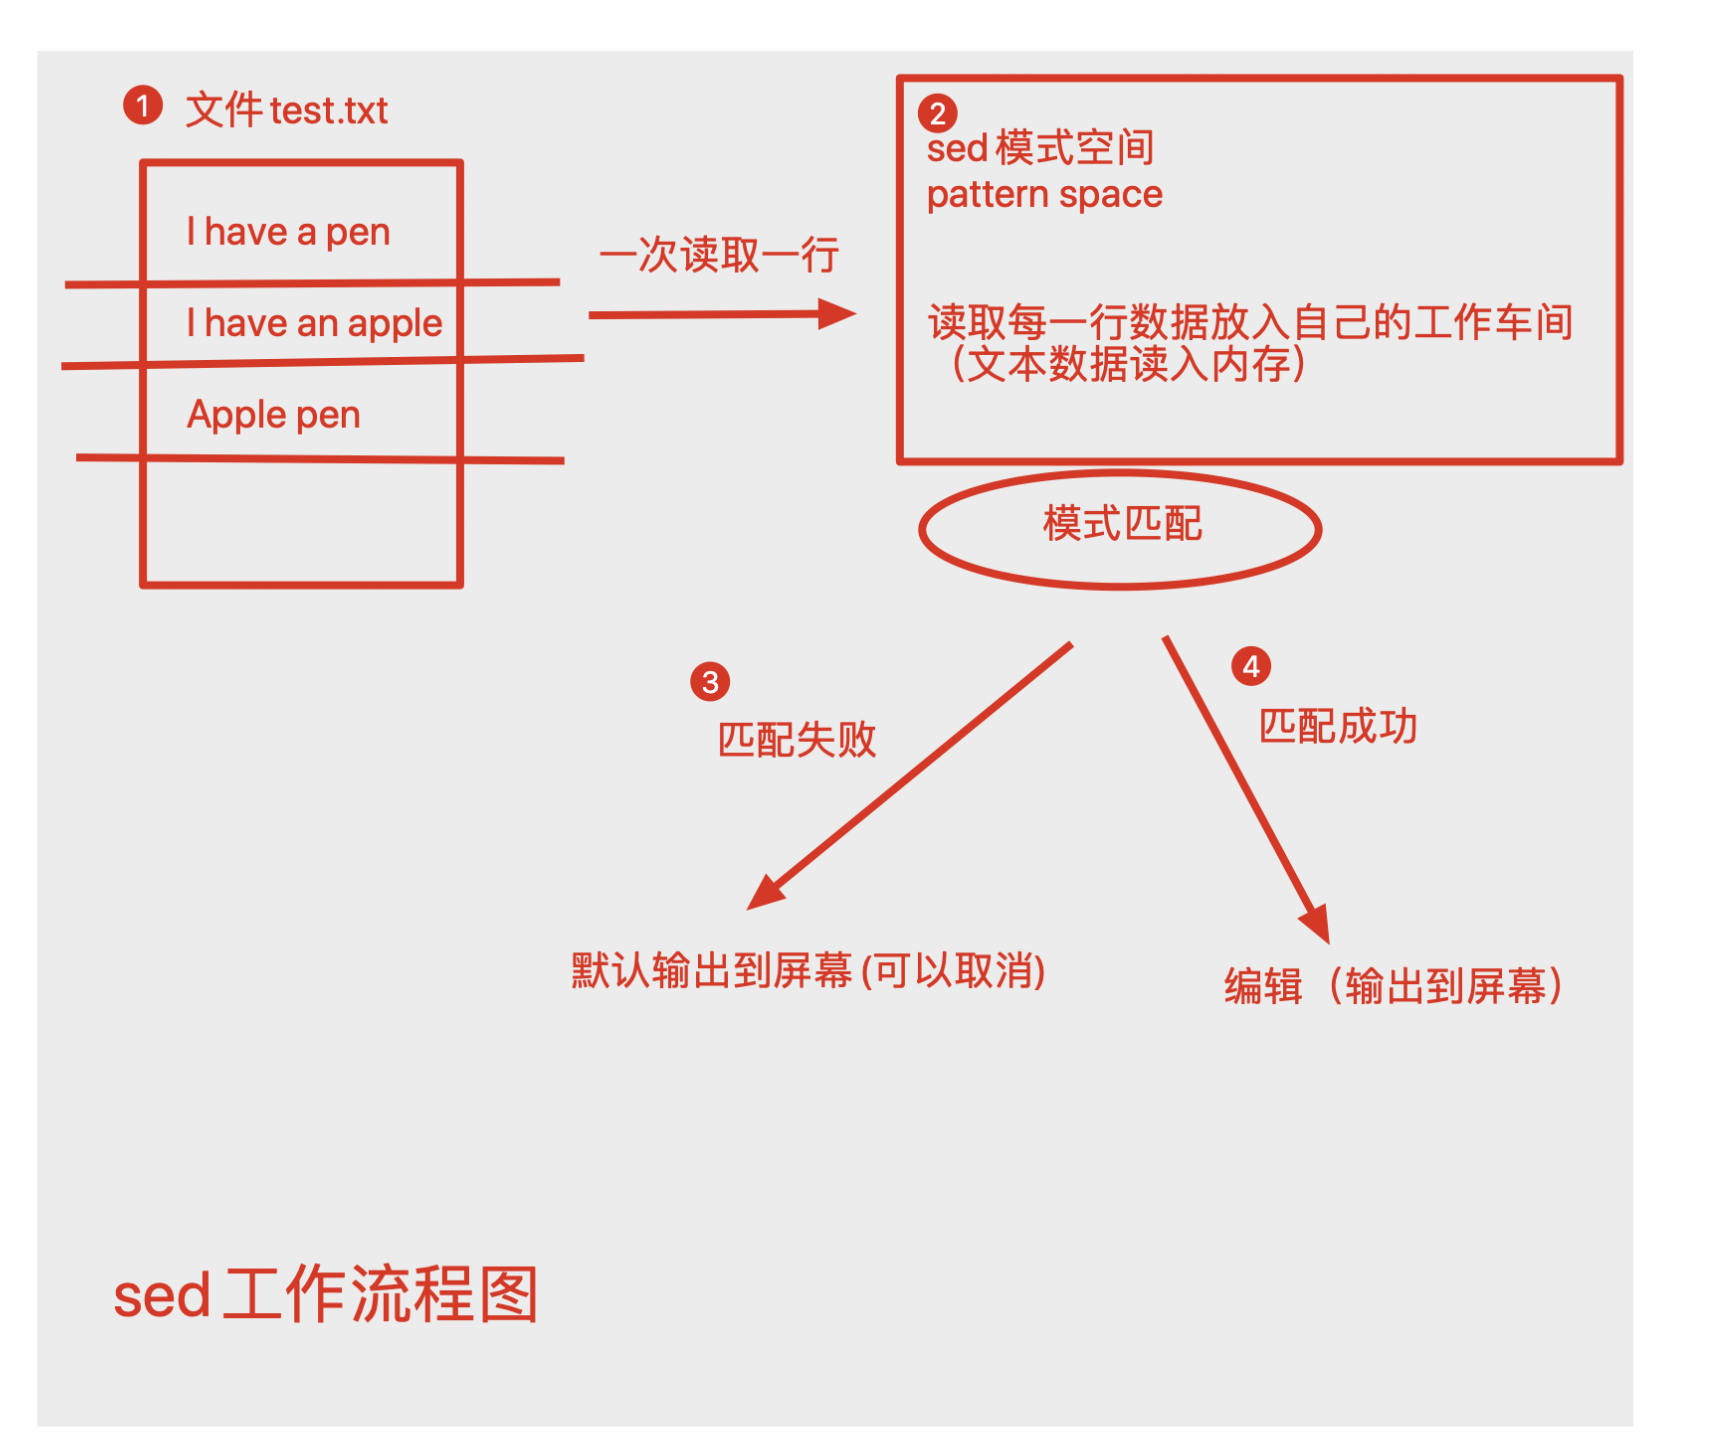
sed还有一块空间叫做保持空间的缓冲区域(hold space)。
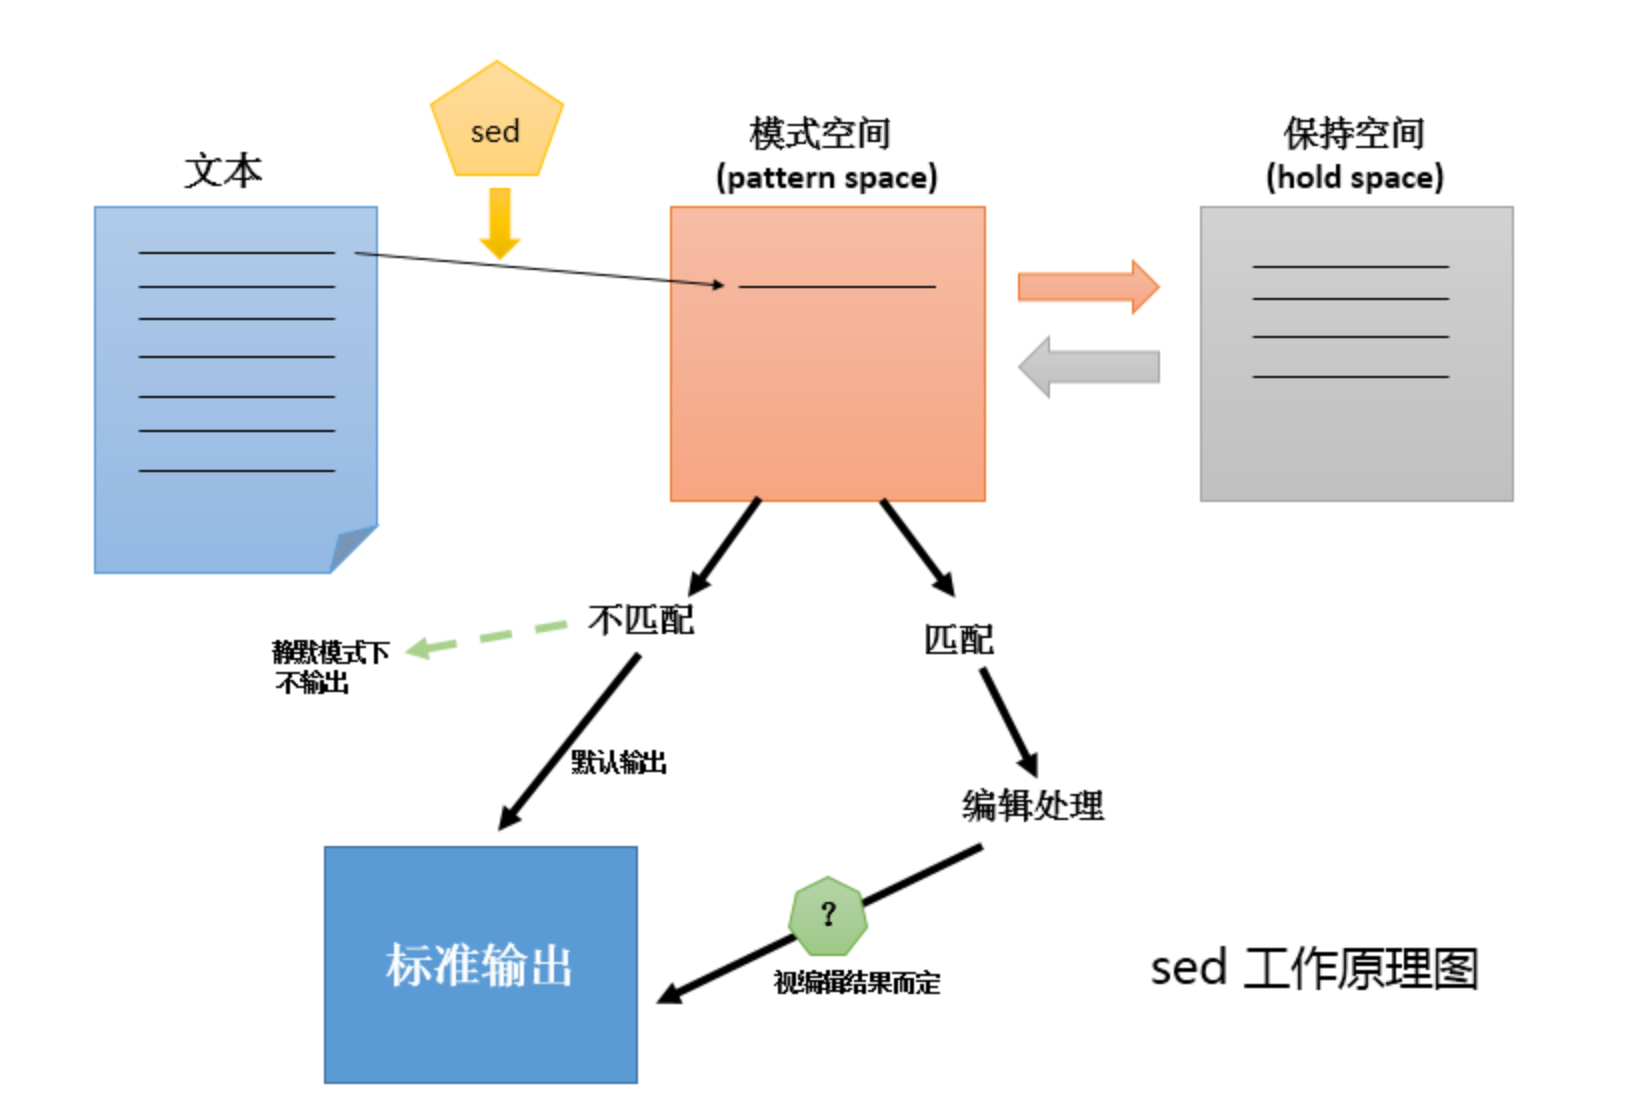
sed之所以能以行为单位的编辑或修改文本,其原因在于它使用了两个空间:一个是活动的“模式空间(pattern space)”,另一个是起辅助作用的“保持空间(hold space)这2个空间的使用。
模式空间:可以想成工程里面的流水线,数据之间在它上面进行处理。 保持空间:可以想象成仓库,我们在进行数据处理的时候,作为数据的暂存区域。
正常情况下,如果不显示使用某些高级命令,保持空间不会使用到!
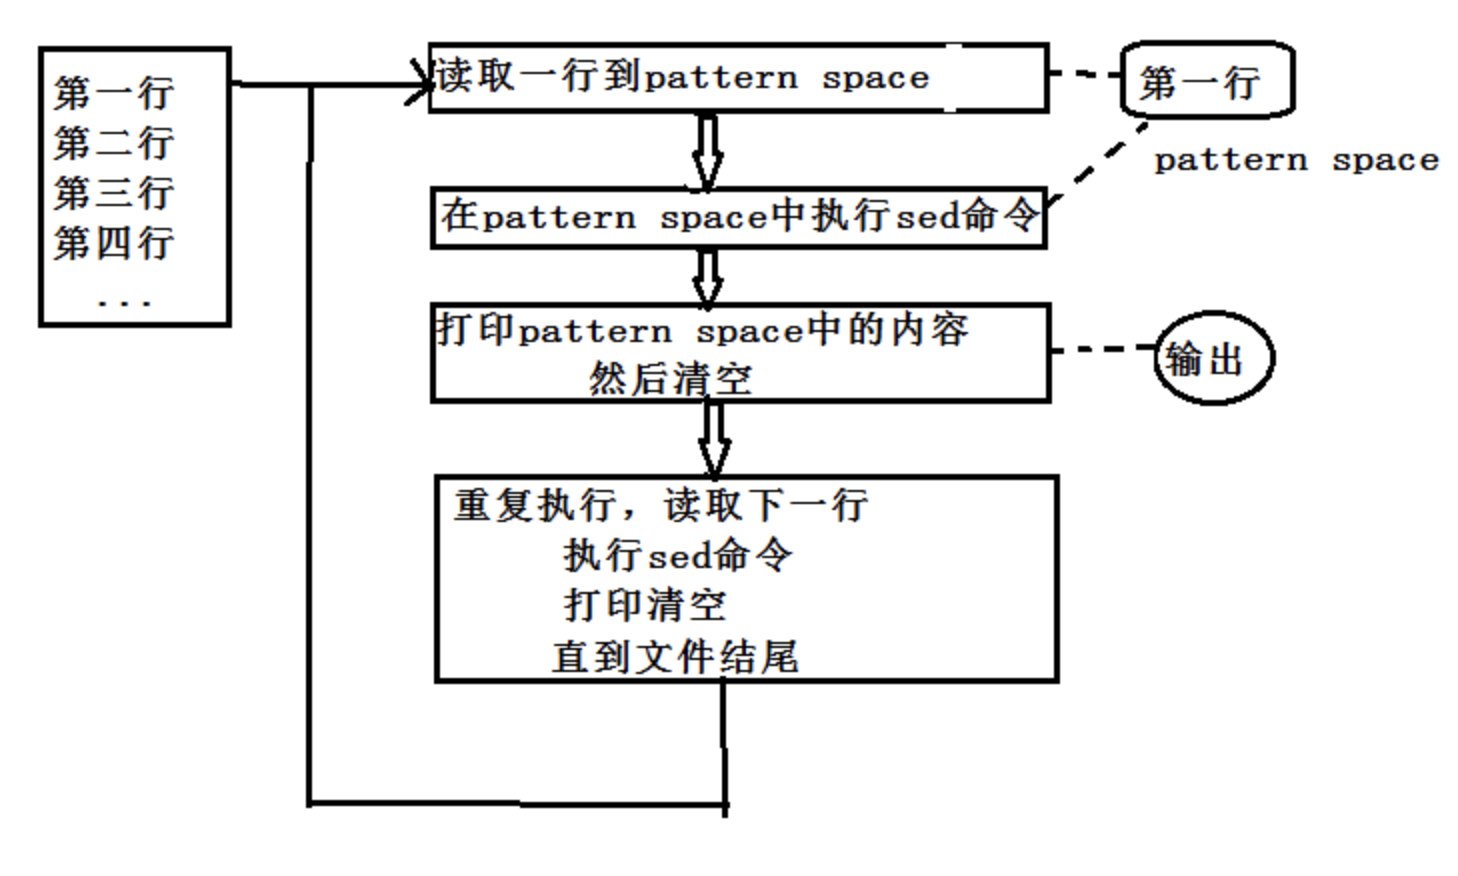
一般情况下,数据的处理只使用模式空间(pattern space),按照如上的逻辑即可完成主要任务。但是某些时候,通过使用保持空间(hold space),还可以带来意想不到的效果。
sed编辑器的保持空间命令。
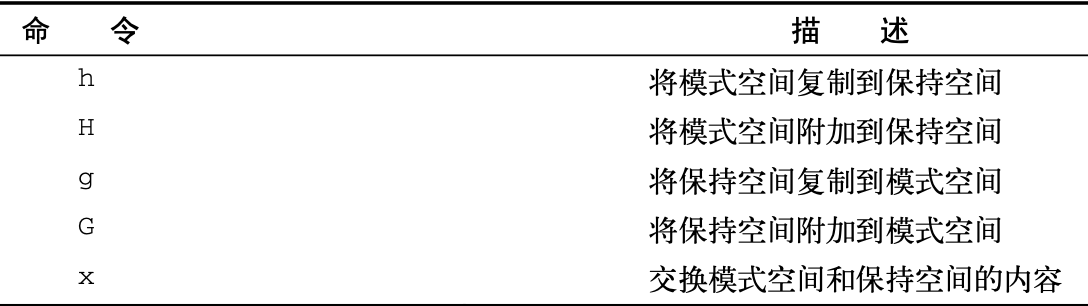
这些命令可以将文本从模式空间复制到保持空间。
这些保持空间的命令用于将文本从模式空间复制到保持空间。这样就可以清空模式空间加载其他需要处理的字符串。
案例,理解如何用h和g命令将数据在两个缓冲空间移动。
[root@node02 tmp]# cat data2.txt
This is the header line.
This is the first data line.
This is the second data line.
This is the last line.
[root@node02 tmp]#
[root@node02 tmp]#
[root@node02 tmp]#
[root@node02 tmp]#
[root@node02 tmp]# sed -n '/first/{h;p;n;p;g;p}' data2.txt
This is the first data line.
This is the second data line.
This is the first data line.
我们看下这个案例
- sed过滤含有first的单词的行
- 当出现含有first单词的行,h指令将该行复制到保持空间
- p命令此时打印模式空间第一行的数据,也就是first的行
- n命令提取数据流的下一行,并且也放到了模式空间
- p命令再次打印模式空间的内容,也就是打印了second那一行。
- g命令此时将保持空间的内容放回模式空间,替换当前文本
- p命令再次打印模式空间的内容,又打印了first内容了。
此时可以看出,保持空间的指令,可以来回移动文本行,再看一个案例
[root@node02 tmp]# sed -n '/first/{h;n;p;g;p}' data2.txt
This is the second data line.
This is the first data line.
若是这里去掉一个p打印,则会看出不同的结果了。
排除命令
sed编辑会将一些处理命令应用到数据流中的每一个文本行,单个行,或者一些区间行。也支持排除某个区间。
sed支持用感叹号!来排除命令,让某个命令不起作用。
[root@node02 tmp]# cat data2.txt
This is the header line.
This is the first data line.
This is the second data line.
This is the last line.
[root@node02 tmp]#
[root@node02 tmp]#
[root@node02 tmp]#
[root@node02 tmp]# sed -n '/header/p' data2.txt
This is the header line.
[root@node02 tmp]#
[root@node02 tmp]#
[root@node02 tmp]#
[root@node02 tmp]# sed -n '/header/!p' data2.txt
This is the first data line.
This is the second data line.
This is the last line.
sed实战
向文本中插入空白行
[root@node02 tmp]# cat data2.txt
This is the header line.
This is the first data line.
This is the second data line.
This is the last line.
[root@node02 tmp]#
[root@node02 tmp]#
[root@node02 tmp]# sed 'G' data2.txt
This is the header line.
This is the first data line.
This is the second data line.
This is the last line.
这里的技巧在于,sedG命令会简单的保持空间内容附加到模式空间后。
当sed启动时候,保持空间默认只有一个空行,将它附加到已有行后面,就是上述的效果了。
向文本中插入空白行,去掉最后一行的空白
# 使用排除符号! 和尾行符号$确保sed不会在最后一行添加空白行
[root@node02 tmp]# sed '$!G' data2.txt
This is the header line.
This is the first data line.
This is the second data line.
This is the last line.
这里的技巧在于,只要不是最后一行,G命令就会附加保持空间的内容,且忽略最后一行。
对可能存在空白行的文件,加倍行间距
如果文件已经有了一些空白行,但是你想要给所有的行加倍间距怎么办?上面的案例没发用,因为会导致有些区域空白太多。
[root@node02 tmp]# cat data2.txt
This is the header line.
This is the first data line.
This is the second data line.
This is the last line.
[root@node02 tmp]#
[root@node02 tmp]#
[root@node02 tmp]#
[root@node02 tmp]#
[root@node02 tmp]#
[root@node02 tmp]#
[root@node02 tmp]# sed '$!G' data2.txt
This is the header line.
This is the first data line.
This is the second data line.
This is the last line.
想要解决的办法是,先删除数据流所有的空白行,然后再用G加入新行。
答案如下
[root@node02 tmp]# sed '/^$/d' data2.txt
This is the header line.
This is the first data line.
This is the second data line.
This is the last line.
[root@node02 tmp]#
[root@node02 tmp]#
[root@node02 tmp]# sed '/^$/d;$!G' data2.txt
This is the header line.
This is the first data line.
This is the second data line.
This is the last line.
给文件中行编号
sed可以使用=命令打印当前行号。
[root@node02 tmp]# sed '=' data2.txt
1
This is the header line.
2
This is the first data line.
3
This is the second data line.
4
This is the last line.
这样太丑,你应该会想到可以用N命令合并行处理。
[root@node02 tmp]# sed '=' data2.txt | sed 'N;s/\n/ /'
1 This is the header line.
2 This is the first data line.
3 This is the second data line.
4 This is the last line.
你可能会想到其他有些linux命令也会显示行号,但是可能不那么合适
[root@node02 tmp]# nl data2.txt
     1    This is the header line.
     2    This is the first data line.
     3    This is the second data line.
     4    This is the last line.
[root@node02 tmp]#
[root@node02 tmp]#
[root@node02 tmp]#
[root@node02 tmp]# cat -n data2.txt
     1    This is the header line.
     2    This is the first data line.
     3    This is the second data line.
     4    This is the last line.
[root@node02 tmp]# grep '.' data2.txt -n
1:This is the header line.
2:This is the first data line.
3:This is the second data line.
4:This is the last line.
因此sed会是一个很合适的小工具。
删除行
若是用sed删除所有的空白行很简单,但是选择性的删除空白行,则麻烦了些
[root@node02 tmp]# cat data2.txt
This is the header line.
This is the first data line.
This is the second data line.
This is the last line.
[root@node02 tmp]#
[root@node02 tmp]#
[root@node02 tmp]#
[root@node02 tmp]# sed '/^$/d' data2.txt
This is the header line.
This is the first data line.
This is the second data line.
This is the last line.
删除连续的空白行
有些文件里会有讨厌的多个空白行,删除连续的空白行是用地址区间检查数据流。
删除连续的空白行的关键在于创建一个非空白行和空白行的地址区间,sed碰到该区间,不删除,其他的空白行区间则删除。
案例
[root@node02 tmp]# cat data2.txt
This is the header line.
This is the first data line.
This is the second data line.
This is the last line.
[root@node02 tmp]#
[root@node02 tmp]#
[root@node02 tmp]# sed '/./,/^$/!d' data2.txt
This is the header line.
This is the first data line.
This is the second data line.
This is the last line.
无论数据行之间有多少个空白行,都会只保留一个空白行了。
删除开头的空白行
数据文件经常也会存在空白行,若是导入数据库也会生成空项,较为麻烦。
案例
[root@node02 tmp]# cat data2.txt
This is the header line.
This is the first data line.
This is the second data line.
This is the last line.
[root@node02 tmp]#
[root@node02 tmp]#
[root@node02 tmp]#
[root@node02 tmp]#
[root@node02 tmp]# sed '/./,$!d' data2.txt
This is the header line.
This is the first data line.
This is the second data line.
This is the last line.
[root@node02 tmp]#
删除HTML标签
现在从网站上下载html并且保存使用的场景还是较多,例如爬虫等场景,HTML的标签较多,如何筛选出有益的信息。
[root@node02 tmp]# cat data2.txt
<html>
<head>
<title>This is the page title</title> </head>
<body>
<p>
This is the <b>first</b> line in the Web page.
This should provide some <i>useful</i>
information to use in our sed script.
</body>
</html>
对HTML标签的删除大部分是成对的删除,例如
对于标签的删除正则,要小心,否则会删错,例如这样的正则
s/<.*>//g 这样的正则是有问题的
[root@node02 tmp]# sed 's/<.*>//g' data2.txt
This is the  line in the Web page.
This should provide some
information to use in our sed script.
这里是有问题,发现titile标签整行被删除了,以及加粗,斜体的文本都不见了。
sed认为的是在大于号、小于号之间的文本都要被替换为空。
正确的正则改成如下
# 正确的思路应该是让sed编辑器忽略掉,嵌入在原始标签里的大于号,排除写法[^>]
[root@node02 tmp]# cat data2.txt
<html>
<head>
<title>This is the page title</title> </head>
<body>
<p>
This is the <b>first</b> line in the Web page.
This should provide some <i>useful</i>
information to use in our sed script.
</body>
</html>
[root@node02 tmp]#
[root@node02 tmp]# sed 's/<[^>]*>//g;/^$/d' data2.txt
This is the page title
This is the first line in the Web page.
This should provide some useful
information to use in our sed script.
sed基本练习题
以行为单位添加/删除
将/etc/passwd的内容输出并且打印行号,同时在第1行之前插入两行文本,第一行内容为"How are you?",第二行内容为"How old are you?":
[root@node02 tmp]# nl /etc/passwd | sed '1i How are you?\nHow old are you?' | head -5
How are you?
How old are you?
     1    root:x:0:0:root:/root:/bin/bash
     2    bin:x:1:1:bin:/bin:/sbin/nologin
     3    daemon:x:2:2:daemon:/sbin:/sbin/nologin
在/etc/passwd第2行之后追加文本"Drink tea?":
[root@node02 tmp]# nl /etc/passwd|sed '2a Drink Tea?'  | head -5
     1    root:x:0:0:root:/root:/bin/bash
     2    bin:x:1:1:bin:/bin:/sbin/nologin
Drink Tea?
     3    daemon:x:2:2:daemon:/sbin:/sbin/nologin
     4    adm:x:3:4:adm:/var/adm:/sbin/nologin
删除/etc/passwd第2行至第5行内容:
[root@node02 tmp]# nl /etc/passwd|sed '2,5d' | head -5
     1    root:x:0:0:root:/root:/bin/bash
     6    sync:x:5:0:sync:/sbin:/bin/sync
     7    shutdown:x:6:0:shutdown:/sbin:/sbin/shutdown
     8    halt:x:7:0:halt:/sbin:/sbin/halt
     9    mail:x:8:12:mail:/var/spool/mail:/sbin/nologin
 sed将2-5行匹配到模式空间,然后d命令删除了模式空间的内容,因此这几行没输出
题:把文本第二行之后的空白行删除
这里注意要用到next命令
[root@node02 tmp]# cat data2.txt
<html>
<head>
<title>This is the page title</title> </head>
<body>
<p>
This is the <b>first</b> line in the Web page.
This should provide some <i>useful</i>
information to use in our sed script.
</body>
</html>
[root@node02 tmp]#
[root@node02 tmp]#
[root@node02 tmp]# sed '2n;/^$/d' data2.txt
<html>
<head>
<title>This is the page title</title> </head>
<body>
<p>
This is the <b>first</b> line in the Web page.
This should provide some <i>useful</i>
information to use in our sed script.
</body>
</html>
{}提示
对某一行执行多次处理,用{}将命令扩起来,花括号内每个命令用分号分割。
以行为单环替换/打印
将/etc/passwd第三行替换为文本"This is the third line.":
提示:
c \TEXT:将指定行的内容替换为文本TEXT;
[root@node02 tmp]# nl /etc/passwd | sed '3c This is the third line'
     1    root:x:0:0:root:/root:/bin/bash
     2    bin:x:1:1:bin:/bin:/sbin/nologin
This is the third line
     4    adm:x:3:4:adm:/var/adm:/sbin/nologin
     5    lp:x:4:7:lp:/var/spool/lpd:/sbin/nologin
使用编辑命令y实现对应转换字符:
提示
y:用于(对应)转换字符;
例如 a > A b > B,注意字符数对应
[root@node02 tmp]#
[root@node02 tmp]# cat data.txt
On Tuesday, the Linux System
Administrator's group meeting will be held.
All System Administrators should attend.
Thank you for your attendance.
[root@node02 tmp]#
[root@node02 tmp]#
[root@node02 tmp]#
[root@node02 tmp]#
[root@node02 tmp]# sed 'y/abc/ABC/' data.txt
On TuesdAy, the Linux System
AdministrAtor's group meeting will Be held.
All System AdministrAtors should Attend.
ThAnk you for your AttendAnCe.
显示/etc/passwd前十行
提示
q:读取匹配到的行后退出;
# 注意,一个文件若是非常大,sed用p处理会处理每一行,因此用q节省cpu资源。
[root@node02 tmp]# nl /etc/passwd | sed '10q'
     1    root:x:0:0:root:/root:/bin/bash
     2    bin:x:1:1:bin:/bin:/sbin/nologin
     3    daemon:x:2:2:daemon:/sbin:/sbin/nologin
     4    adm:x:3:4:adm:/var/adm:/sbin/nologin
     5    lp:x:4:7:lp:/var/spool/lpd:/sbin/nologin
     6    sync:x:5:0:sync:/sbin:/bin/sync
     7    shutdown:x:6:0:shutdown:/sbin:/sbin/shutdown
     8    halt:x:7:0:halt:/sbin:/sbin/halt
     9    mail:x:8:12:mail:/var/spool/mail:/sbin/nologin
    10    operator:x:11:0:operator:/root:/sbin/nologin
搜索/etc/passwd中root用户对应的一行,将'bash'改为'blueshell',再输出该行:
# -n 不自动打印模式空间的内容
[root@node02 ~]# nl /etc/passwd | sed '/^root/{s/bash/blueshell/;p}' /etc/passwd -n
root:x:0:0:root:/root:/bin/blueshell
# 替换后立即退出
[root@node02 ~]# nl /etc/passwd | sed '/^root/{s/bash/blueshell/;q}' /etc/passwd
root:x:0:0:root:/root:/bin/blueshell
在两个数字之间添加 : 符号
# -r, --regexp-extended  在脚本中使用扩展正则表达式
[root@node02 tmp]# cat num.txt
789
345
[root@node02 tmp]#
[root@node02 tmp]#
[root@node02 tmp]#
[root@node02 tmp]#
[root@node02 tmp]# sed -r 's/([0-9])([0-9])([0-9])/\1:\2:\3/' num.txt
7:8:9
3:4:5
输出ens33网卡ip
# 正则锚点用法
[root@node02 tmp]#  ifconfig ens33 | sed -n '/inet\>/p' | sed -e 's/^.*inet //' -e 's/netmask.*$//'
172.18.0.69
将/etc/passwd第1到第5行中shell为/bin/bash的用户的shell改为'/bin/greenshell',再输出:
# sed执行多次命令的花括号用法
[root@node02 tmp]# sed '1,5{s@/bin/bash@/bin/greenshell@;p}' /etc/passwd -n
root:x:0:0:root:/root:/bin/greenshell
bin:x:1:1:bin:/bin:/sbin/nologin
daemon:x:2:2:daemon:/sbin:/sbin/nologin
adm:x:3:4:adm:/var/adm:/sbin/nologin
lp:x:4:7:lp:/var/spool/lpd:/sbin/nologin
awk进阶
我们所学的centos7,awk,也就是gawk
awk能够对原始数据进行格式化展示,适合处理各种数据格式化任务。
使用变量
awk该编程语言一特性就是使用变量存取值,支持两种类型变量
- 内置变量
- 自定义变量
awk的一些内置变量,存放处理数据文件中的数据字段和记录的信息。
内置变量
字段和记录分隔符
已知awk使用$1 $2 $3的形式记录字段的位置,以此类推,awk默认分隔符是空格。
以及可以使用-F选项修改分隔符,NR内置变量指定行号。
awk数据字段和记录变量
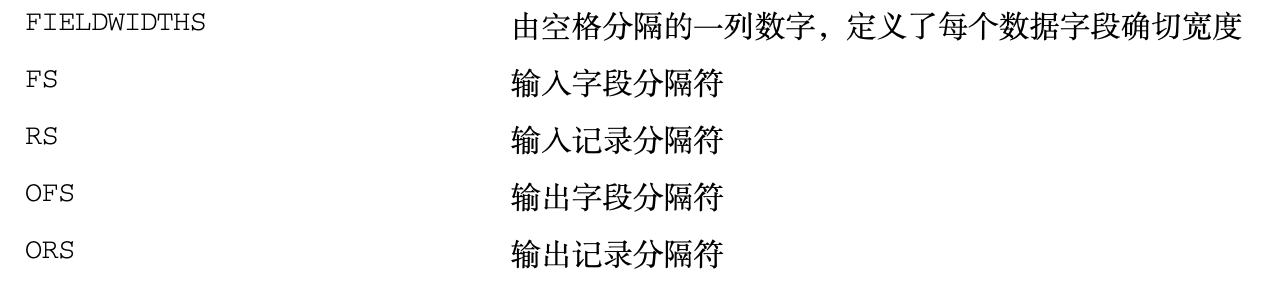
案例
awk逐行处理文本的时候,以输入分割符为准,把文本切成多个片段,默认符号是空格
当我们处理特殊文件,没有空格的时候,可以自由指定分隔符特点
FS变量就是控制分隔符的作用
[root@node02 tmp]# cat num.txt
data11,data12,data13,data14,data15
data21,data22,data23,data24,data25
data31,data32,data33,data34,data35
[root@node02 tmp]# awk 'BEGIN{FS=","}{print $1,$2,$3}' num.txt
data11 data12 data13
data21 data22 data23
data31 data32 data33
还可以通过修改OFS变量,控制输出时的分隔符。
[root@node02 tmp]# gawk 'BEGIN{FS=",";OFS="|"}{print $1,$2,$3}' num.txt
data11|data12|data13
data21|data22|data23
data31|data32|data33
[root@node02 tmp]# gawk 'BEGIN{FS=",";OFS=" | "}{print $1,$2,$3}' num.txt
data11 | data12 | data13
data21 | data22 | data23
data31 | data32 | data33
数据变量
除了字段和记录分隔符变量,awk还提供了些内置变量用于了解数据的变化。
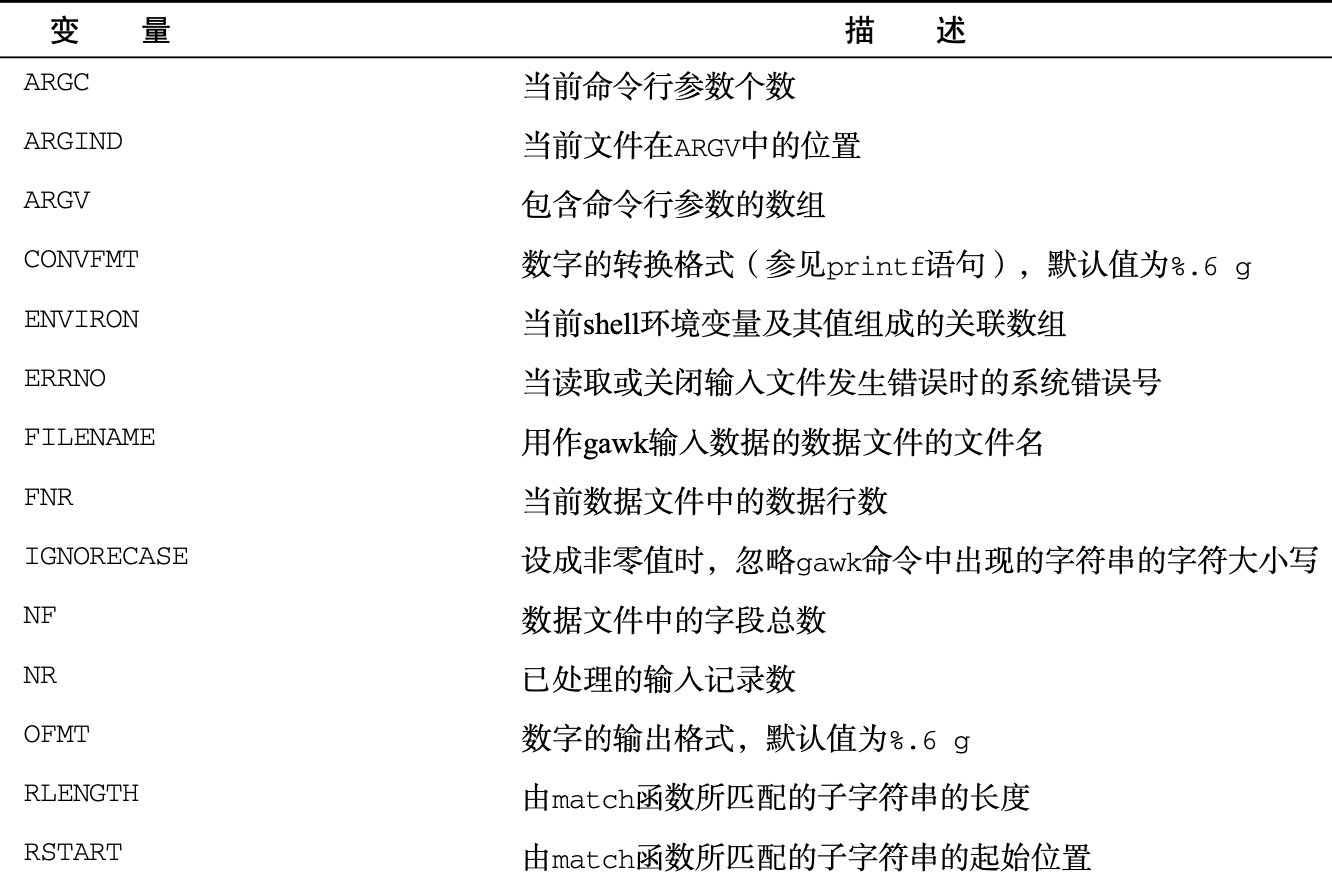
ARGC和ARGV变量允许awk从shell中获取命令行参数的总数,但是awk不会把脚本文件当作参数的一部分
ARGC变量表示命令行上的参数,包括awk命令和文件名
[root@node02 tmp]# awk 'BEGIN{print ARGC}'
1
[root@node02 tmp]#
[root@node02 tmp]# awk 'BEGIN{print ARGC}' data.txt
2
ARGV数组值从索引0开始,表示awk本身,索引1表示第一个命令行参数
[root@node02 tmp]# awk 'BEGIN{print ARGV[0]}' data.txt
awk
[root@node02 tmp]# awk 'BEGIN{print ARGV[0],ARGV[1]}' data.txt
awk data.txt
[root@node02 tmp]# awk 'BEGIN{print ARGV[0],ARGV[1],ARGV[2]}' data.txt
awk data.txt
[root@node02 tmp]# awk 'BEGIN{print ARGV[0],ARGV[1],ARGV[2]}' data.txt xxxx
awk data.txt xxxx
awk内置变量的引用不用加美元符。
ENVIRON变量
该变量用关联数组提取shell环境变量,注意点:关联数组用文本字符串作为数组的索引值,而不是数值。
在计算机科学中,关联数组(英语:Associative Array),又称映射(Map)、字典(Dictionary)是一个抽象的数据结构,它包含着类似于(键,值)的有序对。一个关联数组中的有序对可以重复(如C++中的multimap)也可以不重复(如C++中的map)。
数组索引中的key是shell的环境变量名,值是shell环境变量的值。
[root@node02 tmp]# awk 'BEGIN{print ENVIRON["HOME"],ENVIRON["PATH"]}'
/root /usr/local/sbin:/usr/local/bin:/usr/sbin:/usr/bin:/root/bin
awk跟踪数据字段和记录时,变量FNR,NF和NR用起来就很方便了,比如你不知道awk到底分隔了多少个数据字段,可以根据NF变量获取最后一个数据字段。
案例
[root@chaogelinux ~]# awk 'BEGIN{FS=":";OFS=" - "}{print $1,$NF}' /etc/passwd | head -3
root - /bin/bash
bin - /sbin/nologin
daemon - /sbin/nologin
NF变量就记录了字段的数量,因此$NF也就是打印最后一个字段。
NR和FNR变量
FNR和NR变量类似,FNR变量含有当前数据文件中已经被处理过的记录数量
NR变量含有已处理过的记录总数。
看下案例差别
[root@chaogelinux ~]# awk 'BEGIN{FS=":"}{print $1,"FNR="FNR}' /etc/passwd | head -5
root FNR=1
bin FNR=2
daemon FNR=3
adm FNR=4
lp FNR=5
可以看出,FNR变量是记录处理的记录数量,也就是行数。
那NR和FNR的区别在哪?
[root@chaogelinux ~]# cat /tmp/pwd.txt
root:x:0:0:root:/root:/bin/bash
bin:x:1:1:bin:/bin:/sbin/nologin
daemon:x:2:2:daemon:/sbin:/sbin/nologin
adm:x:3:4:adm:/var/adm:/sbin/nologin
lp:x:4:7:lp:/var/spool/lpd:/sbin/nologin
[root@chaogelinux ~]# awk 'BEGIN{FS=":"}{print $1,"FNR="FNR,"NR="NR}END{print "There ware",NR,"records processed"}' /tmp/pwd.txt /tmp/pwd.txt
root FNR=1 NR=1
bin FNR=2 NR=2
daemon FNR=3 NR=3
adm FNR=4 NR=4
lp FNR=5 NR=5
root FNR=1 NR=6
bin FNR=2 NR=7
daemon FNR=3 NR=8
adm FNR=4 NR=9
lp FNR=5 NR=10
There ware 10 records processed
我们会发现,FNR变量的值在awk处理第二个文件数据的时候被重置,而NR变量则在处理第二个数据文件时继续统计。
自定义变量
shell脚本与awk变量
awk允许自定义变量在程序中使用,awk自定义的变量可以是任意数目的字母,数字,下划线,不得已数字开头,而且区分大小写。
例如
[root@chaogelinux ~]# awk 'BEGIN{testing="Hello chaoge.";print testing}'
Hello chaoge.
[root@chaogelinux ~]# awk 'BEGIN{v1="超哥nb";print v1;v1="超哥不错哦";print v1}'
超哥nb
超哥不错哦
数值计算
命令行与变量赋值,花式用法
使用awk命令可以给脚本中的变量赋值
该作用可以不改变脚本的情况下,改变脚本的作用。
[root@chaogelinux ~]# cat data
data11,data12,data13,data14,data15
data21,data22,data23,data24,data25
data31,data32,data33,data34,data35
[root@chaogelinux ~]#
[root@chaogelinux ~]#
[root@chaogelinux ~]#
[root@chaogelinux ~]#
[root@chaogelinux ~]# awk -f script1 n=2 data
data12
data22
data32
[root@chaogelinux ~]#
[root@chaogelinux ~]# cat script1
BEGIN{FS=","}
{print $n}
[root@chaogelinux ~]# awk -f script1 n=3 data
data13
data23
data33
使用命令行参数定义变量会有一个问题,设置了变量之后,这个值在代码的BEGIN部分不可用。例如
[root@chaogelinux ~]# cat script2
BEGIN{print "The starting value is",n;FS=","}
{print $n}
[root@chaogelinux ~]#
[root@chaogelinux ~]#
[root@chaogelinux ~]# awk -f script2 n=3 data
The starting value is
data13
data23
data33
发现这里只是打印了第三列的值,但是明没有在BEGIN里输出n的值
这里可以用-v选项解决,允许在awk的BEGIN开始之前设定变量。
处理数组
为了能够在单个变量中,存储多个值,许多编程语言都提供了数组,awk也支持关联数组功能,也就是可以理解为是字典的作用。
关联数组的索引可以是任意文本字符串,每一个字符串都可以对应一个数值。
定义数组变量
语法
var[index]=element
var是变量名字,index是索引,element是值
案例
关联数组计算
遍历数组变量
关联数组的问题是必须要知道索引是什么,否则无法取值。
可以利用for循环遍历出所有的索引。
例如
[root@chaogelinux ~]# awk 'BEGIN{
> var["a"]=1
> var["b"]=2
> var["d"]=3
> var["h"]=4
> for (s in var)
> {print "Index: ",s," - Value:",var[s]}}'
Index:  h  - Value: 4
Index:  a  - Value: 1
Index:  b  - Value: 2
Index:  d  - Value: 3
注意,索引值的返回是没有顺序的,但是对应的值是唯一的。
删除数组变量
一旦删除了索引,就无法用用它提取元素了。
[root@chaogelinux ~]# awk 'BEGIN{
var["a"]=1
var["b"]=2
var["d"]=3
var["h"]=4
for (s in var)
{print "Index: ",s," - Value:",var[s]};delete var["d"];print "----";for (s in var){print "Index:",s,"Value:",var[s]}}'
使用模式
awk的模式,我们已知有BEGIN和END俩关键字来处理,数据流开始与结束两个模式。
正则表达式
正则表达式必须出现在要控制的脚本左花括号前面。
匹配操作符
(matching operator)匹配操作符是波浪线~,来看下如何用
例如
[root@chaogelinux ~]# cat data
data11,data12,data13,data14,data15
data21,data22,data23,data24,data25
data31,data32,data33,data34,data35
[root@chaogelinux ~]#
[root@chaogelinux ~]#
[root@chaogelinux ~]#
[root@chaogelinux ~]# awk -F "," '$2 ~ /^data2/{print $1,$2,$3}' data
data21 data22 data23
该匹配操作符使用正则^data2来比较第二个数据字段。
再看个实际场景,搜索特定数据。
[root@chaogelinux ~]# awk -F : '$1 ~ /yu/{print $1,$NF}' /etc/passwd
yu /bin/bash
yu1 /bin/bash
yu2 /bin/bash
pyyu /bin/bash
pyyuc /bin/bash
[root@chaogelinux ~]# awk -F : '$1 ~ /^yu/{print $1,$NF}' /etc/passwd
yu /bin/bash
yu1 /bin/bash
yu2 /bin/bash
这个语法会在第一列中查找文本以yu开头。如果找到了该记录,打印该记录的第一个和最后一个字段。
排除语法
搜索出除了以a,b,c开头的行
[root@chaogelinux ~]# head -5 /etc/passwd
root:x:0:0:root:/root:/bin/bash
bin:x:1:1:bin:/bin:/sbin/nologin
daemon:x:2:2:daemon:/sbin:/sbin/nologin
adm:x:3:4:adm:/var/adm:/sbin/nologin
lp:x:4:7:lp:/var/spool/lpd:/sbin/nologin
[root@chaogelinux ~]# head -5 /etc/passwd | awk -F : '$1 !~ /^[a-c]/{print $1,$NF}'
root /bin/bash
daemon /sbin/nologin
lp /sbin/nologin
数学表达式
除了正则,还可以用数学表达式,过滤如UID,GID寻找用户信息。
# 找出所有组ID为0的用户。
[root@chaogelinux ~]# awk -F :  '$4==0{print $1}' /etc/passwd
root
sync
shutdown
halt
operator
常见的数学表达式
例如找出uid大于1000的用户信息
[root@chaogelinux ~]# awk -F :  '$3>1000{print $0}' /etc/passwd
yu1:x:1001:1004::/home/yu1:/bin/bash
yu2:x:1002:1002::/home/yu2:/bin/bash
pyyu:x:1500:1500::/home/pyyu:/bin/bash
tom:x:1501:1500::/home/tom:/bin/bash
jerry:x:1502:1502::/var/jerry:/sbin/nologin
eva:x:1503:1503:The girl eva userinfo:/home/eva:/bin/bash
mjj:x:1504:1504::/home/mjj:/bin/bash
xiaomage:x:1505:1505::/home/xiaomage:/bin/bash
pyyuc:x:2000:2000::/home/pyyuc:/bin/bash
alex:x:2001:1500::/home/alex:/bin/bash
virtual_chao:x:2003:2003::/var/ftpdir:/sbin/nologin
nfsnobody:x:65534:65534:Anonymous NFS User:/var/lib/nfs:/sbin/nologin
cc:x:2004:2004::/home/cc:/bin/bash
only:x:2005:2005::/home/only:/bin/bash
test1:x:2006:2006::/home/test1:/bin/bash
chaoge:x:2007:2007::/home/chaoge:/bin/bash
chao:x:2008:2008::/home/chao:/bin/bash
susu:x:2009:2010::/home/susu:/bin/bash
结构化命令
awk也支持逻辑判断
if语句
awk支持标准的if语句
案例,如果uid在1000,2000之间就打印出用户信息
[root@chaogelinux ~]# awk -F: '{if ($3 > 1000 && $3 < 2000)print $0}' /etc/passwd
yu1:x:1001:1004::/home/yu1:/bin/bash
yu2:x:1002:1002::/home/yu2:/bin/bash
pyyu:x:1500:1500::/home/pyyu:/bin/bash
tom:x:1501:1500::/home/tom:/bin/bash
jerry:x:1502:1502::/var/jerry:/sbin/nologin
eva:x:1503:1503:The girl eva userinfo:/home/eva:/bin/bash
mjj:x:1504:1504::/home/mjj:/bin/bash
xiaomage:x:1505:1505::/home/xiaomage:/bin/bash
执行多条语句
[root@chaogelinux ~]# cat data
10
5
13
50
34
[root@chaogelinux ~]#
[root@chaogelinux ~]#
[root@chaogelinux ~]#
[root@chaogelinux ~]#
[root@chaogelinux ~]# awk '{
> if ($1>20)
> {
> x=$1*2
> print x
> }
> }' data
100
68
if else
awk也支持if语句不成立,执行其他语句。
[root@chaogelinux ~]# awk '{
> if ($1 > 20)
> { x= $1 *2;print x}
> else {x=$1/2;print x}
> }' data
5
2.5
6.5
100
68
单行写法
单行写法,要注意分号;和花括号{}的使用。
while语句
awk也支持while的循环功能。
while循环会遍历数据,且检查结束条件。
[root@chaogelinux ~]# cat data
130 120 135
160 113 140
145 170 215
# 该循环作用是相加三个列的值,求平均值
[root@chaogelinux ~]# awk '{
> total=0
> i=1
> while (i<4)
> {
> total+=$i
> i++
> }
> avg=total/3
> print "Average:",avg
> }' data
Average: 128.333
Average: 137.667
Average: 176.667
循环中断
awk支持在while循环里使用break和continue跳出循环。
[root@chaogelinux ~]# awk '{
> total=0
> i=1
> while (i<4)
> {
> total+=$i
> if (i==2)
> break
> i++
> }
> avg=total/2
> print "The average of the first tow data elements is:",avg
> }' data
The average of the first tow data elements is: 125
The average of the first tow data elements is: 136.5
The average of the first tow data elements is: 157.5
for循环
awk也支持for循环,且是c语言风格。
[root@chaogelinux ~]# awk '{
> total=0
> for (i=1;i<4;i++)
> {
> total+=$i
> }
> avg=total/3
> print "Average:",avg
> }' data
Average: 128.333
Average: 137.667
Average: 176.667
for循环的计数器比起while要好用了。
awk内置函数
awk内置的函数功能非常强大,可以进行常见的数学,字符串等运算。
数学函数
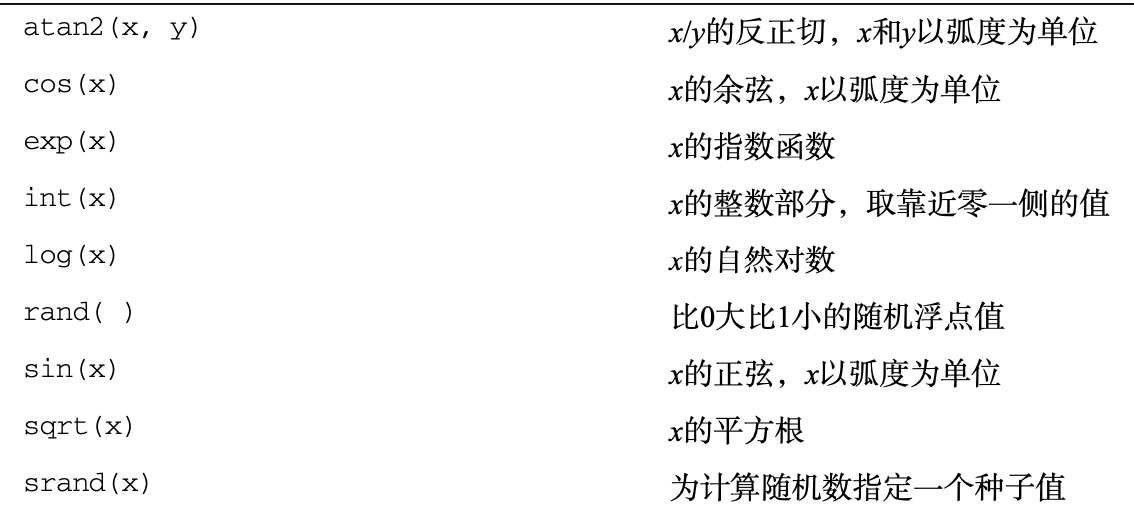
int()函数用法,得到整数,如同其他编程语言的floor函数
floor函数,其功能是“向下取整”,或者说“向下舍入”、“向零取舍”,即取不大于x的最大整数,与“四舍五入”不同,下取整是直接取按照数轴上最接近要求值的左边值,即不大于要求值的最大的那个整数值。
Int()函数会生成值和0之间最接近该值整数。
例如int()函数值为5.6返回5,值为-5.6时取-5
rand()函数用于创建随机数,但是只会在0和1之间,要得到更大的数,就要放大返回值。
srand() 随机数种子,计算机无法产生绝对的随机数,生成只能是伪随机数,也就是根据某规则生成的,因此可以加入随机数种子,根据系统时间的变化,产生不同的随机数。
具体用法,注意随机数种子必须写在BEGIN里,这是awk的机制,我们必须在awk开始计算前,加入随机种子。
[root@chaogelinux ~]# awk -F "\t" 'BEGIN{
srand();
}{
value=int(rand()*100)
print value
if(value<=10)
print "值:"value"\t次数:"NR
}'
随机数简单写法
[root@chaogelinux ~]# awk 'BEGIN{srand();print rand()}'
0.547909
[root@chaogelinux ~]# awk 'BEGIN{srand();print rand()}'
0.999358
[root@chaogelinux ~]# awk 'BEGIN{srand();print int(100*rand())}'
29
[root@chaogelinux ~]# awk 'BEGIN{srand();print int(100*rand())}'
4
字符串函数
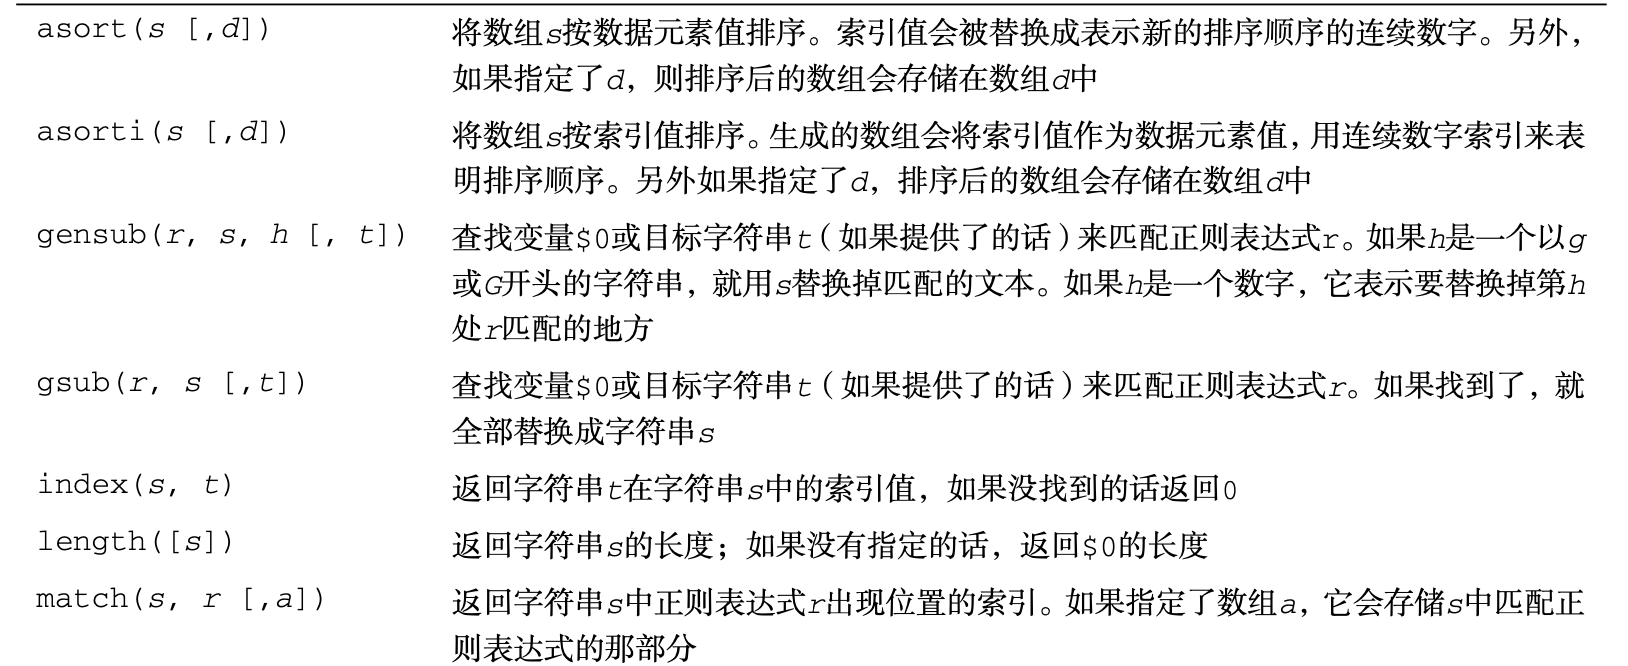
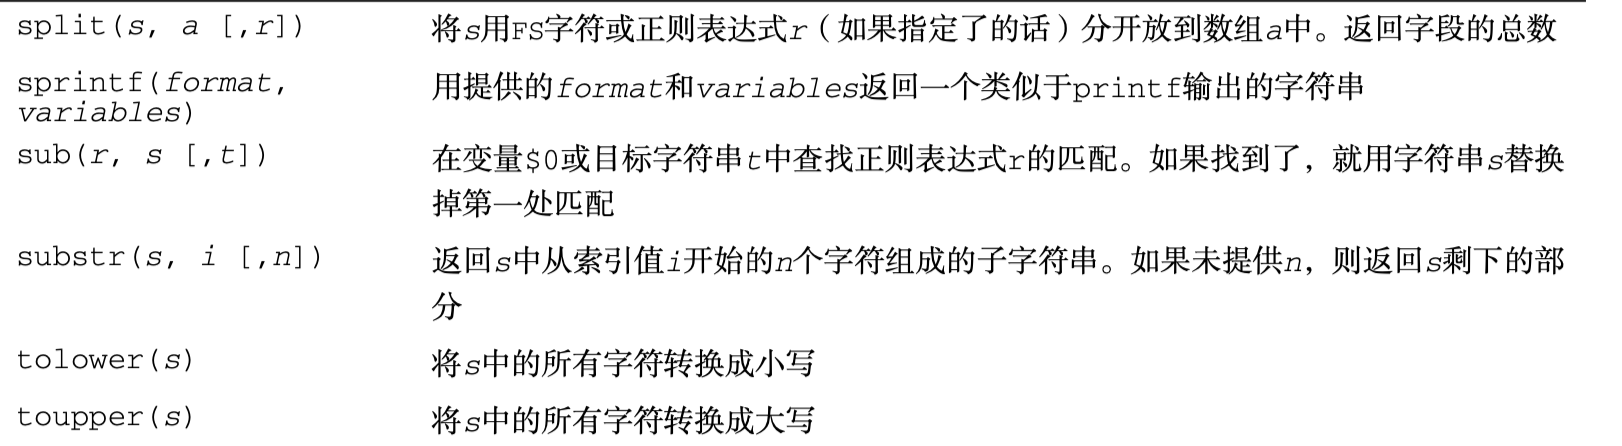
函数使用案例
大写转换,统计长度
全局替换函数
[root@chaogelinux ~]# awk '
BEGIN{
str="Hello,chaoge"
print "替换前的字符串:",str
gsub("chaoge","超哥",str)
print "替换后的字符串: ",str
}'
替换前的字符串: Hello,chaoge
替换后的字符串:  Hello,超哥
排序函数asort(),经过排序后的数组,索引会被重置
asort根据value进行排序
# 生成关联数组
[root@chaogelinux ~]# awk 'BEGIN{t["a"]=66;t["b"]=88;t["c"]=22;for(i in t){print i,t[i]}}'
a 66
b 88
c 22
# asort()排序,新数组
[root@chaogelinux ~]# awk 'BEGIN{t["a"]=66;t["b"]=88;t["c"]=22;asort(t,newt);for(i in newt){print i,newt[i]}}'
1 22
2 66
3 88
排序函数asorti(),排序的是索引
当关联数组的索引是字符串时,可以使用asorti()函数排序,如果是数字,直接for循环即可
# 当前关联数组
[root@chaogelinux ~]# awk 'BEGIN{t["z"]=66;t["q"]=88;t["a"]=3;for(i in t){print i,t[i]}}'
z 66
a 3
q 88
# 排序后
[root@chaogelinux ~]# awk 'BEGIN{t["z"]=66;t["q"]=88;t["a"]=3;\
> len=asorti(t,newt);\
> for(i=1;i<=len;i++){print i,newt[i]} }
> '
1 a
2 q
3 z
# 那么可以根据排序后的索引,对原关联数组再进行排序
[root@chaogelinux ~]# awk 'BEGIN{t["z"]=66;t["q"]=88;t["a"]=3;\
> len=asorti(t,newt);\
> for(i=1;i<=len;i++){print i,newt[i],t[newt[i]]}}'
1 a 3
2 q 88
3 z 66
时间函数

时间函数用在日志文件格式化处理非常有用。
[root@chaogelinux ~]# awk 'BEGIN{
> date=systime()
> day=strftime("%A,%B %d,%Y",date)
> print day
> }'
星期一,十月 12,2020
自定义函数
自定义函数
自定义函数必须写在awk最开始的地方。
定义awk脚本
[root@chaogelinux ~]# cat func.awk
function find_min(num1,num2)
{
    if (num1<num2)
        return num1
    return num2
}
function find_max(num1,num2)
{
    if (num1>num2)
        return num1
    return num2
}
function main(num1,num2)
{
    # 找最小值
    result=find_min(num1,num2)
    print "最小值= ",result
    # 找最大值
    result=find_max(num1,num2)
    print "最大值= ",result
}
BEGIN {
main(10,30)
}
# 执行
[root@chaogelinux ~]# awk -f func.awk
最小值=  10
最大值=  30
awk实践
现有一个数据文件,可以使用awk进行格式化数据处理。
[root@chaogelinux ~]# cat scores.txt
Rich Blum,team1,100,115,95
Barbara Blum,team1,110,115,100
Christine Bresnahan,team2,120,115,118
Tim Bresnahan,team2,125,112,116
对每只队伍的成绩排序,且计算总平均分
# 脚本
[root@chaogelinux ~]#
c[root@chaogelinux ~]# cat bowling.sh
#!/bin/bash
# for循环首先迭代出队名然后去重
for team in $(awk -F, '{print $2}' scores.txt|uniq)
do
    # 循环内部计算,传递shell变量给awk
    awk -v team=$team 'BEGIN{FS=",";total=0}
    {
        # 如果队名一致,就计算三场总分
        if ($2==team)
    {
        total+=$3+$4+$5;
}
}
    END {
        # 求平均数
        avg=total/6;
        print "Total for",team,"is",total,",the average is ",avg
}' scores.txt
done
执行结果