day09 并发和前端
今日概要:
- 并发:进程、线程。
- 项目:小猿圈项目(项目驱动)
- Flask写小网站
- 前端开发:HTML、CSS、JS、第三方插件。
- 数据库操作
1.上节作业
见代码:homework.py
2.反射
以字符串的形式去操作某个 对象 中的成员(Python中一切皆对象)。
# 1.传统的导入并执行成员
# import utils
# utils.f1()

# 2.反射的形式找成员
"""
import utils
data = getattr(utils, "f2")
data()
"""
class Foo(object):
    def __init__(self, name, age):
        self.name = name
        self.age = age


obj1 = Foo("欧阳", 99)
print(obj1.name)
print(obj1.age)

v1 = getattr(obj1, 'name')
print(v1)
v2 = getattr(obj1, 'age')
print(v2)
- getattr,去对象中获取成员
- settattr,设置成员
class Foo(object):
    def __init__(self, name, age):
        self.name = name
        self.age = age


obj1 = Foo("欧阳", 99)
obj1.email = "xxx@live.com"

setattr(obj1, "email", "xxx@live.com")
setattr(obj1, "name", "熊阳")
- hasattr,判断对象中是否有此成员
class Foo(object):
    def __init__(self, name, age):
        self.name = name
        self.age = age

obj1 = Foo("欧阳", 99)
v1 = hasattr(obj1, 'xxxx')
print(v1)
- delattr,删除对象中的成员
class Foo(object):
    def __init__(self, name, age):
        self.name = name
        self.age = age


obj1 = Foo("欧阳", 99)
print(obj1.name)

delattr(obj1, 'name')

print(obj1.name)
所以,以后给你一个对象,让你通过这个对象去 操作 他内部成员时,就有两种方式:
- 对象.xxxx
- 反射:getattr/setattr/hasattr/delattr
应用场景和优势:
- 一般做普通项目开发用不上。
- 动态对某些值想要配置配置并根据配置去操作时才会用他。
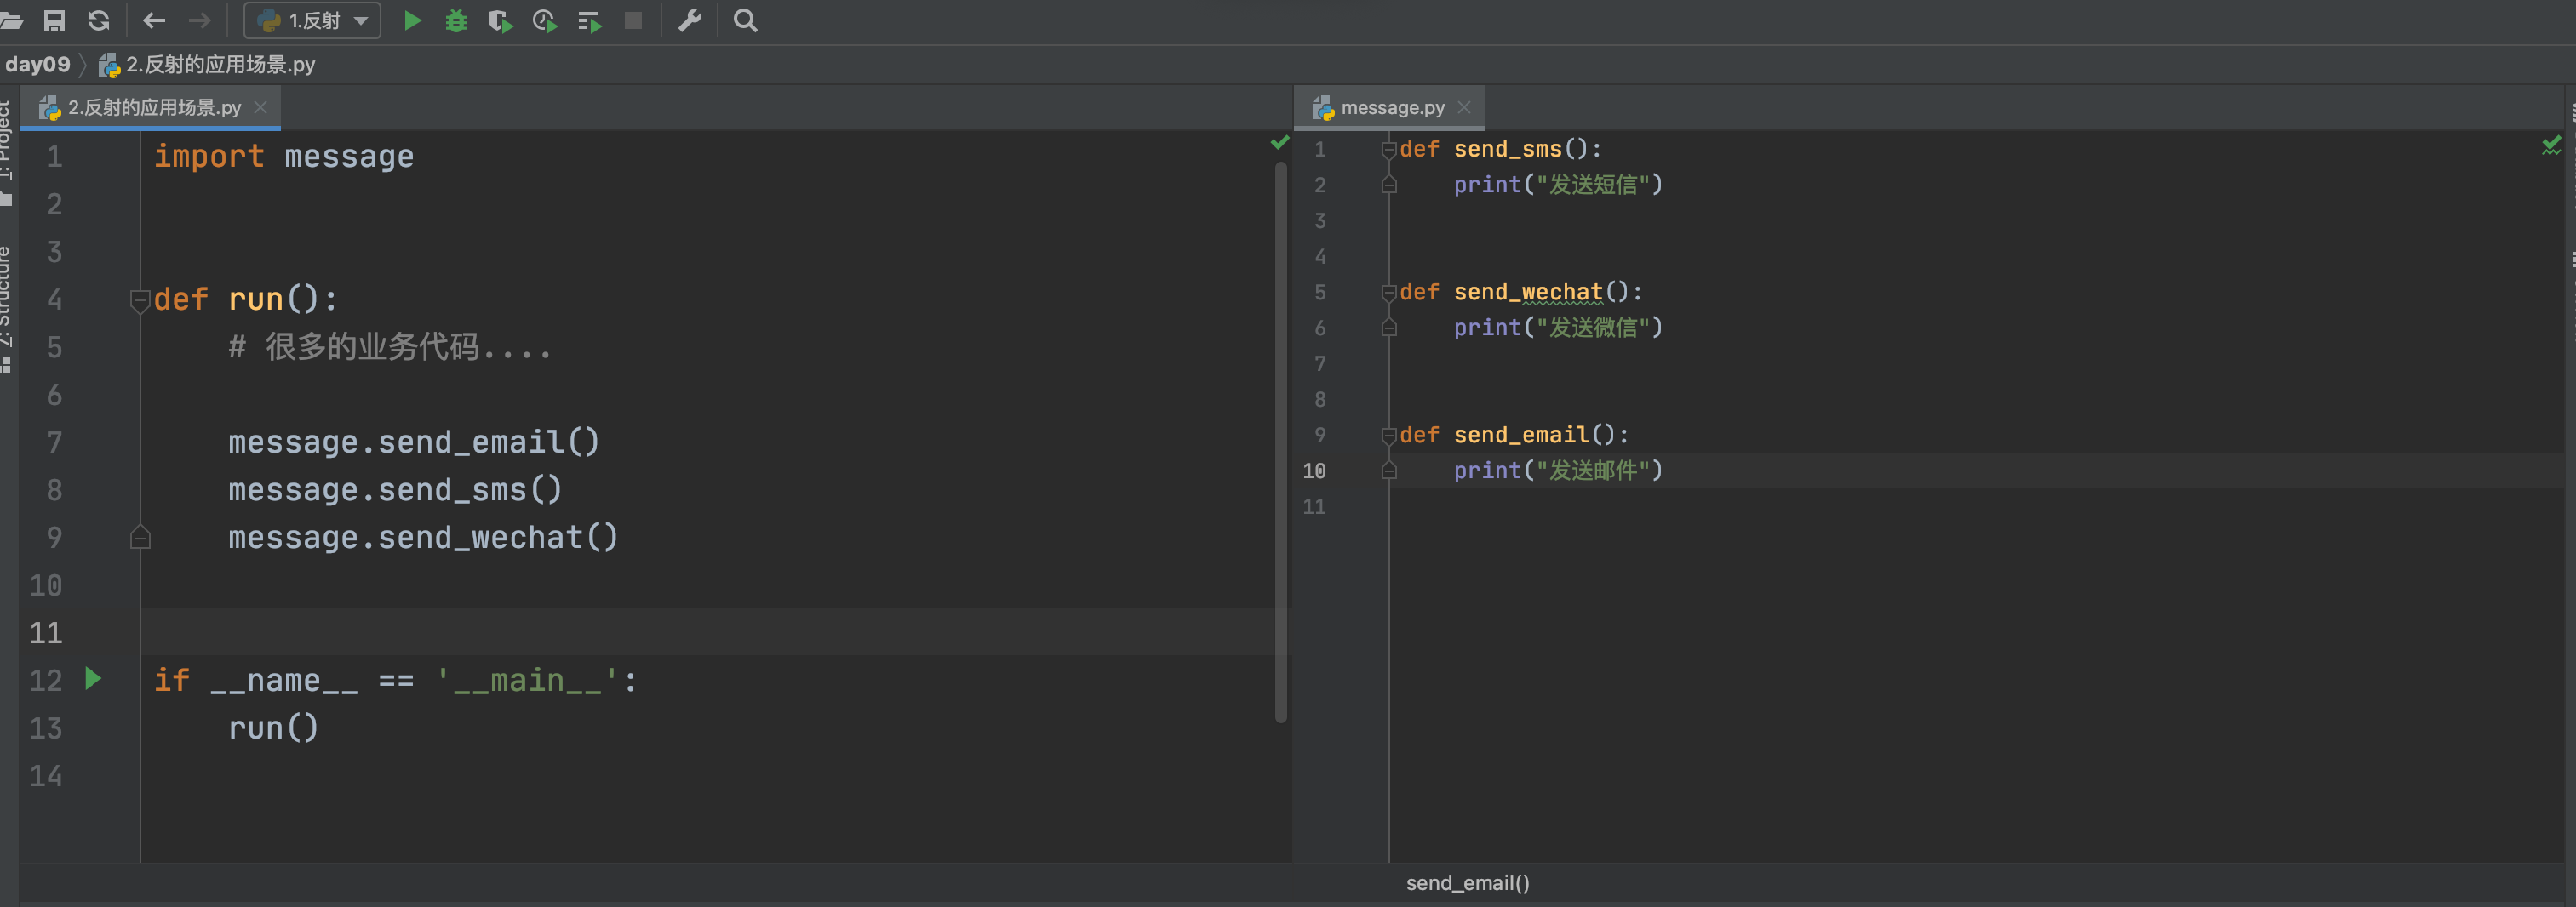
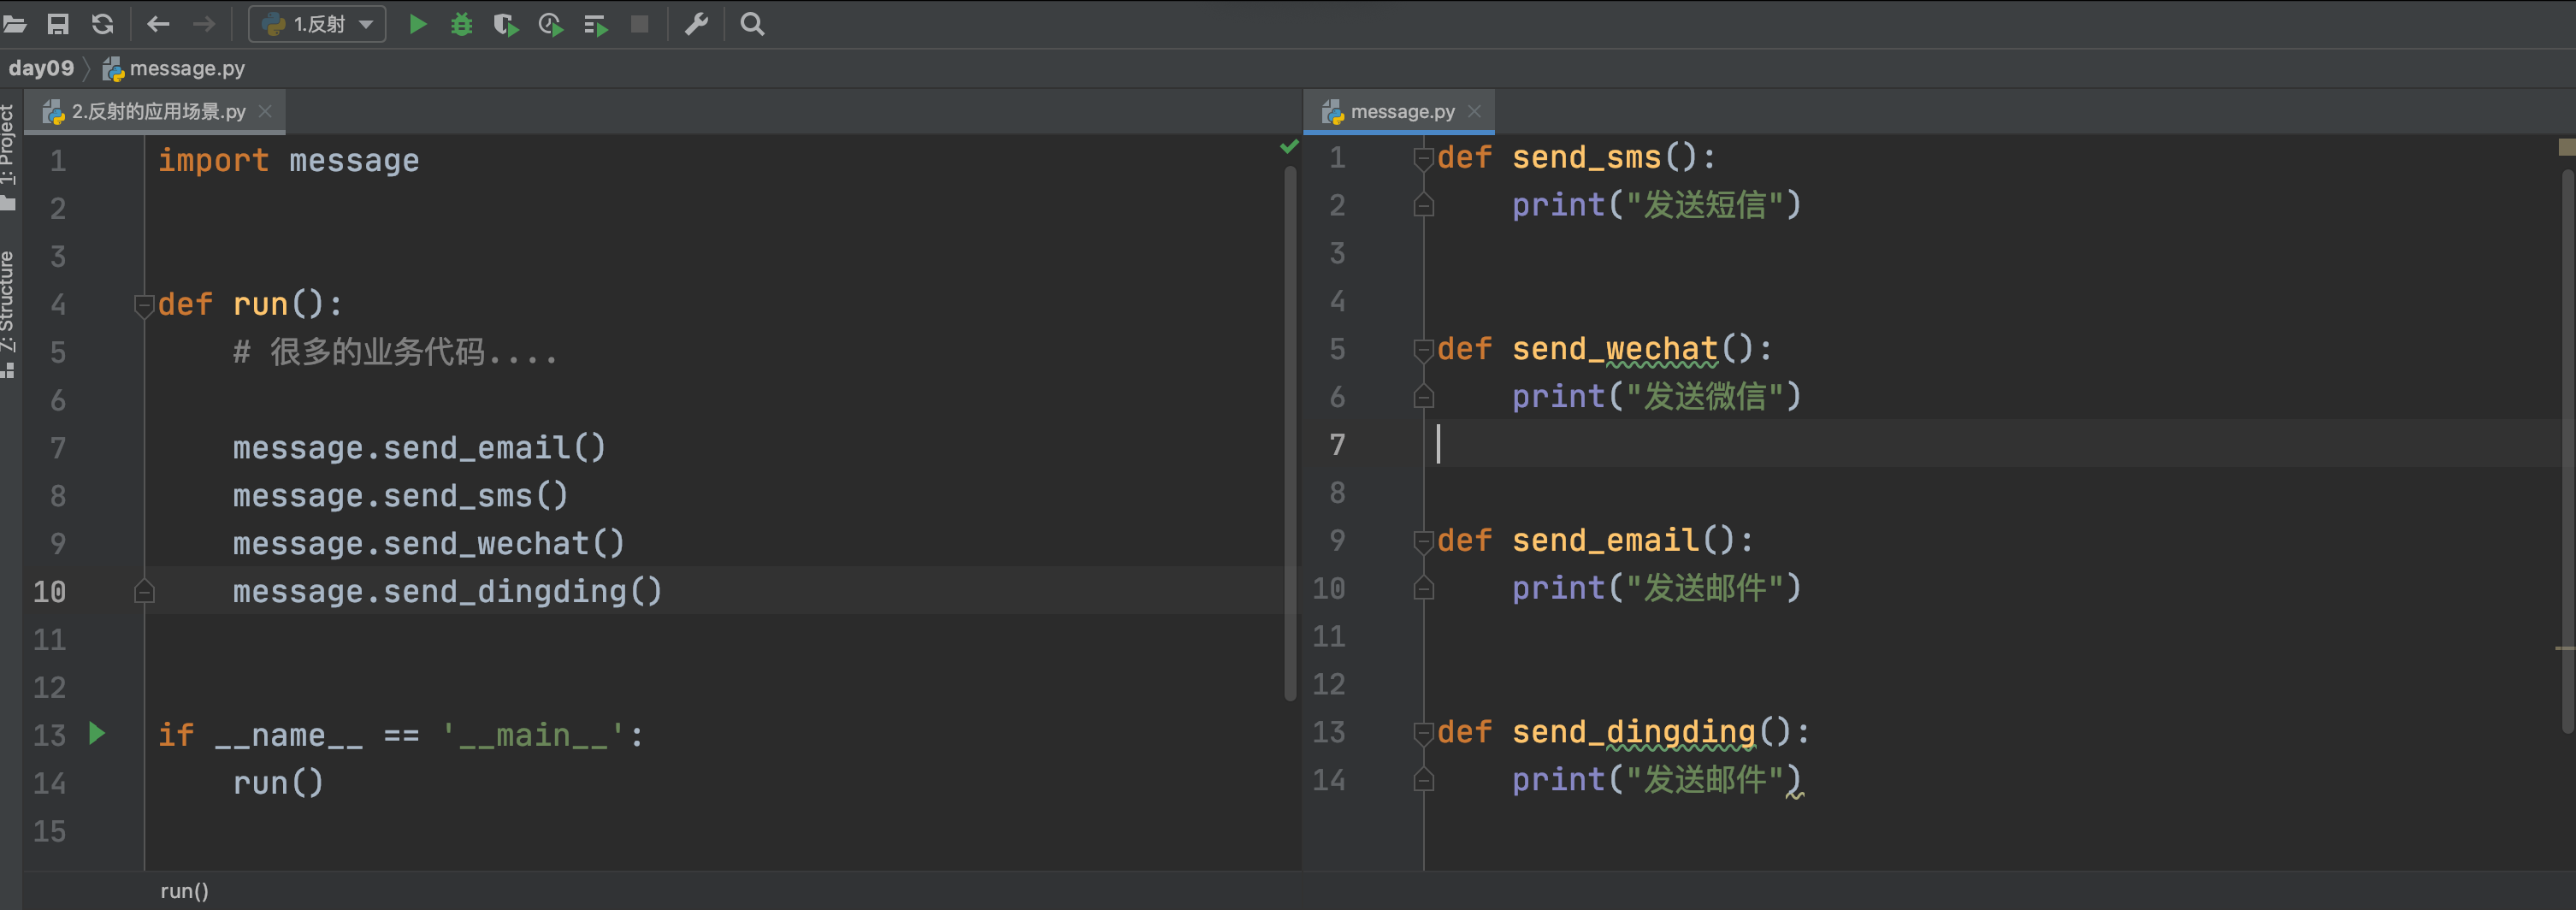
利用反射:
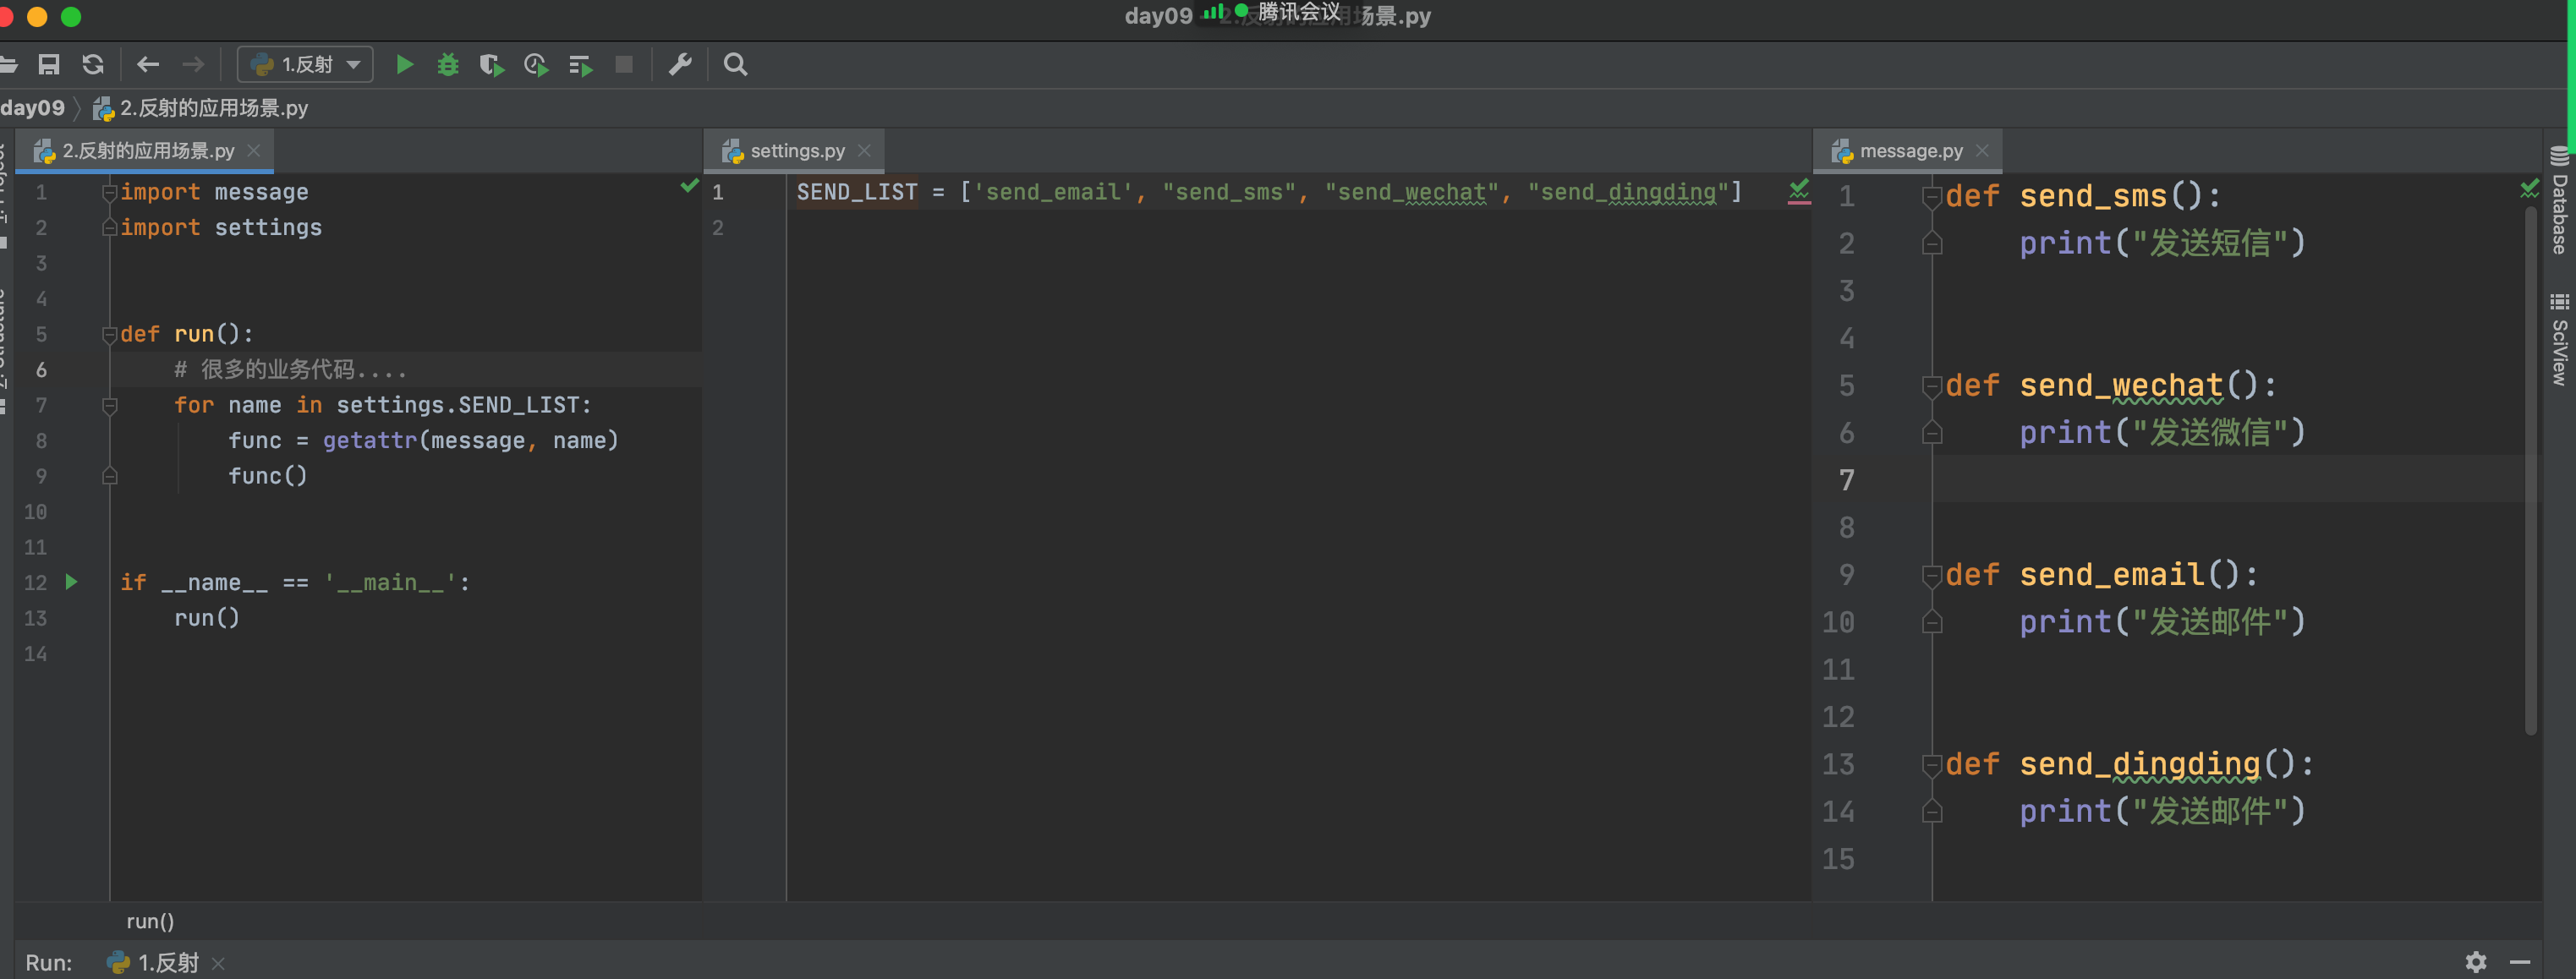
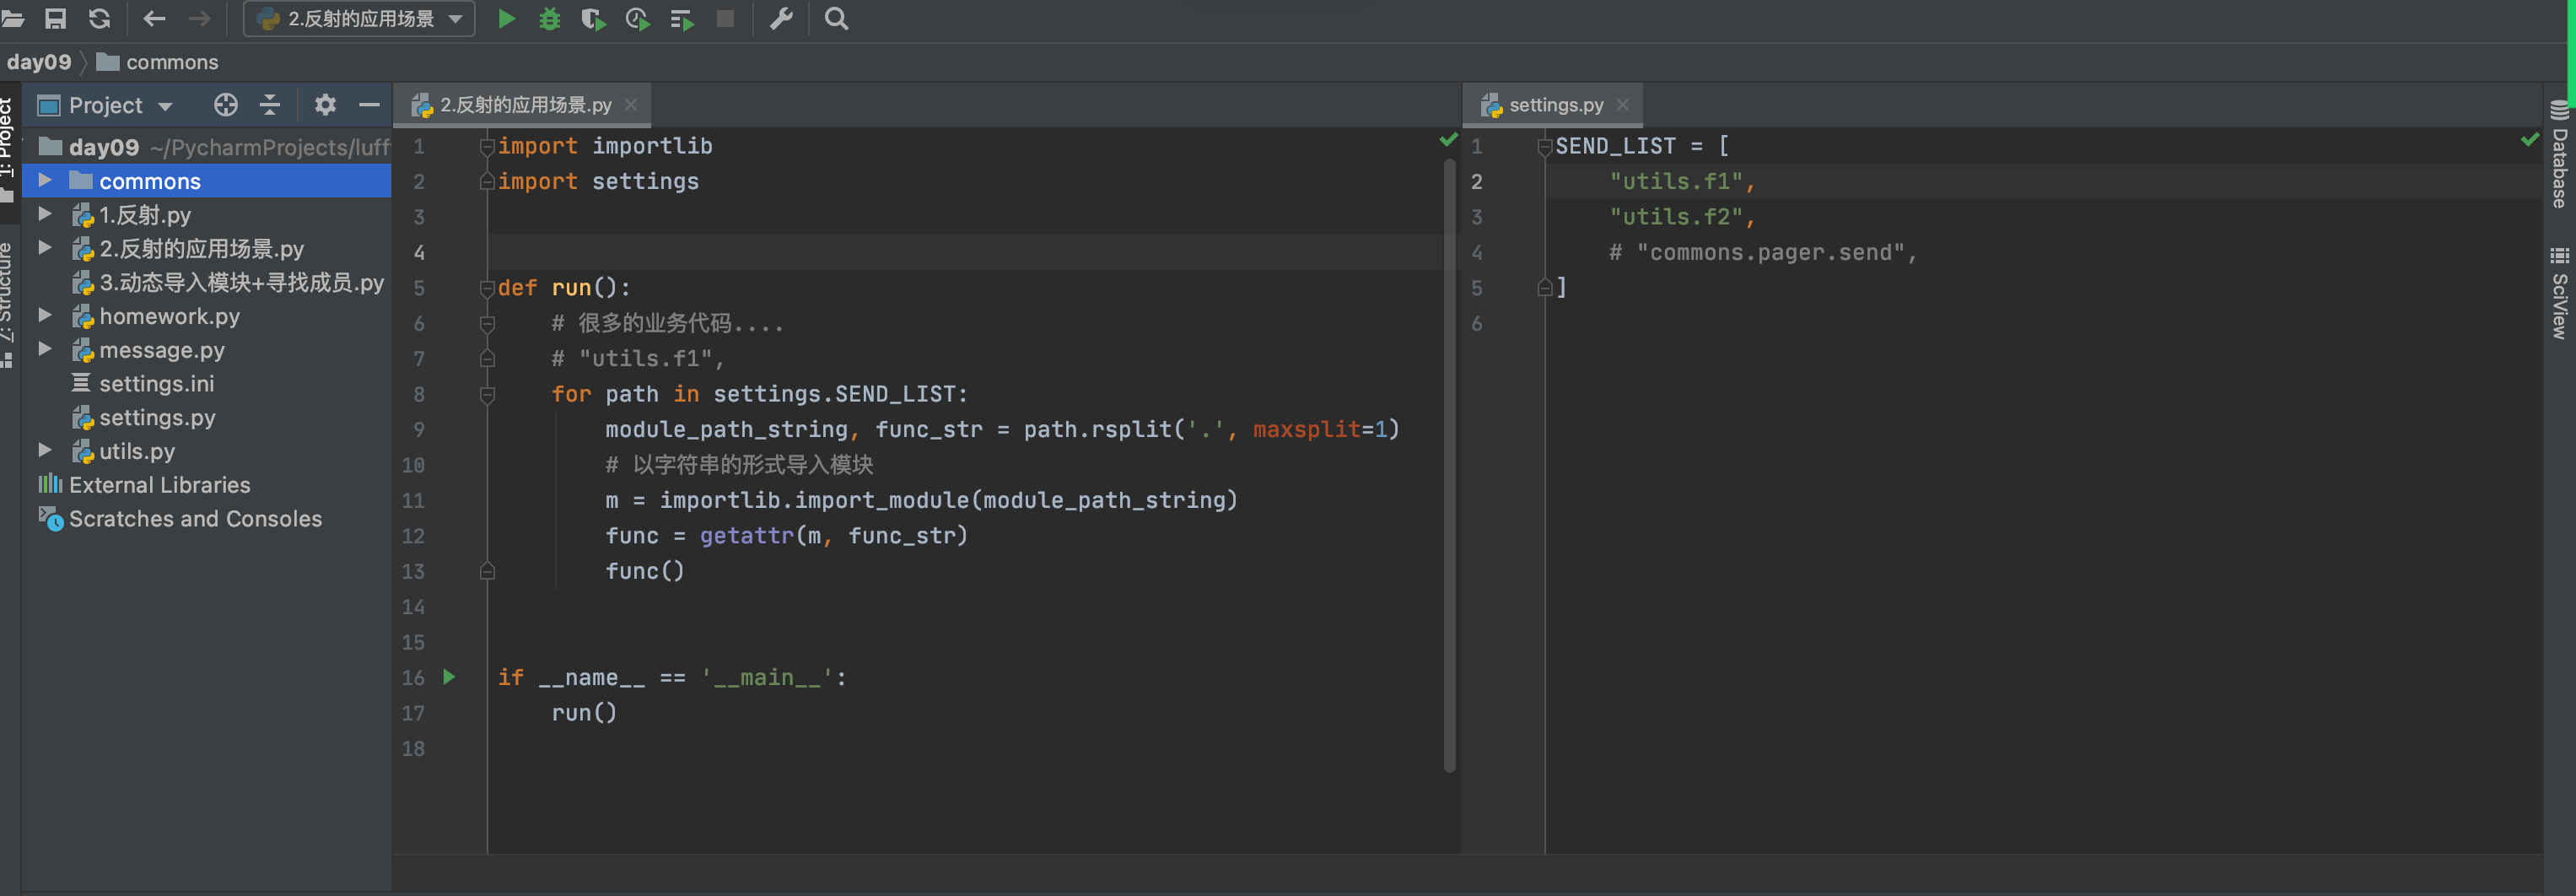
写在最后:
- 简单应用用不上。
- 可扩展应用(不同公司不同用法)。
3.疑问
- 关于数据类型
str/list/dict/tuple,其实是Python写好的类。

class list:
    def insert(self..):
        pass
    def append(self,..):
        pass

v1 = [11,22,33]
v1 = list()
v1.append(11)
v1.append(22)
v1.append(33)

v1[0]    ->  list类中 __getitem__ 方法
v1 = [11, 22, 33]

print(v1[2])

res = v1.__getitem__(2)
print(res)

method = getattr(v1, '__getitem__')
res = method(2)
print(res)
4.并发编程
https://www.bilibili.com/video/BV1Ev411G7i3
4.1 进程和线程
- 进程包含线程
- 线程是计算机中工作的最小单元
- 默认:进程之间是相互隔离
- 默认:一个程序中有一个进程、一个进程中有一个线程。
对于其他的所有编程语言来将,一般都会创建多线程。
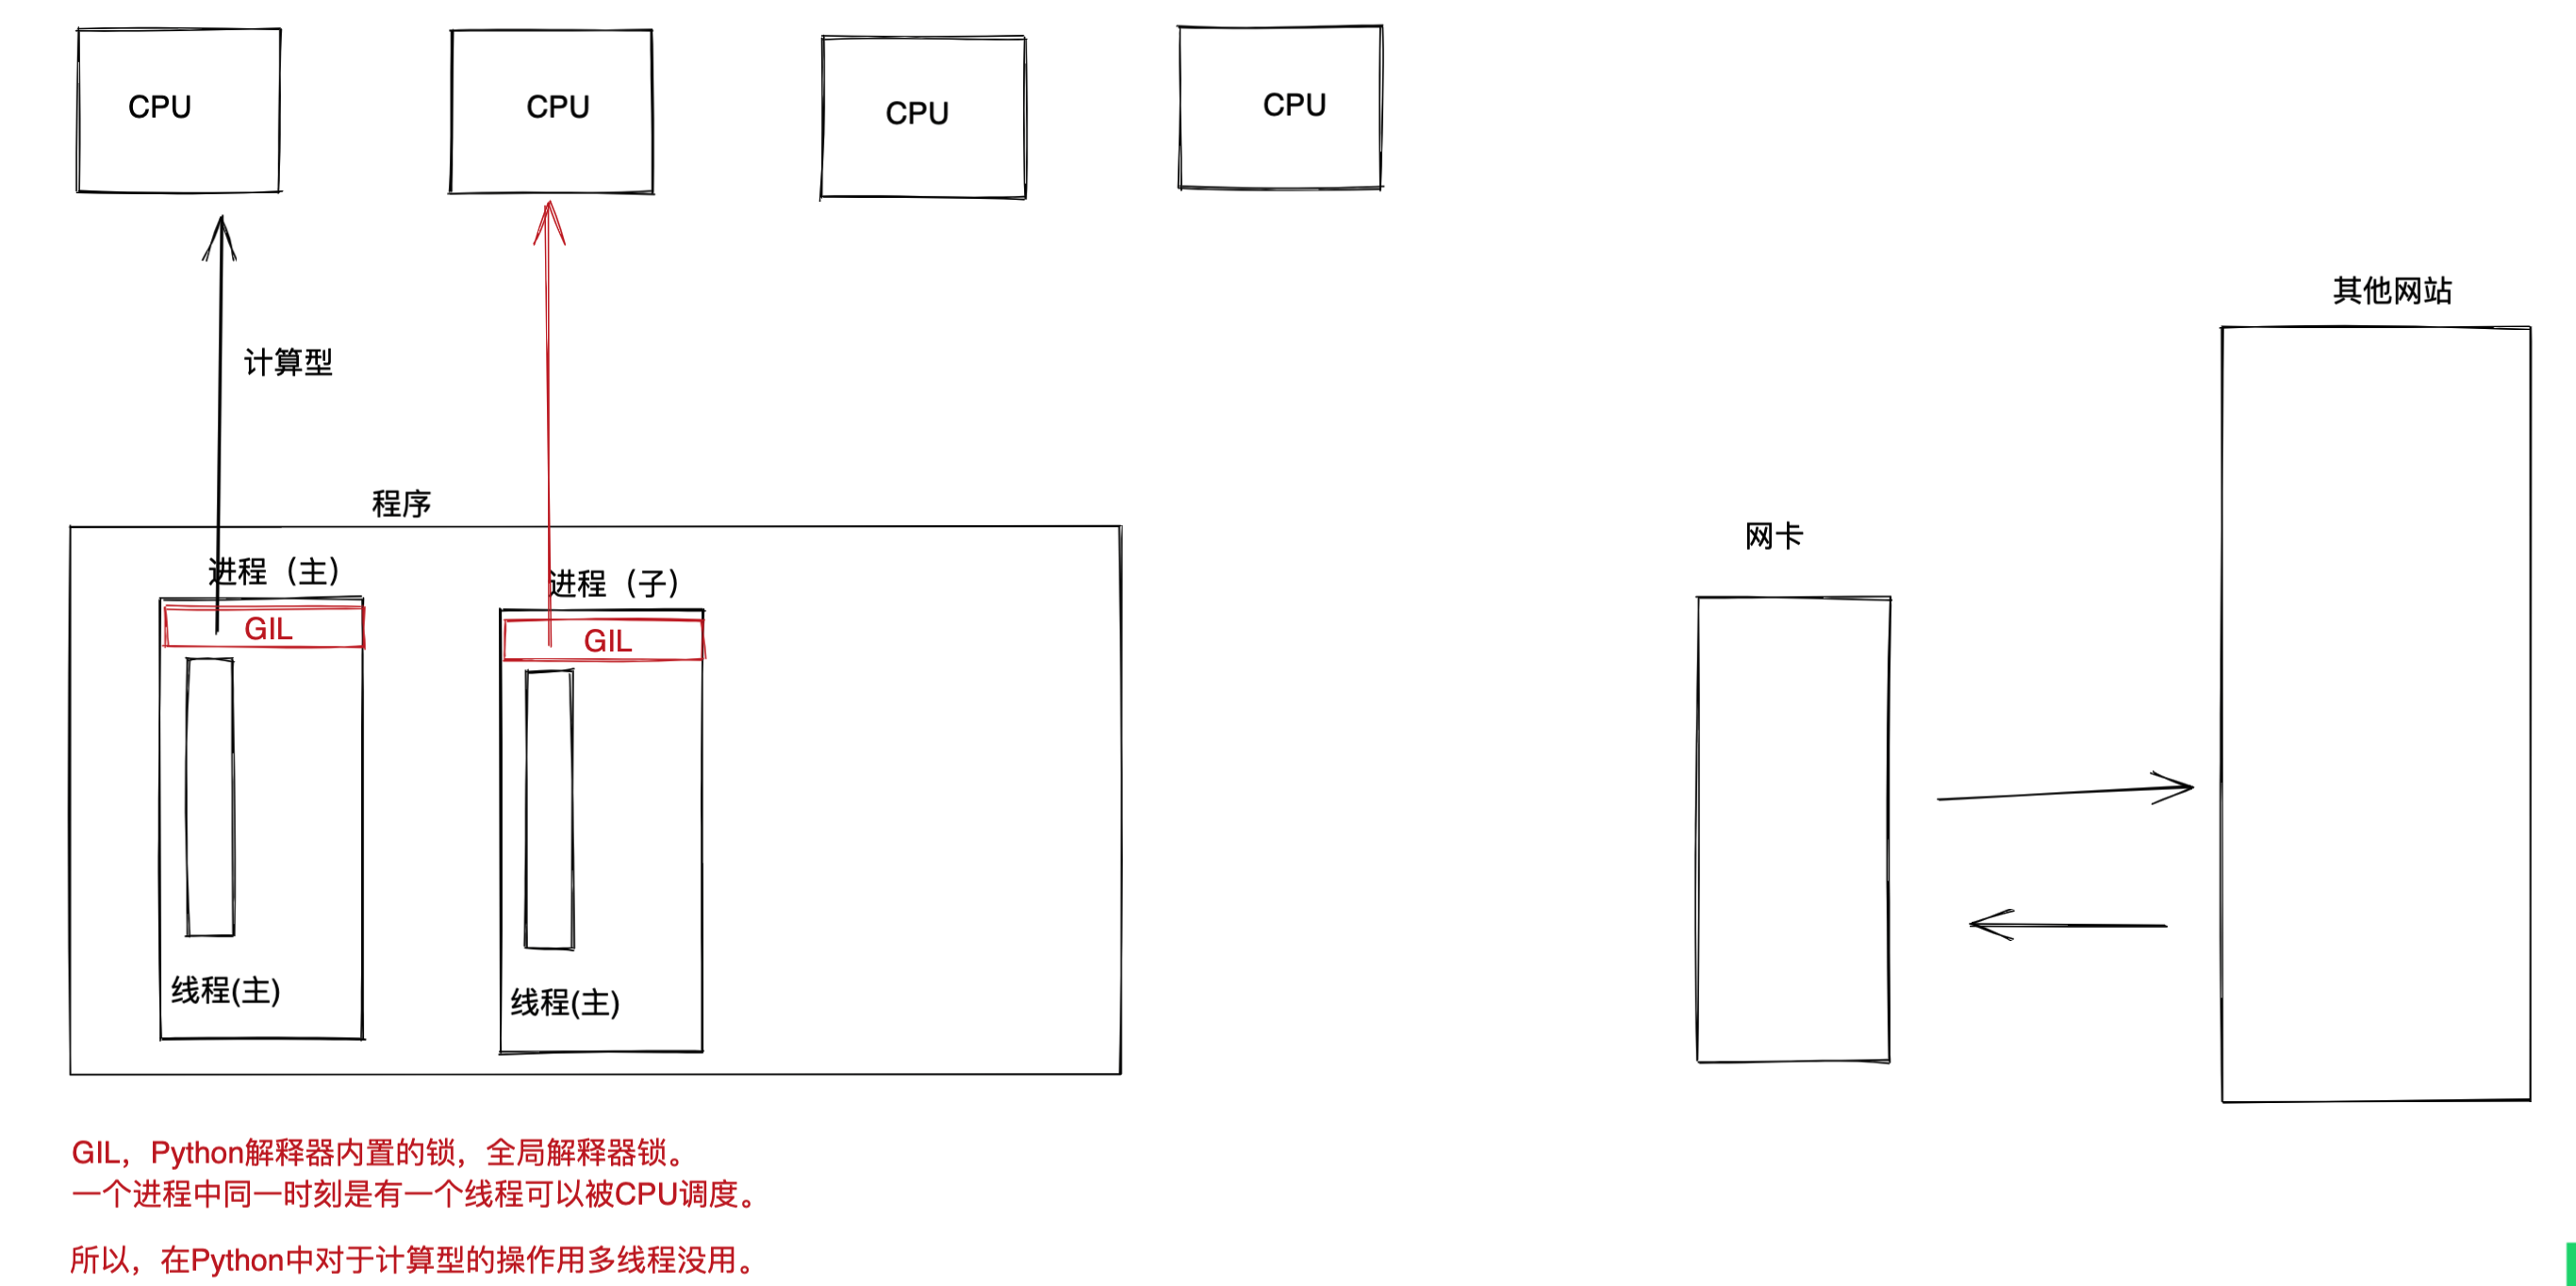
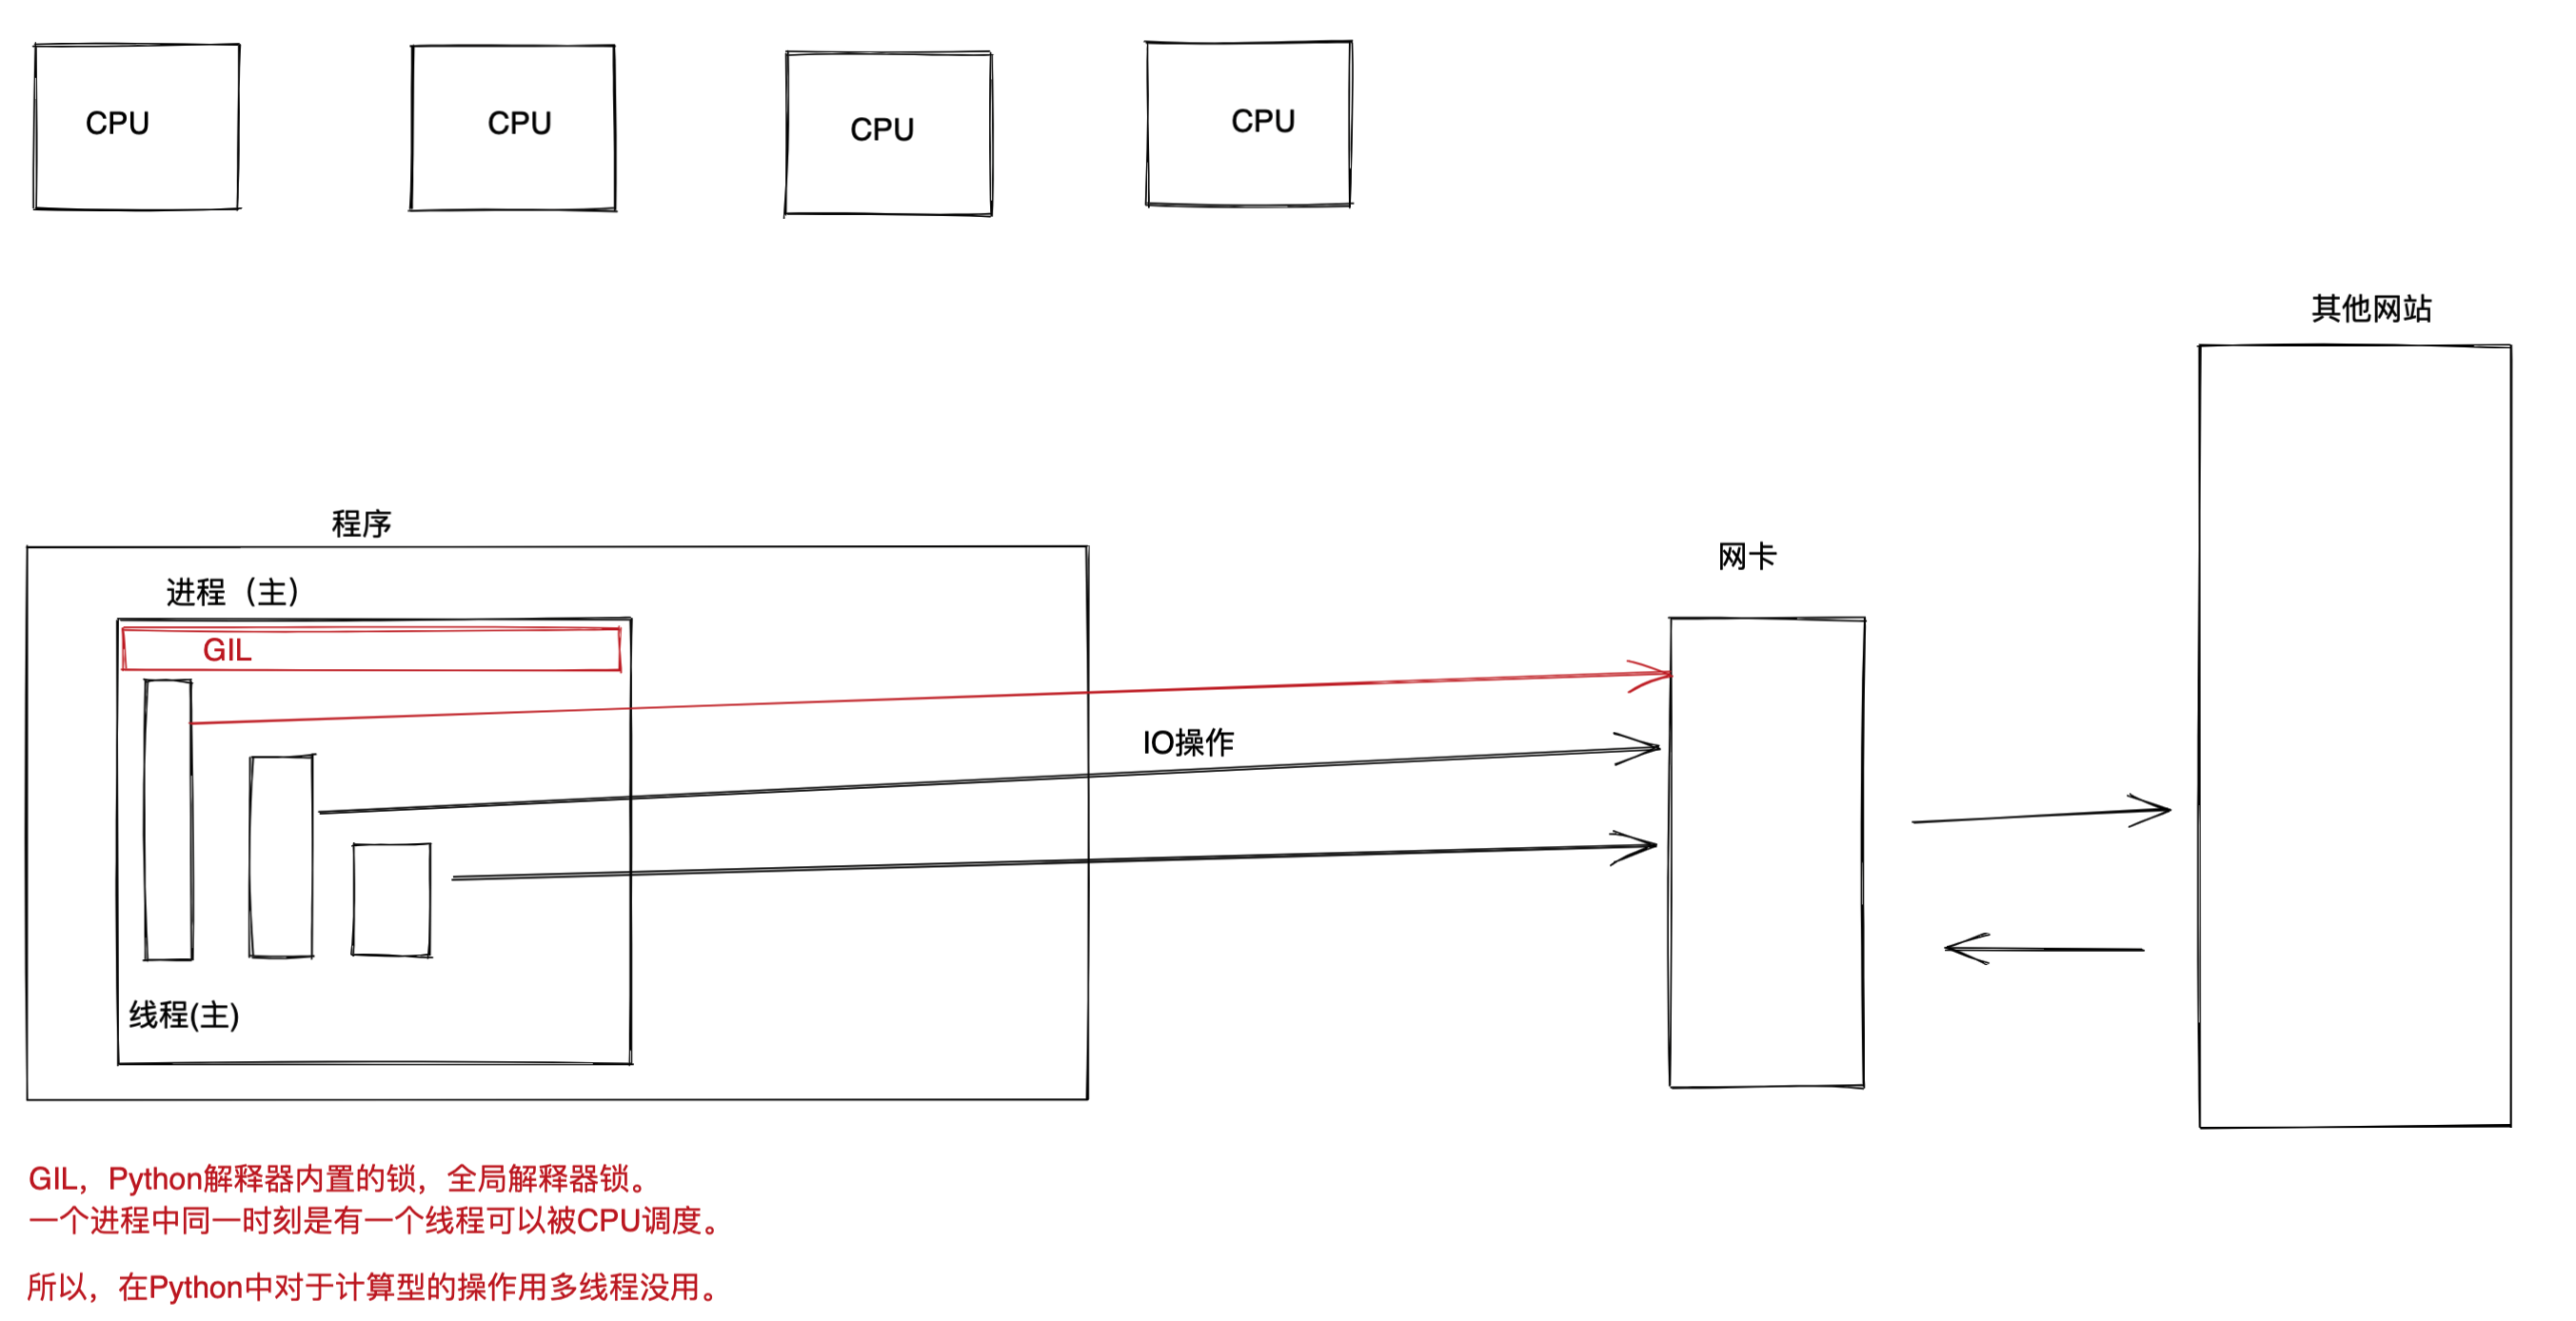
在Python开发中(全局解释器锁导致)。
- IO型的操作,用多线程提高并发。
- 计算型的操作,用多进程提高并发。
串行的代码:
import requests


def download(url):
    res = requests.get(url)
    print(res)


def run():
    url_list = [
        "https://space.bilibili.com/283478842",
        "https://www.luffycity.com/",
        "https://www.cnblogs.com/wupeiqi"
    ]

    for url in url_list:
        download(url)

    print("END")


if __name__ == '__main__':
    run()
多线程:
import time
import threading


def task(v1, v2):
    time.sleep(10)
    print("结束")

t = threading.Thread(target=task, args=(11, 22))
t.start()
import threading
import requests


def download(url):
    res = requests.get(url)
    print(res)


def run():
    url_list = [
        "https://space.bilibili.com/283478842",
        "https://www.luffycity.com/",
        "https://www.cnblogs.com/wupeiqi"
    ]

    for url in url_list:
        # download(url)
        t = threading.Thread(target=download, args=(url,))
        t.start()

    print("END")


if __name__ == '__main__':
    run()
多进程示例:
import multiprocessing


def task(v1):
    print("V1")


def run():
    print("开始")
    p = multiprocessing.Process(target=task, args=(1,))
    p.start()
    print("结束")


if __name__ == '__main__':
    run()
import multiprocessing
import requests


def download(url):
    res = requests.get(url)
    print(res)


def run():
    url_list = [
        "https://space.bilibili.com/283478842",
        "https://www.luffycity.com/",
        "https://www.cnblogs.com/wupeiqi"
    ]

    for url in url_list:
        # download(url)
        t = multiprocessing.Process(target=download, args=(url,))
        t.start()

    print("END")


if __name__ == '__main__':
    run()
4.2 线程
1. 创建多线程
2.线程共享和锁
同一个进程中的线程,是共享进程中的资源。
import threading

LK = threading.RLock()

DATA = 0


def task():
    # 9等待
    # 申请锁
    LK.acquire()
    global DATA
    DATA += 1
    # 释放锁
    LK.release()

for i in range(10):
    t = threading.Thread(target=task)
    t.start()
import threading

LK = threading.RLock()

DATA = 0


def task():
    # 申请锁
    with LK:
        global DATA
        DATA += 1
        # 释放锁


for i in range(10):
    t = threading.Thread(target=task)
    t.start()
3.线程池
如何使用线程池呢?
import time
from concurrent.futures import ThreadPoolExecutor

def task(v1):
    time.sleep(1)
    print(v1)


# 创建线程池,做多有10个线程
pool = ThreadPoolExecutor(10)

# 100任务丢给线程池
for i in range(100):
    pool.submit(task, i)

print(1)
pool.shutdown()
print(2)  # 执行完毕的动作
4.3 进程
1. 创建多进程
2. 进程的数据共享
进程之间数据是相互隔离。
import time
import multiprocessing

data = [11]


def task():
    data.append(123)


if __name__ == '__main__':
    p = multiprocessing.Process(target=task)
    p.start()
    time.sleep(2)

    print(data)  # [11,]
如果想要实现共享就需要利用特殊的东西:Queue、Manager、Array..
如果进程之间数据共享,势必会存在数据混乱,一定要加进程锁。
3.进程池
import time
from concurrent.futures import ThreadPoolExecutor, ProcessPoolExecutor


def task(v1):
    time.sleep(1)
    print(v1)


def run():
    # 创建线程池,做多有10个线程
    pool = ProcessPoolExecutor(10)

    # 100任务丢给线程池
    for i in range(100):
        pool.submit(task, i)

    print(1)
    pool.shutdown()
    print(2)  # 执行完毕的动作


if __name__ == '__main__':
    run()
获取结果:
import time
from concurrent.futures import ThreadPoolExecutor

data_result = []


def task(v1):
    time.sleep(1)
    print(v1)
    data_result.append("结果")


pool = ThreadPoolExecutor(10)

for i in range(100):
    pool.submit(task, i)

pool.shutdown()
import time
from concurrent.futures import ThreadPoolExecutor


def task(v1):
    time.sleep(1)
    return v1


pool = ThreadPoolExecutor(10)
fu_list = []
for i in range(100):
    future = pool.submit(task, i)
    fu_list.append(future)

pool.shutdown()
# 执行完毕之后,自行此处代码
for obj in fu_list:
    data = obj.result()
    print(data)
5.Flask框架
5.1 创建项目和虚拟环境
5.2 创建程序
from flask import Flask

app = Flask(__name__)


@app.route('/show')
def show():
    return "成功"


if __name__ == '__main__':
    app.run()
5.3 HTML & CSS
想要让用户浏览器看到我们定义的效果:
- HTML超文本标记语言,控制浏览器的显示。
- CSS,样式,对标签进行修饰,让他可以更加好看。
5.4 HTML
- a标签,行内
<a id='xx' xx="123">百度</a>
<a href="https://www.luffycity.com">路飞学城</a>
<a href="https://www.luffycity.com" target="_blank">路飞学城</a>
锚点,当前页面中显示那一部分数据。

<a href="#i1">第2张</a>
<a href="#i2">第3张</a>

<div style="height: 800px;background-color: pink">第1章</div>

<div id="i1" style="height: 800px;background-color: gold">第2章</div>

<div id="i2" style="height: 800px;background-color: black">第3章</div>
- img标签,行内标签
<img src="图片地址" />

-- 自己的图片
<img src="/static/xx.png" alt="xx" />

-- 其他图片(有时可以)
<img src="https://hcdn2.luffycity.com/media/frontend/public_class/PY1@2x_1566529821.1110113.png" />
- div,块级标签(自己独占一行)。
<div>
    <img src="/static/xx.png" alt="xx" />
    <img src="/static/xx.png" alt="xx" />
    <img src="/static/xx.png" alt="xx" />
</div>
<div>
    <div>
        <img src="/static/xx.png" alt="xx" />
      <img src="/static/xx.png" alt="xx" />
    </div>
    <img src="/static/xx.png" alt="xx" />
</div>
- span,行内标签(自己有多宽就占多宽)
5.5 样式
- 高度和宽度
-- 块级:生效
<div style="height: 100px;width: 200px;">宋琪瑞</div>

-- 行内:不生效
<span style="height: 100px;width: 200px;">宋琪瑞</span>
- 行内和块级标签
<span style="height: 100px;width: 200px;display: block;">宋琪瑞</span>
<div style="height: 100px;width: 200px; display: inline;">宋琪瑞</div>
<div style="height: 100px;width: 200px;display: inline-block;">宋琪瑞</div>
- 外边距 margin
<div style="background-color: gold;height: 50px;margin-bottom: 50px;margin-top: 20px;"></div>
<div style="background-color: red;height: 50px;margin-top: 20px;margin-left: 50px;"></div>
<div style="background-color: red;height: 50px;margin:10px 20px 9px 8px;"></div>
<div style="background-color: red;height: 50px;margin:10px 20px"></div>
居中:
<div style="height: 300px;width: 400px;background-color: burlywood;margin: 100px auto 0 auto;"></div>
框架居中:
<!DOCTYPE html>
<html lang="en">
<head>
    <meta charset="UTF-8">
    <title>标题</title>
</head>
<body>

<div style="background-color: white">
    <div style="margin: 0 auto;width: 980px">
        内容
    </div>
</div>

</body>
</html>
body标签默认外边距:
- 内边距,自己扩大,内部数据距离变宽就远了(脂肪厚了)
<div style="background-color: gold;height: 50px;"></div>
<div style="background-color: red;height: 50px;padding-top:20px;padding-left: 20px; ">
    5:30断点
</div>
- 浮动
<div>
    <span style="float: left;">左边</span>
    <span style="float: right;">右边</span>
</div>

如果用了浮动,就会脱离文档流。
<div style="background-color: red;">
    <span style="float: left;">左边</span>
    <span style="float: right;">右边</span>
    <div style="clear: both;"></div>
</div>
<div>你好呀</div>
案例:小猿圈
<!DOCTYPE html>
<html lang="en">
<head>
    <meta charset="UTF-8">
    <title>标题</title>
</head>
<body style="margin: 0">

<div style="background-color: white;">
    <div style="width: 1190px;margin: 0 auto;line-height: 68px;">
        <div style="float: left;">Logo</div>

        <div style="float: left;margin-left: 200px">
            <a style="padding: 0 10px;" href="#">Python</a>
            <a style="padding: 0 10px;" href="#">Linux云计算</a>
            <a style="padding: 0 10px;" href="#">Java</a>
        </div>

        <div style="float: right;">
            <a href="#">登录</a>
        </div>

        <div style="clear: both"></div>
    </div>
</div>

<div style="background-color: #edecec">
    <div style="margin: 0 auto;width: 1190px;padding-top: 20px;">

        <!--
        <div>
            <img src="/static/hd.png" alt="" style="width: 1190px">
        </div>
        -->
        <div style="width: 1190px;">
            <img src="/static/hd.png" alt="" style="width: 100%">
        </div>

        <div style="background-color: white;height: 800px;margin-top: 10px;padding: 20px 10px;">

            <div style="font-size: 20px;font-weight: bold;border-bottom: 2px solid #ddd;padding: 5px 0;">Python</div>
            <div>
                <div style="width: 373.33px;height: 90px;background-color: #dfdfdf;float: left;margin-right: 10px;margin-top: 10px;padding: 5px;">
                    <div style="float: left;margin-top: 30px;">图片</div>
                    <div style="float:left;margin-top: 30px;width: 300px">
                        <div>
                            Python开发入门
                            <div style="float: right;">1999在学</div>
                        </div>
                        <div>零基础2周搞定Python开发</div>
                    </div>
                    <div style="clear: both;"></div>
                </div>
                <div style="width: 383.33px;height: 100px;background-color: #dfdfdf;float: left;margin-right: 10px;margin-top: 10px;">asd</div>
                <div style="width: 383.33px;height: 100px;background-color: #dfdfdf;float: left;margin-top: 10px;">asd</div>

                <div style="width: 383.33px;height: 100px;background-color: #dfdfdf;float: left;margin-right: 10px;margin-top: 10px;">asd</div>
                <div style="width: 383.33px;height: 100px;background-color: #dfdfdf;float: left;margin-right: 10px;margin-top: 10px;">asd</div>
                <div style="width: 383.33px;height: 100px;background-color: #dfdfdf;float: left;margin-top: 10px;">asd</div>

                <div style="clear: both;"></div>
            </div>
        </div>
    </div>
</div>
</body>
</html>