day05 面向对象
加强班,实战 & 源码。
今日概要:知识点 & 源码
- 接口 & 抽象 & 异常
- 数据封装,打包。
- 数据
线程隔离 - 栈 &
线程隔离 - 偏函数 和 代理(面向对象)
- Web框架Flask(上下文管理机制)
- 元类(wtform & django admin)
- 简单用面向对象去实现一些业务。【录播课目标】
- 用框架去实现。【别致的用户】
- 探究源码。【元类】
1. 接口 & 抽象 & 异常
1.1 接口(Python不支持)
接口,给我一个URL,让我通过URL可以访问你的平台(第三方的API)。
接口,面向对象中的数据类型(Python中没有 ,Java & C# )。
其他语言中接口的作用。
# 定义了一个接口,接口名字 IMessage;接口中定义了 f1 和 f2方法。
# 注意:接口中定义的方法不能用具体的代码实现。
interface IMessage(object):

    def f1(self):
        pass

    def f2(self):
        pass
意义何在?
- 约束,如果某个类继承(实现)了接口,那么再找个类中必须去定义接口中的f1和f2方法。
- 泛型,泛指多个类型(“继承”了他的类型)。实现
interface IMessage(object):
    def f1(self):
        pass

    def f2(self):
        pass

class Wechat(IMessage):
    def f1(self):
        print('666')

    def f2(self):
        print('999')

class Email(IMessage):
    def f1(self):
        print('111')

    def f2(self):
        print('222')


def func(IMessage a1):
    pass


obj1 = Wechat()
func(obj1)


obj2 = Email()
func(obj2)
1.2 抽象类和抽象方法
1. Java中的逻辑
# 定义了一个接口,接口名字 IMessage;接口中定义了 f1 和 f2方法。
# 注意:接口中定义的方法不能用具体的代码实现。
interface IMessage(object):

    def f1(self):
        pass

    def f2(self):
        pass


class Foo1(IMessage):
    pass

class Foo2(IMessage):
    pass
# 定了一个抽象类 abstract【接口 + 继承】
class abstract Message(object):

    # 在抽象类中定义抽象方法
    def abstract f1(self):
        pass

    # 在抽象类中定义抽象方法
    def abstract f2(self):
        pass

    def f3(self):
        print("公共功能")


class Foo1(Message):

    def f1(self):
        print("具体的功能 ")

    def f2(self):
        print("具体的功能 ")

obj = Foo1()
obj.f1()
obj.f2()
obj.f3()
2. Python实现
import abc


# 定义了一个抽象类
class Base(object, metaclass=abc.ABCMeta):

    @abc.abstractmethod
    def do(self):
        """ 抽象方法 """
        pass

    def func(self):
        """ 绑定方法 """
        print(123)


# 不合法,在python中运行不报错 (Java中定义时就报错)。
class Foo(Base):

    def do(self):
        print(123)


# TypeError: Can't instantiate abstract class Foo with abstract method do
obj = Foo()
obj.do()
obj.func()
在Python中2中也支持。
import abc


# 定义了一个抽象类
class Base(object):
    __metaclass__ = abc.ABCMeta

    @abc.abstractmethod
    def do(self):
        """ 抽象方法 """
        pass

    def func(self):
        print(123)
想象,让大家去实现发送短信/微信/邮件的功能。
import abc


class Message(object, metaclass=abc.ABCMeta):
    """ 以后让所有发送消息的类,都继承Message """

    @abc.abstractmethod
    def send(self):
        """ 发送消息 """
        pass


class WechatMessage(Message):
    def send(self):
        print("发送微信")


class DingDingMessage(Message):
    def send(self):
        print("发送钉钉")


class EmailMessage(Message):
    def send(self):
        print("发送邮件")
优点:统一规范。
Python开发过程中很少用 抽象类+抽象方法 的方式做上述统一规范的事。
1.3 异常处理
class Message(object):
    """ 以后让所有发送消息的类,都继承Message """

    def send(self):
        """ 发送消息 """
        # 抛出异常
        raise NotImplementedError()


class WechatMessage(Message):
    def send(self):
        print("发送微信")


class DingDingMessage(Message):
    def send(self):
        print("发送钉钉")


obj = DingDingMessage()
obj.send()
实战案例
- 手写案例
- 反射实现工厂模式
- 异常做了约束
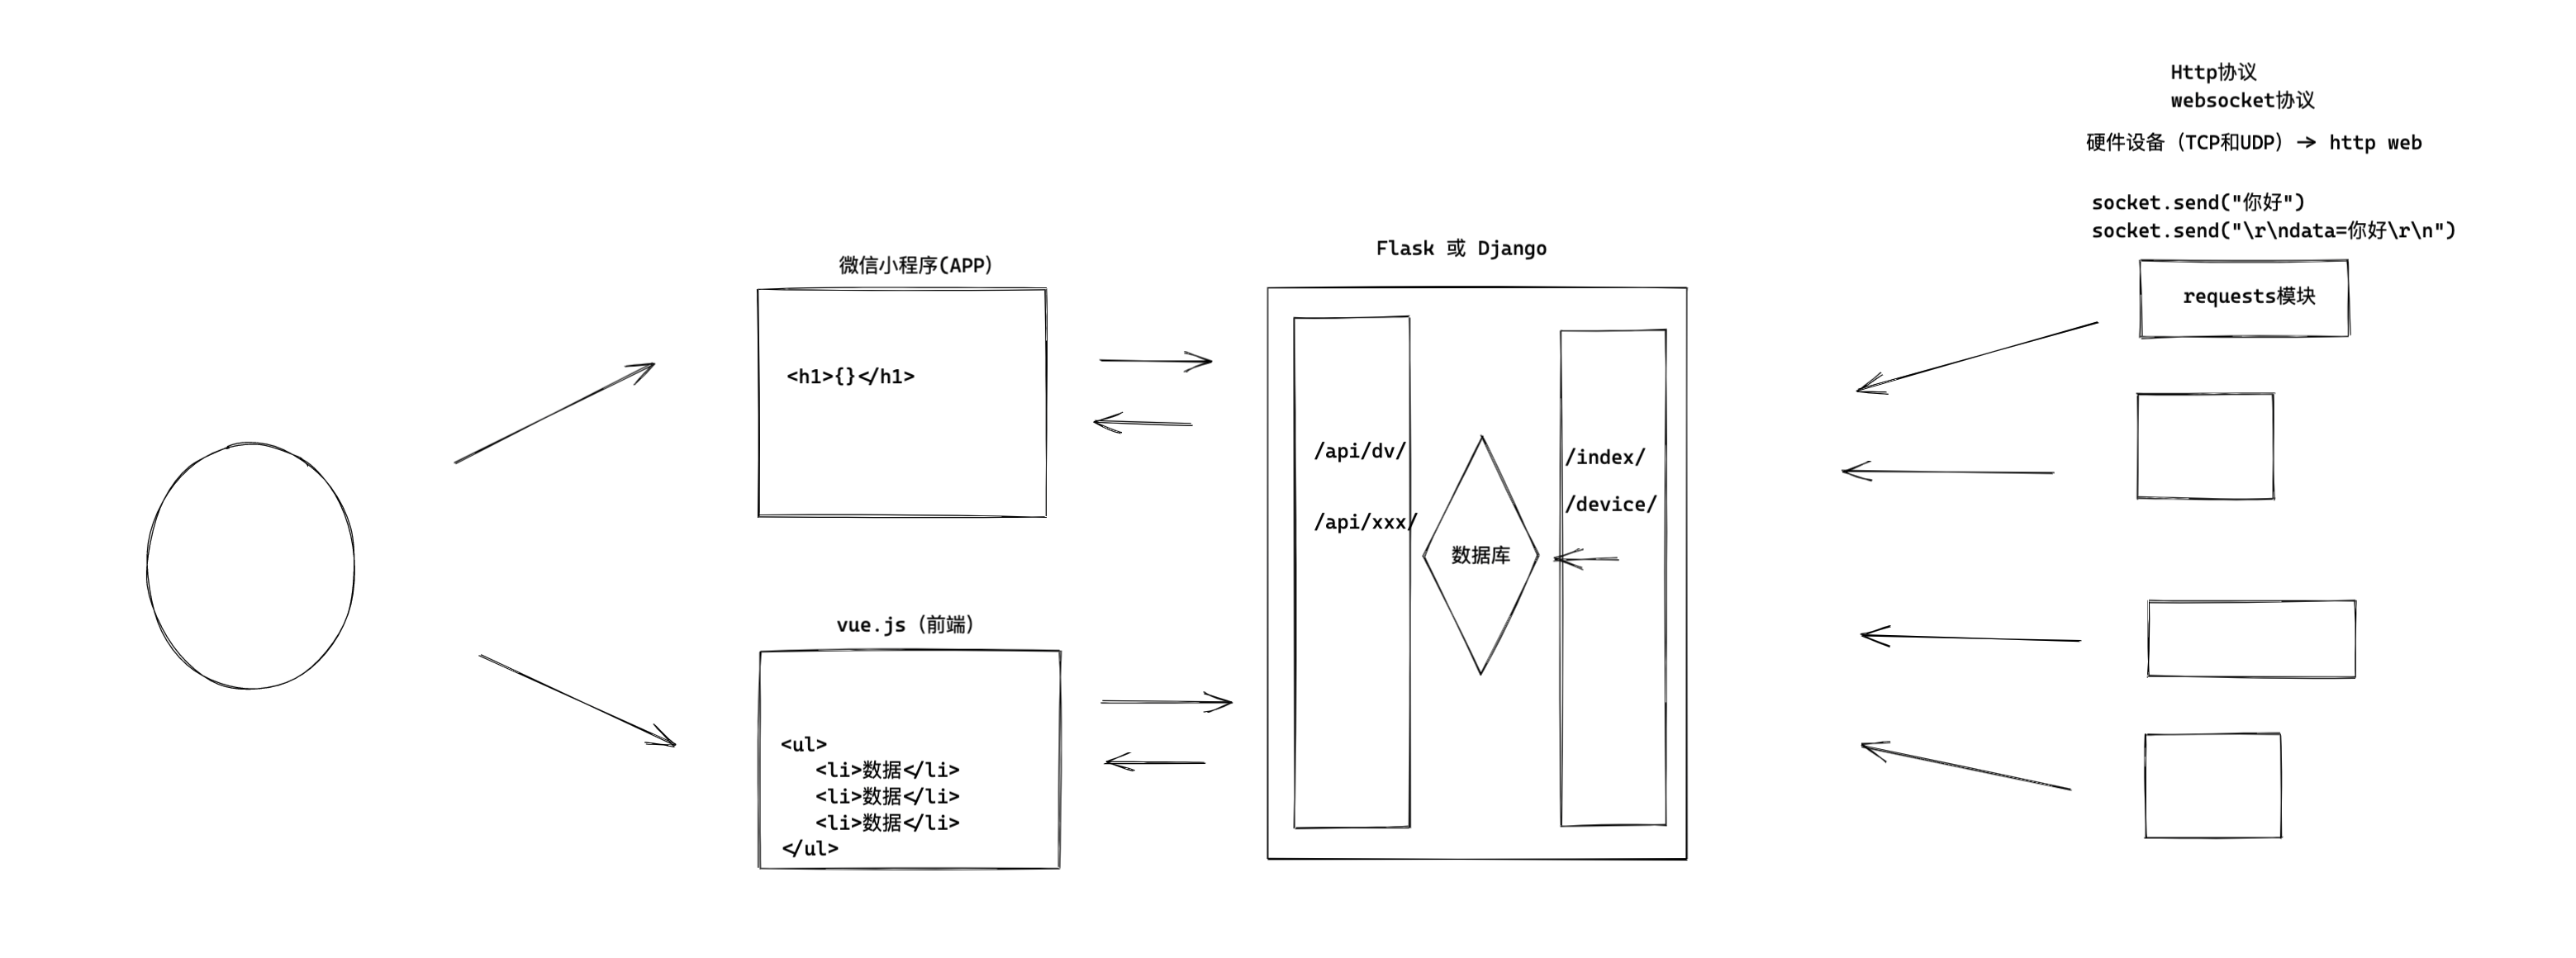
- 实战案例(CMDB资产管理)
- 源码内部
class BaseThrottle:
    """
    Rate throttling of requests.
    """

    def allow_request(self, request, view):
        """
        Return `True` if the request should be allowed, `False` otherwise.
        """
        raise NotImplementedError('.allow_request() must be overridden')

    def get_ident(self, request):
        """
        Identify the machine making the request by parsing HTTP_X_FORWARDED_FOR
        if present and number of proxies is > 0. If not use all of
        HTTP_X_FORWARDED_FOR if it is available, if not use REMOTE_ADDR.
        """
        xff = request.META.get('HTTP_X_FORWARDED_FOR')
        remote_addr = request.META.get('REMOTE_ADDR')
        num_proxies = api_settings.NUM_PROXIES

        if num_proxies is not None:
            if num_proxies == 0 or xff is None:
                return remote_addr
            addrs = xff.split(',')
            client_addr = addrs[-min(num_proxies, len(addrs))]
            return client_addr.strip()

        return ''.join(xff.split()) if xff else remote_addr

    def wait(self):
        """
        Optionally, return a recommended number of seconds to wait before
        the next request.
        """
        return None
用户访问频率限制。
class MyThrottle(BaseThrottle):

    def allow_request(self, request, view):
        # 用户IP进行评率限制, 89.98
        # 注册用户,          用户名

        ip = self.get_ident() # 获取用户IP
2. 数据封装
def do():
    """ 下载图片,可能失败,也可能成功。如果失败,返回错误信息;如果成功,则返回保存到本地的路径"""
    info = {"status":None, "message":"", "data":None}
    pass # 代码具体的实现逻辑
    return info


def run():
    ret = do()
    # {"status":None, "message":"", "data":None}
    if ret['status']:
        pass
    else:
        pass

if __name__ == '__main__':
    run()
class Response(object):
    def __init__(self, status=False, error=None, data=None):
        """
        封装响应数据
        :param status: 状态
        :param error: 错误信息
        :param data: 数据
        """
        self.status = status
        self.error = error
        self.data = data

    @property
    def dict(self):
        return self.__dict__


def do():
    """ 下载图片,可能失败,也可能成功。如果失败,返回错误信息;如果成功,则返回保存到本地的路径"""
    info = Response()
    try:
        info.status = True
        info.data = [11, 22, 33]
    except Exception as e:
        info.error = str(e)
    return info


def run():
    ret = do()  # 对象类型
    print(ret.status)
    print(ret.data)

    print(ret.dict)  # 字典


if __name__ == '__main__':
    run()
3. 数据隔离

import time
import threading


class Foo(object):
    pass

obj = Foo()  # 内存 {num:10}


# 函数=任务
def task(index):
    obj.num = index
    time.sleep(2)  # 线程1停住;线程2停住;.... 线程10

    message = "当前线程是{},内部读取num等于{}".format(index, obj.num)  # 10
    print(message)


# 创建了10个线程(类似于创建了10个人,每个人都执行一次task任务)
for i in range(1, 11):  # 1、2、3、4、5..10
    t = threading.Thread(target=task, args=(i,))
    t.start()
threding.local对象,让线程之间进行数据隔离。
import time
import threading

"""
{
    1190:{num:1},
    1888:{num:2}
    ...
    9000:{num:10}
}
"""
obj = threading.local()  # 为线程进行隔离。


# 函数=任务
def task(index):
    obj.num = index  # 在内部读取线程ID
    time.sleep(2)  # 线程1停住;线程2停住;.... 线程10

    message = "当前线程是{},内部读取num等于{}".format(index, obj.num)  # 1
    print(message)


# 创建了10个线程(类似于创建了10个人,每个人都执行一次task任务)
for i in range(1, 11):  # 1、2、3、4、5..10
    t = threading.Thread(target=task, args=(i,))
    t.start()
在Python中 threading.local 对象可以自动帮助我们实现为每个线程独立维护空间,让自己当前线程对空间进行存取数据。
threading.local 的内部实现机制:
import threading
import time

storage = {}


class Local(object):

    def __setattr__(self, key, value):
        ident = threading.get_ident()  # 获取当前线程ID
        if ident in storage:
            storage[ident][key] = value
        else:
            storage[ident] = {key: value}

    def __getattr__(self, item):
        ident = threading.get_ident()  # 获取当前线程ID
        return storage[ident][item]


local = Local()


# 函数=任务
def task(index):
    local.num = index  # 调用 Local.__setattr__
    print(storage)
    time.sleep(2)
    print(local.num)  # 调用 Local.__getattr__


# 创建了10个线程(类似于创建了10个人,每个人都执行一次task任务)
for i in range(1, 11):  # 1、2、3、4、5..10
    t = threading.Thread(target=task, args=(i,))
    t.start()
意义:
-
熟悉语法,
__setattr____getattr__ -
升级版
-
threading.local,线程进行隔离。
-
自定义模式,更多细粒度级别的隔离。
import threading
import time

try:
    from greenlet import getcurrent as get_ident   # 协程ID
except ImportError:
    from threading import get_ident                # 线程ID


storage = {}


class Local(object):

    def __setattr__(self, key, value):
        ident = get_ident()  # 获取当前线程ID
        if ident in storage:
            storage[ident][key] = value
        else:
            storage[ident] = {key: value}

    def __getattr__(self, item):
        ident = get_ident()  # 获取当前线程ID
        return storage[ident][item]


local = Local()


# 函数=任务
def task(index):
    local.num = index  # 调用 Local.__setattr__
    print(storage)
    time.sleep(2)
    print(local.num)  # 调用 Local.__getattr__


# 创建了10个线程(类似于创建了10个人,每个人都执行一次task任务)
for i in range(1, 11):  # 1、2、3、4、5..10
    t = threading.Thread(target=task, args=(i,))
    t.start()
提前注意:在Flask源码中存储 上下文对象时 用的就是自定义 threading.local(Flask支持协程级别的数据隔离)。
应用场景
- 数据库连接 DBUtils
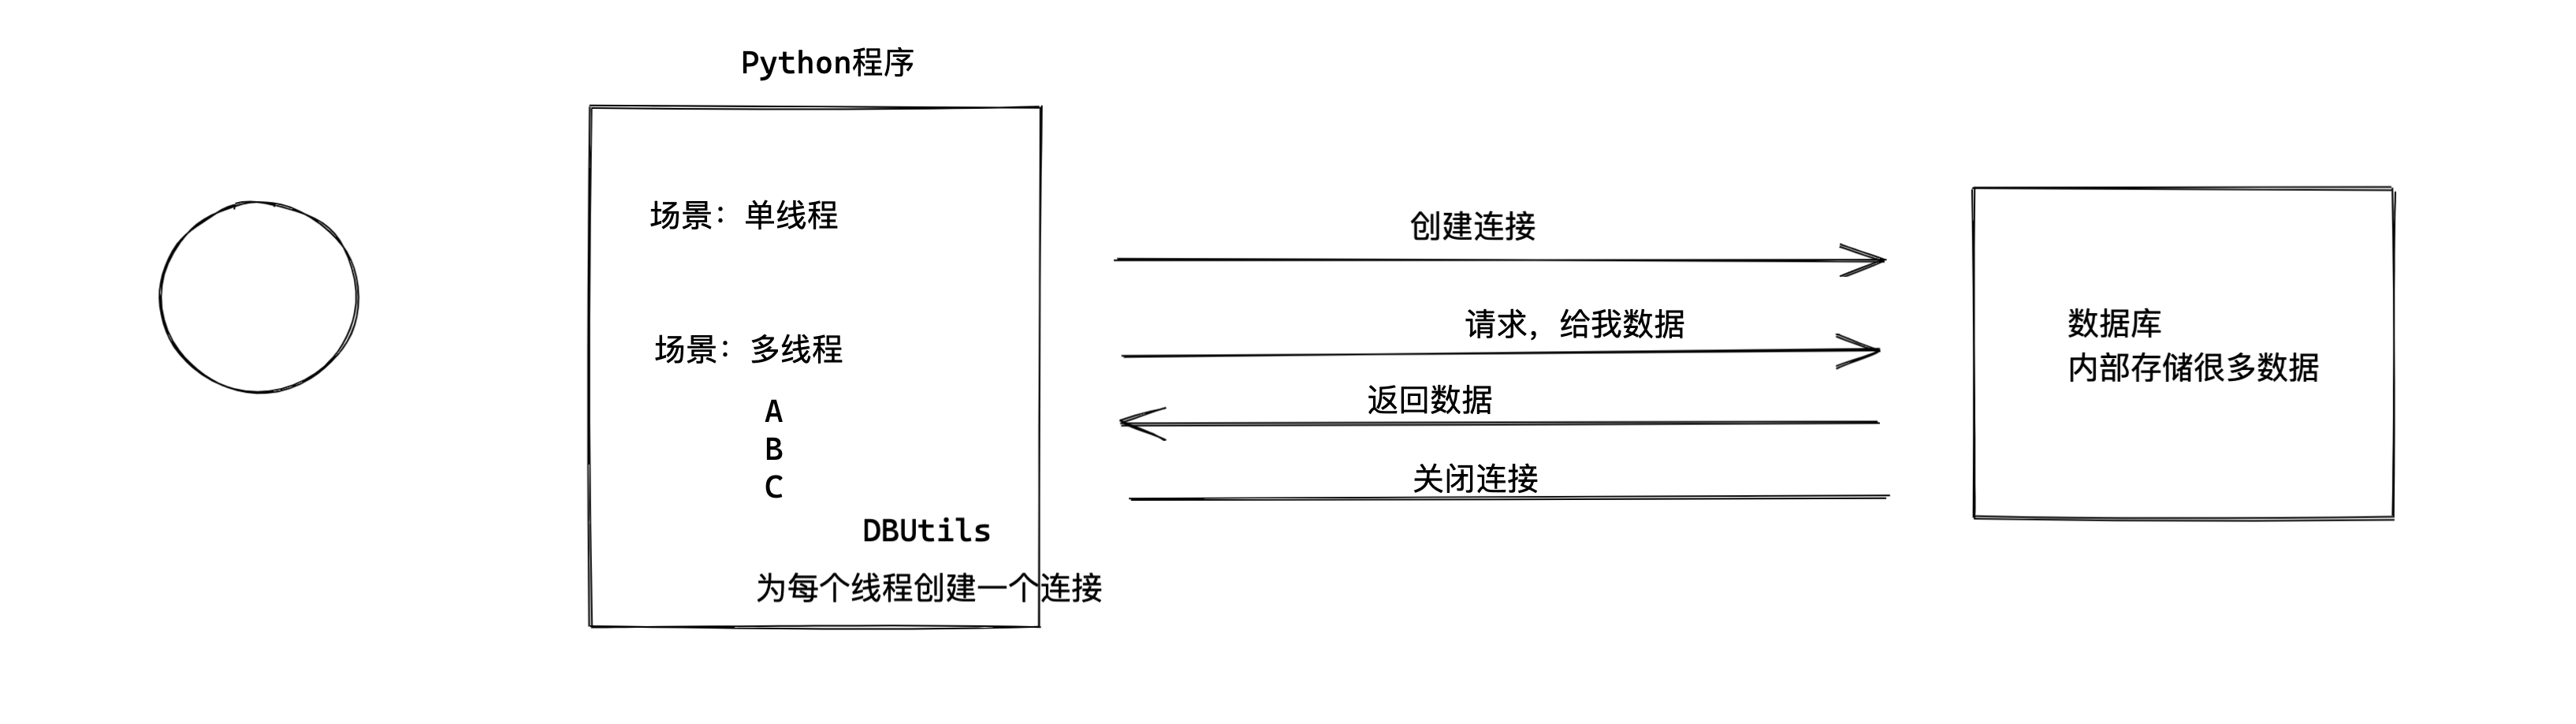
import threading

POOL = PersistentDB(
    threadlocal=None,  # 本线程独享值得对象,用于保存链接对象,如果链接对象被重置
    host='127.0.0.1',
    port=3306,
    user='root',
    password='123',
    database='pooldb',
    charset='utf8'
)

def task():
    # 去DBUtils中获取一个连接,读取线程ID,为你创建连接并保存。
    conn = POOL.conn()
    conn.send('xxxxx')
    conn.get()


def run():
    for i in range(3):
        t = threading.Thread(target=task)
        t.start()


if __name__ == '__main__':
    pass
- Flask上下文管理机制(flask、sanic; django另外一种机制)
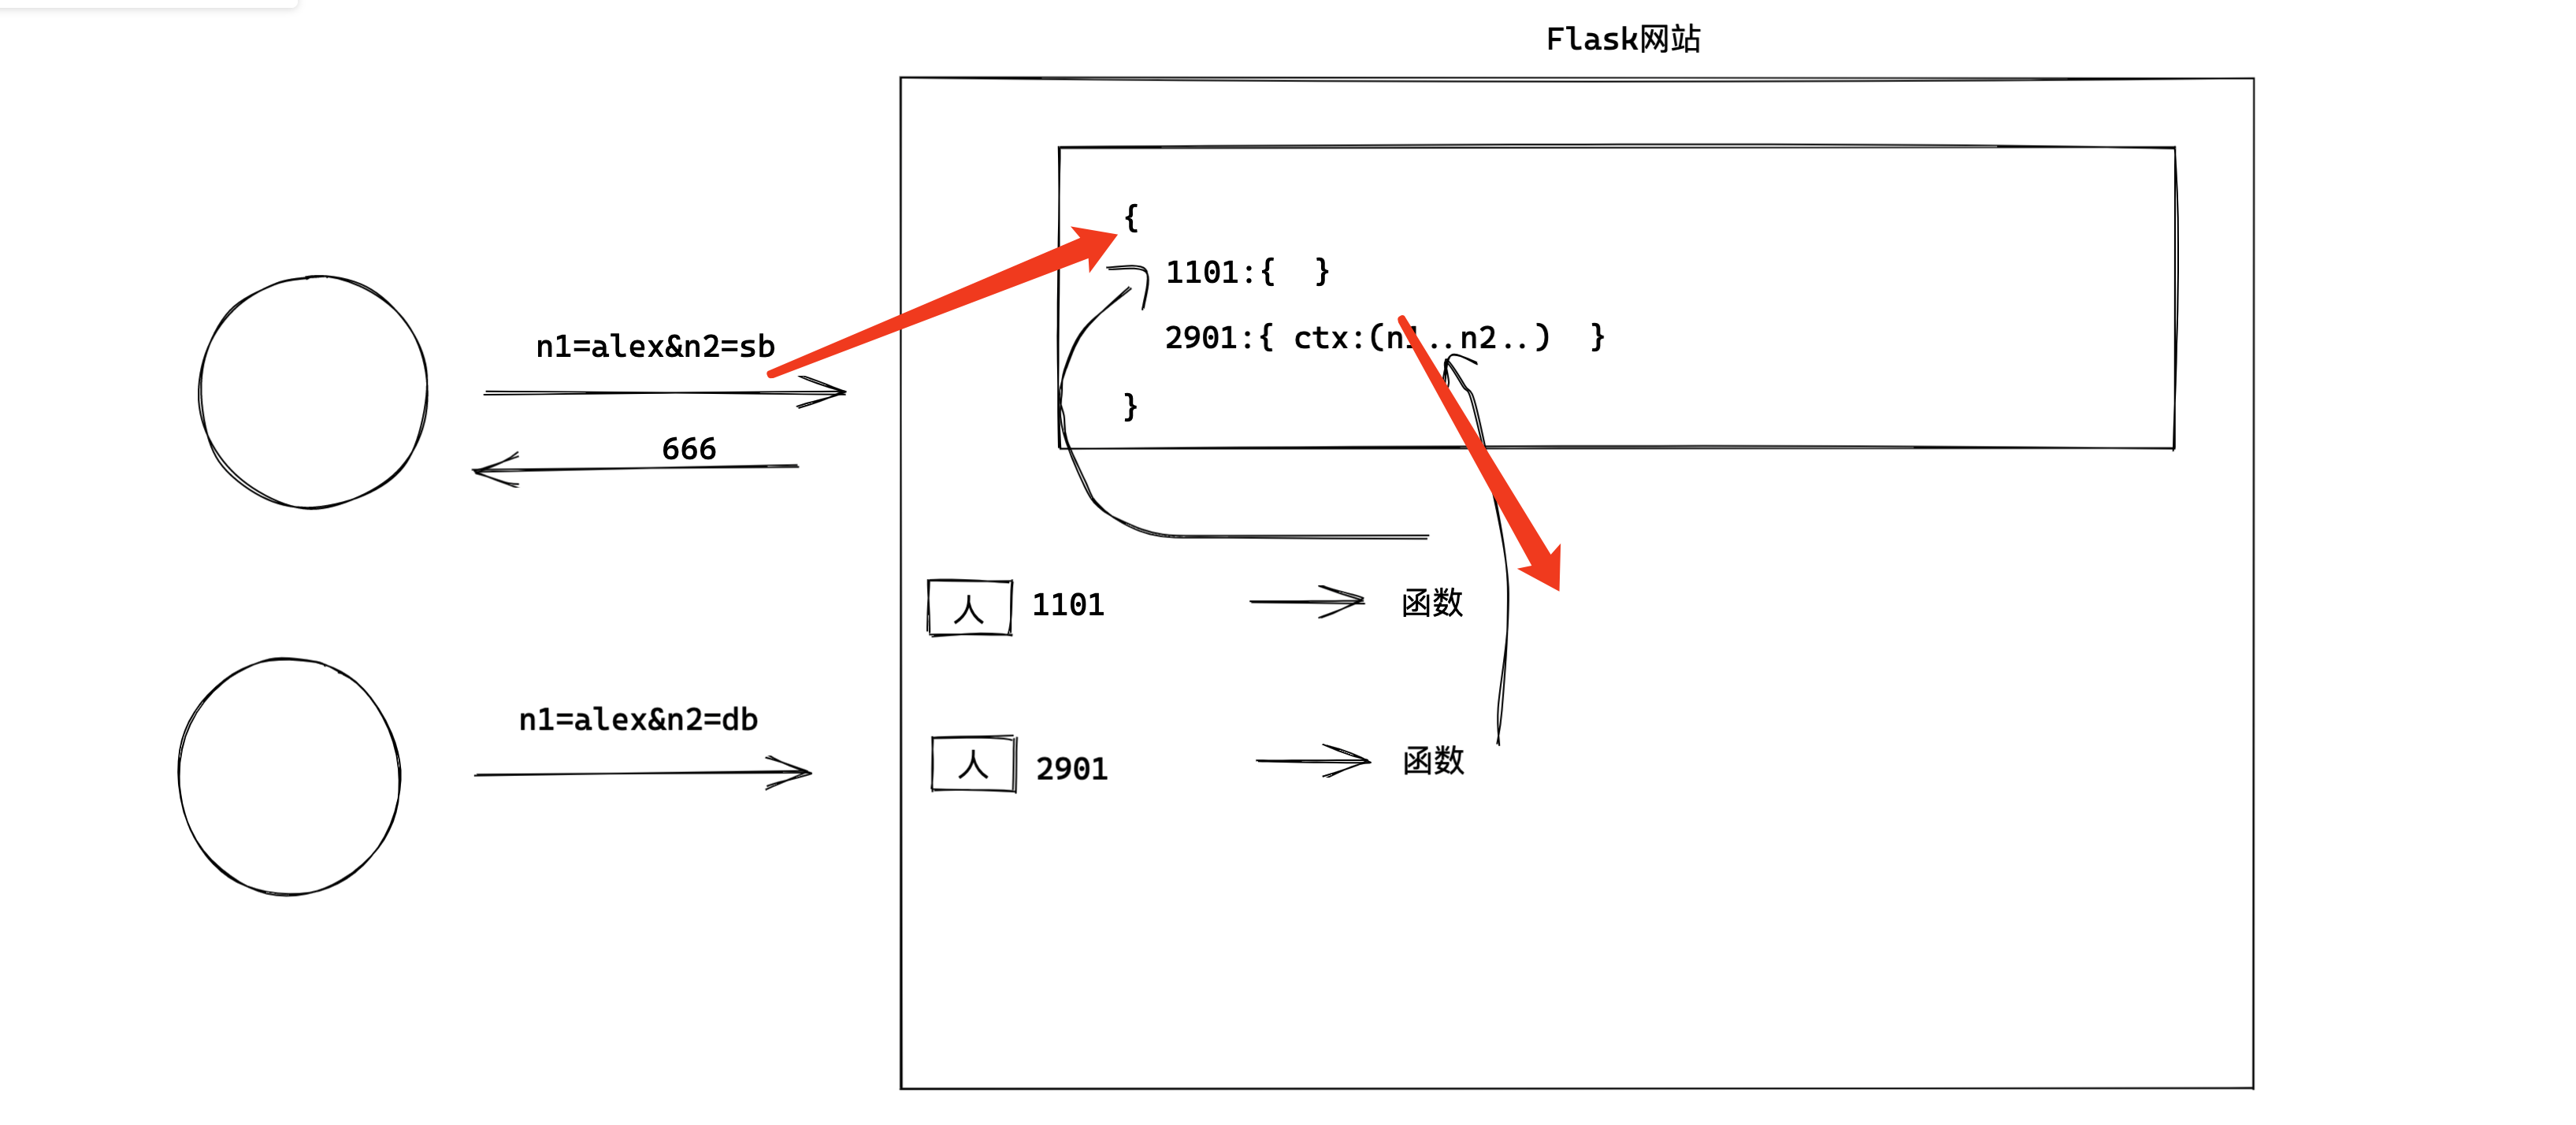
from flask import Flask, request

app = Flask(__name__)


@app.route("/")
def index():
    # 用来获取 URL中传递的参数值,例如:http://127.0.0.1:5000/?name=123&age=123
    print(request.args)
    return "首页"


if __name__ == '__main__':
    app.run()
4.Flask源码 “数据隔离”
import threading


class Local(object):

    def __init__(self):
        object.__setattr__(self, 'storage', {})  # self对象中存储 storage={}

    def __setattr__(self, key, value):
        ident = threading.get_ident()  # 获取当前线程ID
        # self.storage 是否 Local.__getattr__ or object.__getattr__ ?
        # self.storage   --> 执行 object.__getattr__ 直接去取值了。
        if ident in self.storage:
            self.storage[ident][key] = value
        else:
            self.storage[ident] = {key: value}

    def __getattr__(self, item):
        ident = threading.get_ident()  # 获取当前线程ID
        return self.storage[ident][item]


local = Local()
local.x1 = 123  # Local.__setattr__
print(local.x1)
class Foo(object):
    # 当前类的对象,只能初始化 x1、x2 变量(object的__setattr__设置值的约束)
    __slots__ = ("x1", "x2",)

obj = Foo()
obj.x1 = 123
obj.x10 = 890
class Foo(object):
    # 当前类的对象,只能初始化 x1、x2 变量(object的__setattr__设置值的约束)
    __slots__ = ("x1", "x2",)

    def __init__(self):
        # self.x1 = 123
        # self.x2 = 456
        object.__setattr__(self, 'x1', 123)
        object.__setattr__(self, 'x2', 456)

    def __setattr__(self, key, value):
        print(key, value)

obj = Foo()
obj.xxxxx = 123
在Flask源码中实现的数据隔离:
try:
    from greenlet import getcurrent as get_ident
except ImportError:
    try:
        from thread import get_ident
    except ImportError:
        from _thread import get_ident


class Local(object):
    __slots__ = ("__storage__", "__ident_func__") # object去创建变量时,约束。

    def __init__(self):
        object.__setattr__(self, "__storage__", {})              # self.__storage__ = {}
        object.__setattr__(self, "__ident_func__", get_ident)    # self.__ident_func__ = get_ident

    def __iter__(self):
        """
        __storage__= {
            1111:{"x1":123},
            222:{"x1":123}
        }
        """
        return iter(self.__storage__.items())

    def __getattr__(self, name):
        # name = "x1"
        try:
            #
            return self.__storage__[self.__ident_func__()][name]
        except KeyError:
            raise AttributeError(name)

    def __setattr__(self, name, value):
        # name="x1"
        # value = 123
        ident = self.__ident_func__() # 线程/协程ID
        storage = self.__storage__    # { 111:{x1:123} }
        try:
            storage[ident][name] = value
        except KeyError:
            storage[ident] = {name: value}

    def __delattr__(self, name):
        try:
            del self.__storage__[self.__ident_func__()][name]
        except KeyError:
            raise AttributeError(name)


obj = Local()
obj.x1 = 123
obj.x1
del obj.x1

"""
__storage__= {
    1111:{"x1":123},
    222:{"x1":123}
}
"""
for ident,dic in obj:
    pass
5.栈 & 数据隔离
5.1 栈
栈,后进先出的结构。
"""
弹夹
"""

class Stack(object):

    def __init__(self):
        self.data = []

    def push(self, item):
        """ 在栈中压入一个数据 """
        self.data.append(item)

    def pop(self):
        """ 从栈中弹出一个数据 """
        return self.data.pop(-1)

    def top(self):
        """ 取栈顶的数据 """
        return self.data[-1]


obj = Stack()


obj.push(11)
obj.push(22)
obj.push(33)

v1 = obj.pop()  # 33
v2 = obj.pop()  # 22
v3 = obj.pop()  # 11
5.1 栈+数据隔离
请实现一个更NB的栈,即:每个线程有自己的栈。
try:
    from greenlet import getcurrent as get_ident
except ImportError:
    try:
        from thread import get_ident
    except ImportError:
        from _thread import get_ident


class Local(object):
    __slots__ = ("__storage__", "__ident_func__")  # object去创建变量时,约束。

    def __init__(self):
        object.__setattr__(self, "__storage__", {})  # self.__storage__ = {}
        object.__setattr__(self, "__ident_func__", get_ident)  # self.__ident_func__ = get_ident

    def __iter__(self):
        return iter(self.__storage__.items())

    def __getattr__(self, name):
        try:
            return self.__storage__[self.__ident_func__()][name]
        except KeyError:
            raise AttributeError(name)

    def __setattr__(self, name, value):
        # key=stack,value=[]
        ident = self.__ident_func__()  # 线程/协程ID
        storage = self.__storage__
        try:
            storage[ident][name] = value
        except KeyError:
            storage[ident] = {name: value}

    def __delattr__(self, name):
        try:
            del self.__storage__[self.__ident_func__()][name]
        except KeyError:
            raise AttributeError(name)

"""
# 目的:栈(后进先出)


__storage__ = {
    1111:{ 0:123,1:456,2:999,3:666 },
    1111:{ stack:[11,22,33,44,55] }
}
"""

class Stack(object):

    def __init__(self):
        self.local = Local()

    def push(self, item):
        """ 在栈中压入一个数据 """
        # self.local.stack ,如果有对应值返回,如果没有就返回None
        rv = getattr(self.local, "stack", None)
        if rv is None:
            # 调用Local对象的stack字段,会执行  Local.__setattr__ 方法(key=stack,value=[])
            self.local.stack = rv = []
            # self.local.stack = []
            # self.local.stack.append(item)

        rv.append(item)

    def pop(self):
        """ 从栈中弹出一个数据 """

        # self.local.stack ,如果有对应值返回,如果没有就返回None
        # [11,22,33]
        rv = getattr(self.local, "stack", None)
        return rv.pop(-1)


obj = Stack()

obj.push(11)
obj.push(22)
obj.push(33)

v1 = obj.pop()  # 33
print(v1)
v2 = obj.pop()  # 22
print(v2)
v3 = obj.pop()  # 11
print(v3)
分析:面向对象 & 列表 & 字典 & threading.local 。
三个步骤:
- 怎么用。
- 读源码,知识点。
- 源码知识点应用。
6.代理
class LocalProxy(object):

    def __init__(self, func):
        object.__setattr__(self, 'func', func)  # self.func = get_top

    def get_current_object(self):
        return self.func()  # get_top()


def get_top():
    return "Alex"


req = LocalProxy(get_top)

data = req.upper()
print(data) # ALEX

data = req.lower()
print(data) # alex
class LocalProxy(object):

    def __init__(self, func):
        object.__setattr__(self, 'func', func)  # self.func = get_top

    def get_current_object(self):
        return self.func()  # get_top()

    def upper(self):
        old = get_current_object()
        return old.upper()

    def lower(self):
        old = get_current_object()
        return old.lower()

    ...
    ...

def get_top():
    return "Alex"


req = LocalProxy(get_top)

data = req.upper()
print(data) # ALEX

data = req.lower()
print(data) # alex
class LocalProxy(object):

    def __init__(self, func):
        object.__setattr__(self, 'func', func)  # self.func = get_top

    def get_current_object(self):
        return self.func()  # get_top()

    def upper(self):
        old = get_current_object()
        return old.upper()

    def lower(self):
        old = get_current_object()
        return old.lower()

    ...
    ...

    def append(self...):
        pass

    def insert(self,...)
        pass

def get_top():
    return []


req = LocalProxy(get_top)

req.append(123)
req.insert(1,123)
class LocalProxy(object):

    def __init__(self, func):
        object.__setattr__(self, 'func', func)  # self.func = get_top

    def get_current_object(self):
        return self.func()  # get_top()

    def __getattr__(self,name):
        # name = append
        # self.get_current_object()得到列表对象,空列表。
        # 通过反射去对象中找append
        return getattr(self.get_current_object(),name)


def get_top():
    return []

req = LocalProxy(get_top)

req.append(123)
class LocalProxy(object):

    def __init__(self, func):
        object.__setattr__(self, 'func', func)  # self.func = get_top

    def get_current_object(self):
        return self.func()  # get_top()

    def __getattr__(self,name):
        # name = upper
        # self.get_current_object()得到列表对象,空列表。 / 字符串对象
        # 通过反射去对象中找append / upper
        return getattr(self.get_current_object(),name)

def get_top():
    return "Alex"

req = LocalProxy(get_top)
v1 = req.upper() #  req.upper
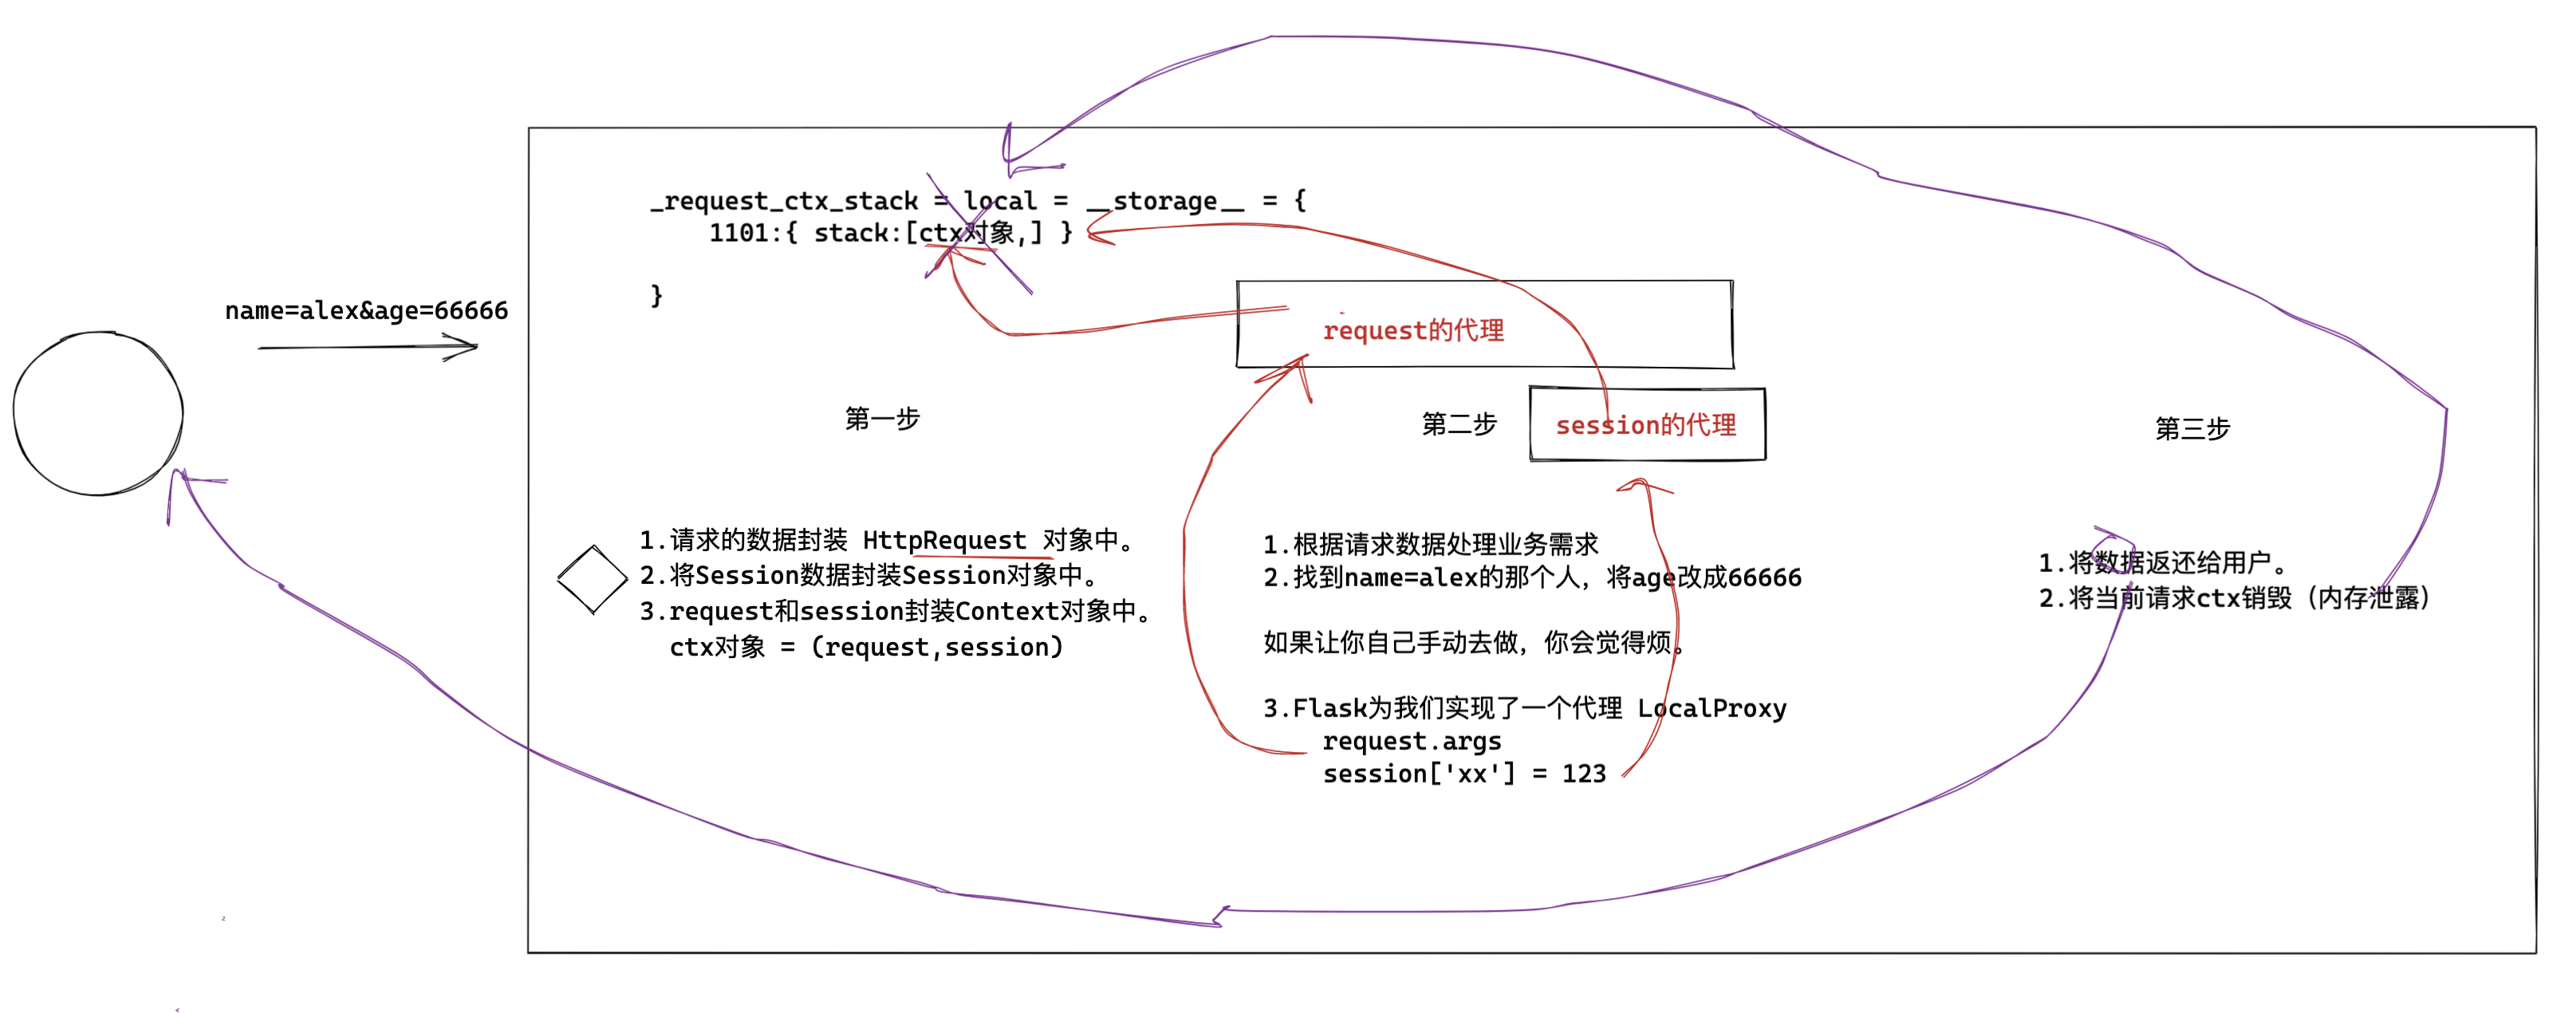
疑问,哪里用到这个东西?用他做什么了呢?
import functools


class HttpRequest(object):
    def method(self):
        print("method")

    def body(self):
        print("body")


class Session(object):

    def get(self):
        print("get")

    def xxxxx(self):
        print("xxxxx")


class Context(object):
    def __init__(self):
        self.request = HttpRequest()
        self.session = Session()


ctx = Context()  # 在内部 { request:HttpRequest对象, session:Session对象 }
data_list = [ctx, ]  # 栈,在栈中只有一个ctx对象。


def get_top(name):
    top = data_list[-1]  # 去栈顶取ctx对象。
    return getattr(top, name)


class LocalProxy(object):

    def __init__(self, func):
        object.__setattr__(self, 'func', func)  # self.func = get_top

    def get_current_object(self):
        return self.func()  # get_top()

    def __getattr__(self, name):
        # name="method"
        # self.get_current_object() 执行传入的函数(偏函数), request对象对象。
        # 去request对象找到method
        return getattr(self.get_current_object(), name)


# self.func = 偏函数 ,以后偏函数执行,自动携带request参数,执行返回值: ctx中的request对象
request = LocalProxy(functools.partial(get_top, "request"))
request.method()  # __getattr__    name = "method"
request.body()  # __getattr__    name = "method"

# self.func = 偏函数 ,以后偏函数执行,自动携带session参数,执行返回值: ctx中的session对象
session = LocalProxy(functools.partial(get_top, "session"))
session.get()  # __getattr__    name = "method"
session.xxxxx()  # __getattr__    name = "method"
关于偏函数:
def func(a1,a2):
    return a1 + a2

v1 = func(1,2)
print(v1) # 3

new_func = functools.partial(func,a2=10)
v2 = new_func(1)
print(v2) # 11
小结
-
threading.local & 应用场景 & 升级版(自定义支持协程ID)
-
__setattr__和__getattr__,涉及到了object直接赋值(避免递归错误)。 -
__slots__,约束通过object设置值的变量。 -
栈的定义(写基础版本 & 数据隔离版本)
-
私有成员
class Foo(object):
    def __init__(self,name):
        self.__name__ = name

obj = Foo("alex")
print(obj.__name__) # 报错
print(obj._Foo__name__) # 对象._类名__name__
-
代理
-
自己玩,直接设置和直接获取。
-
平台&框架,关注点放大。
- 框架,为程序员服务。(公司源码 & 优秀底层源码)
- 程序员,业务逻辑实现。
-
反射
7.元类
- 用模块、框架实现业务功能,没必要学元类。
- 元类 + 案例
在Python中基于类可以创建。
# 定义类
class Foo(object):

    def __init__(self,name):
        self.name = name

    def __new__(cls,*args,**kwargs):
        data = object.__new__(cls)
        return data


# 根据类创建对象
#   1. 执行类的new方法,创建对象(空对象)。【构造方法】  {}
#   2. 执行类的init方法,初始化对象。      【初始化方法】{name:"武沛齐"}
obj = Foo("武沛齐")
对象,是基于类来创建出来。
问题:类是由谁创建的?
# 传统方式创建类(直观)
class Foo(object):
    v1 = 123

    def func(self):
        return 666

# 非传统方式(一行)
Foo = type("Foo",(object,),{ "v1":123, "func":lambda self:666 })
# 传统方式创建类(直观)
"""
class Foo(object):
    v1 = 123

    def func(self):
        return 666
print(Foo)  # <class '__main__.Foo'>
"""


# 非传统方式(一行)
# 1.创建类型
#   - 类名
#   - 继承类
#   - 成员
def do(self):
    pass


Fa = type("Foo", (object,), {"v1": 123, "func": lambda self: 666, 'do': do})

# 2.根据类创建对象
obj = Fa()

# 3.调用对象中v1变量(类变量)
print(obj.v1)

# 4.执行对象的func方法
result = obj.func()
print(result)
类 默认 由type创建,怎么让一个类的创建改成其他的东西呢? 元类。
元类,指定类由谁来创建。
class MyType(type):
    def __init__(self, *args, **kwargs):
        super().__init__(*args, **kwargs)

    def __new__(cls, *args, **kwargs):
        # 创建类
        new_cls = super().__new__(cls, *args, **kwargs)
        return new_cls

    def __call__(self, *args, **kwargs):
        # 1.调用自己那个类的 __new__ 方法去创建对象
        empty_object = self.__new__(self)

        # 2.调用你自己那个类 __init__放发去初始化
        self.__init__(empty_object, *args, **kwargs)

        return empty_object


# 假设Foo是一个对象,由MyType创建。
# Foo类其实是MyType的一个对象。
# Foo()    -> MyType对象()
class Foo(object, metaclass=MyType):
    def __init__(self, name):
        self.name = name

    def __call__(self, *args, **kwargs):
        print("自己")


v1 = Foo()  # type.__call__
v1()
7.1 wtforms源码
from wtforms import Form
from wtforms.fields import simple


class LoginForm(Form):
    name = simple.StringField(label='用户名', render_kw={'class': 'form-control'})
    pwd = simple.PasswordField(label='密码', render_kw={'class': 'form-control'})


form = LoginForm()
print(form.name)  # 类变量
print(form.pwd)  # 类变量
from wtforms import Form
from wtforms.fields import simple


class FormMeta(type):
    def __init__(cls, name, bases, attrs):
        type.__init__(cls, name, bases, attrs)
        cls._unbound_fields = None
        cls._wtforms_meta = None

    def __call__(cls, *args, **kwargs):
        """
        Construct a new `Form` instance.

        Creates the `_unbound_fields` list and the internal `_wtforms_meta`
        subclass of the class Meta in order to allow a proper inheritance
        hierarchy.
        """
        if cls._unbound_fields is None:
            fields = []
            for name in dir(cls):
                if not name.startswith('_'):
                    unbound_field = getattr(cls, name)
                    if hasattr(unbound_field, '_formfield'):
                        fields.append((name, unbound_field))
            # We keep the name as the second element of the sort
            # to ensure a stable sort.
            fields.sort(key=lambda x: (x[1].creation_counter, x[0]))
            cls._unbound_fields = fields

        # Create a subclass of the 'class Meta' using all the ancestors.
        if cls._wtforms_meta is None:
            bases = []
            for mro_class in cls.__mro__:
                if 'Meta' in mro_class.__dict__:
                    bases.append(mro_class.Meta)
            cls._wtforms_meta = type('Meta', tuple(bases), {})
        return type.__call__(cls, *args, **kwargs)


def with_metaclass(meta, base=object):
    #     FormMeta("NewBase", (BaseForm,), {} )
    #         type("NewBase", (BaseForm,), {} )
    return meta("NewBase", (base,), {})

"""
class NewBase(BaseForm,metaclass=FormMeta):
    pass


class Form(  NewBase):
"""
class Form(  with_metaclass(FormMeta, BaseForm)  ):
    pass


# LoginForm其实是由 FormMeta 创建的。
#   1. 创建类时,会执行  FormMeta 的 __new__ 和 __init__,内部在类中添加了两个类变量 _unbound_fields 和 _wtforms_meta
class LoginForm(Form):
    name = simple.StringField(label='用户名', render_kw={'class': 'form-control'})
    pwd = simple.PasswordField(label='密码', render_kw={'class': 'form-control'})


#   2.根据LoginForm类去创建对象。   FormMeta.__call__ 方法   -> LoginForm中的new去创建对象,init去初始化对象。

form = LoginForm()
print(form.name)  # 类变量
print(form.pwd)  # 类变量

# 问题1:此时LoginForm是由 type or FormMeta创建?
"""
类中metaclass,自己类由于metaclass定义的类来创建。
类继承某个类,父类metaclass,自己类由于metaclass定义的类来创建。
"""
学了元类之后,在:
- 类创建,自定义功能。
- 对象的创建前后,自定义功能。
class MyType(type):
    def __init__(self, *args, **kwargs):
        # 创建类,时进行扩展。
        super().__init__(*args, **kwargs)

    def __new__(cls, *args, **kwargs):
        # 创建类,时进行扩展。
        new_cls = super().__new__(cls, *args, **kwargs)
        return new_cls

    def __call__(self, *args, **kwargs):
        # 创建对象,进行扩展。

        # 1.调用自己那个类的 __new__ 方法去创建对象
        empty_object = self.__new__(self)

        # 2.调用你自己那个类 __init__放发去初始化
        self.__init__(empty_object, *args, **kwargs)

        return empty_object


# 假设Foo是一个对象,由MyType创建。
# Foo类其实是MyType的一个对象。
# Foo()    -> MyType对象()
class Foo(object, metaclass=MyType):
    def __init__(self, name):
        self.name = name

    def __call__(self, *args, **kwargs):
        print("自己")


v1 = Foo()  # type.__call__
v1()
7.2 单例模式
- 方式1:模块导入【上一节直播课】。
- 方式2:并发编程。
- 方式3:单例模式。
class MyType(type):
    def __init__(self, name, bases, attrs):
        super().__init__(name, bases, attrs)
        self.instance = None

    def __call__(self, *args, **kwargs):
        # 1.判断是否已对象,有,则不创建;没有,则创建。
        if not self.instance:
            self.instance = self.__new__(self)

        # 2.调用你自己那个类 __init__放发去初始化
        self.__init__(self.instance, *args, **kwargs)

        return self.instance


class Singleton(object, metaclass=MyType):
    pass


class Foo1(Singleton, metaclass=MyType):
    pass


class Foo2(Singleton):
    pass


v1 = Foo1()
v2 = Foo1()

print(v1)
print(v2)
总结
-
接口概念
-
抽象类 & 抽象方法(不常用)
-
异常来做约束。(扩展:工厂模式 + 异常约束)
-
数据封装
-
Flask源码相关:见上述小结。
-
元类
-
type是什么?
-
元类是什么?
-
MyType中
__new__ __int__ __call__ -
wtforms源码
-
一个类自己没指定metaclass,父类指定。
-
基于函数和metaclass两种方式
-
-
单例模式,基于type+元类。
-
项目:CRM项目 。
疑问
-
队列和栈
-
数据结构角度
-
业务代码
-
小小赵
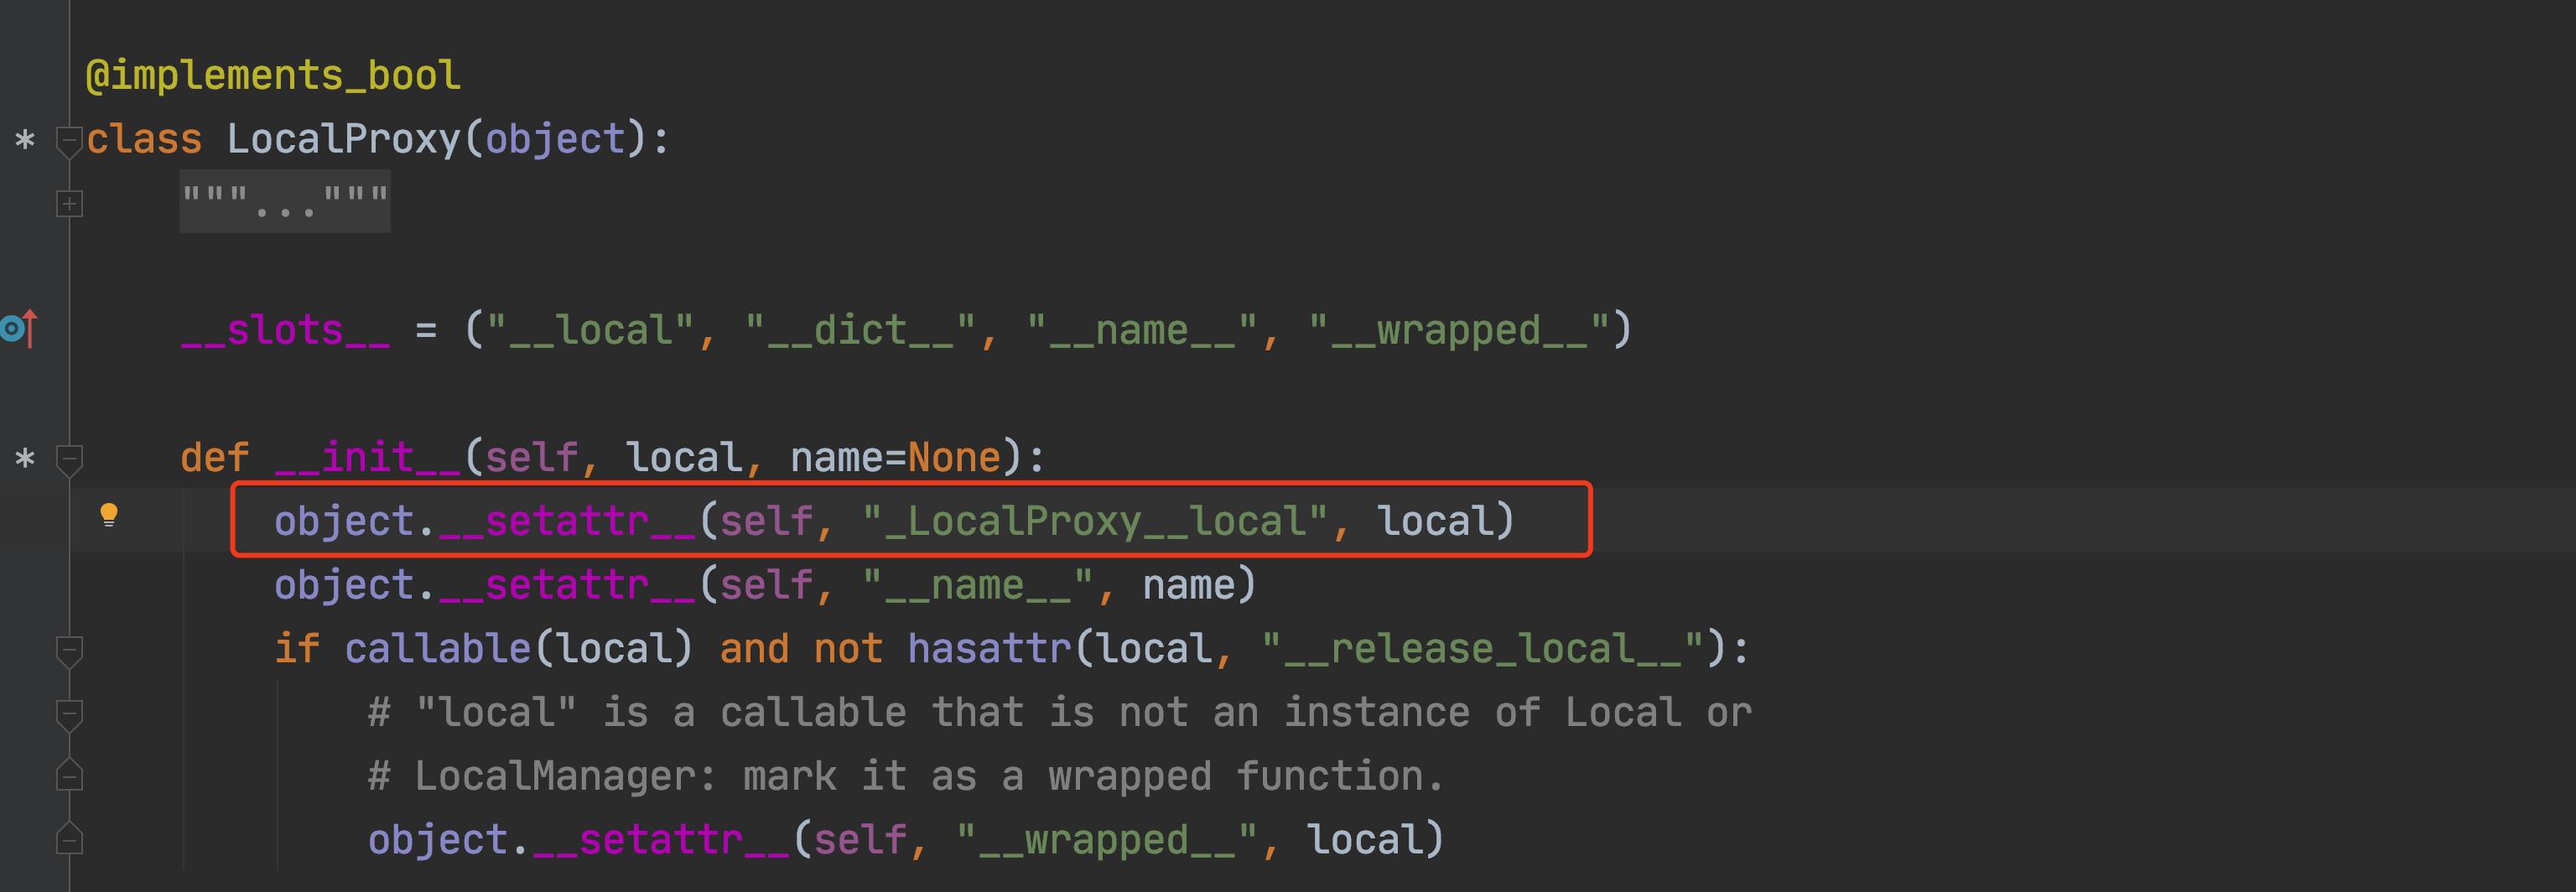
object.__setattr__(self, 'storage', {})  # self对象中存储 storage={}

老师这块是把storage存储在了self 对象里了,还是存储在 object父类 里了?
class objectC(object):

    def ft(self,f1,f2):
        self.name = f1 # obj.name = alex
        self.age = f2 # obj.age =  SB

class Foo(object):
    pass

obj = Foo()
objectC.ft(obj,"alex",'SB') # 调用 objectC 中 ft 方法
- 文佳话
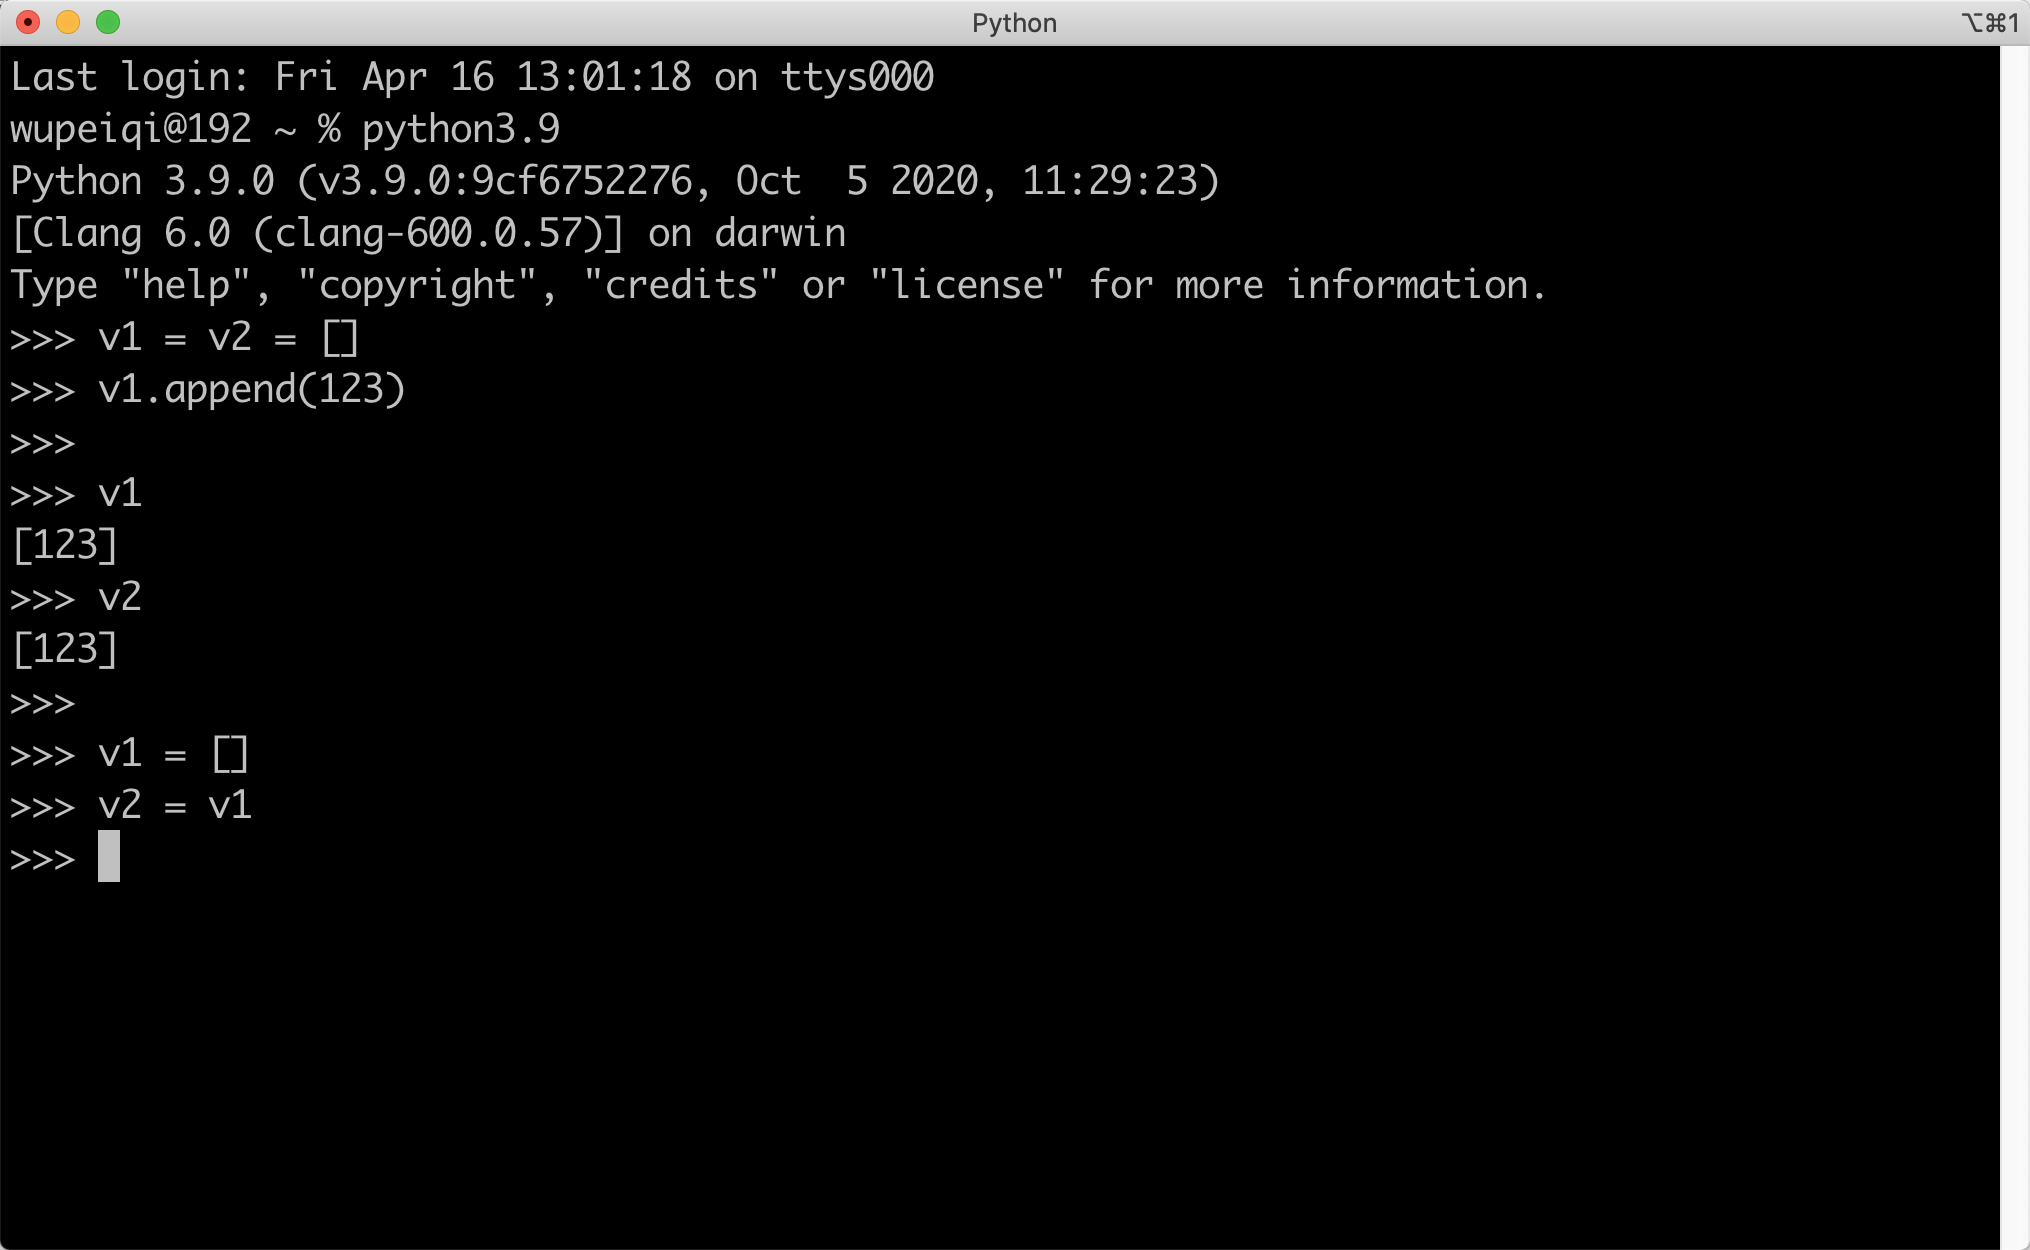
- 谢军
- 上下文
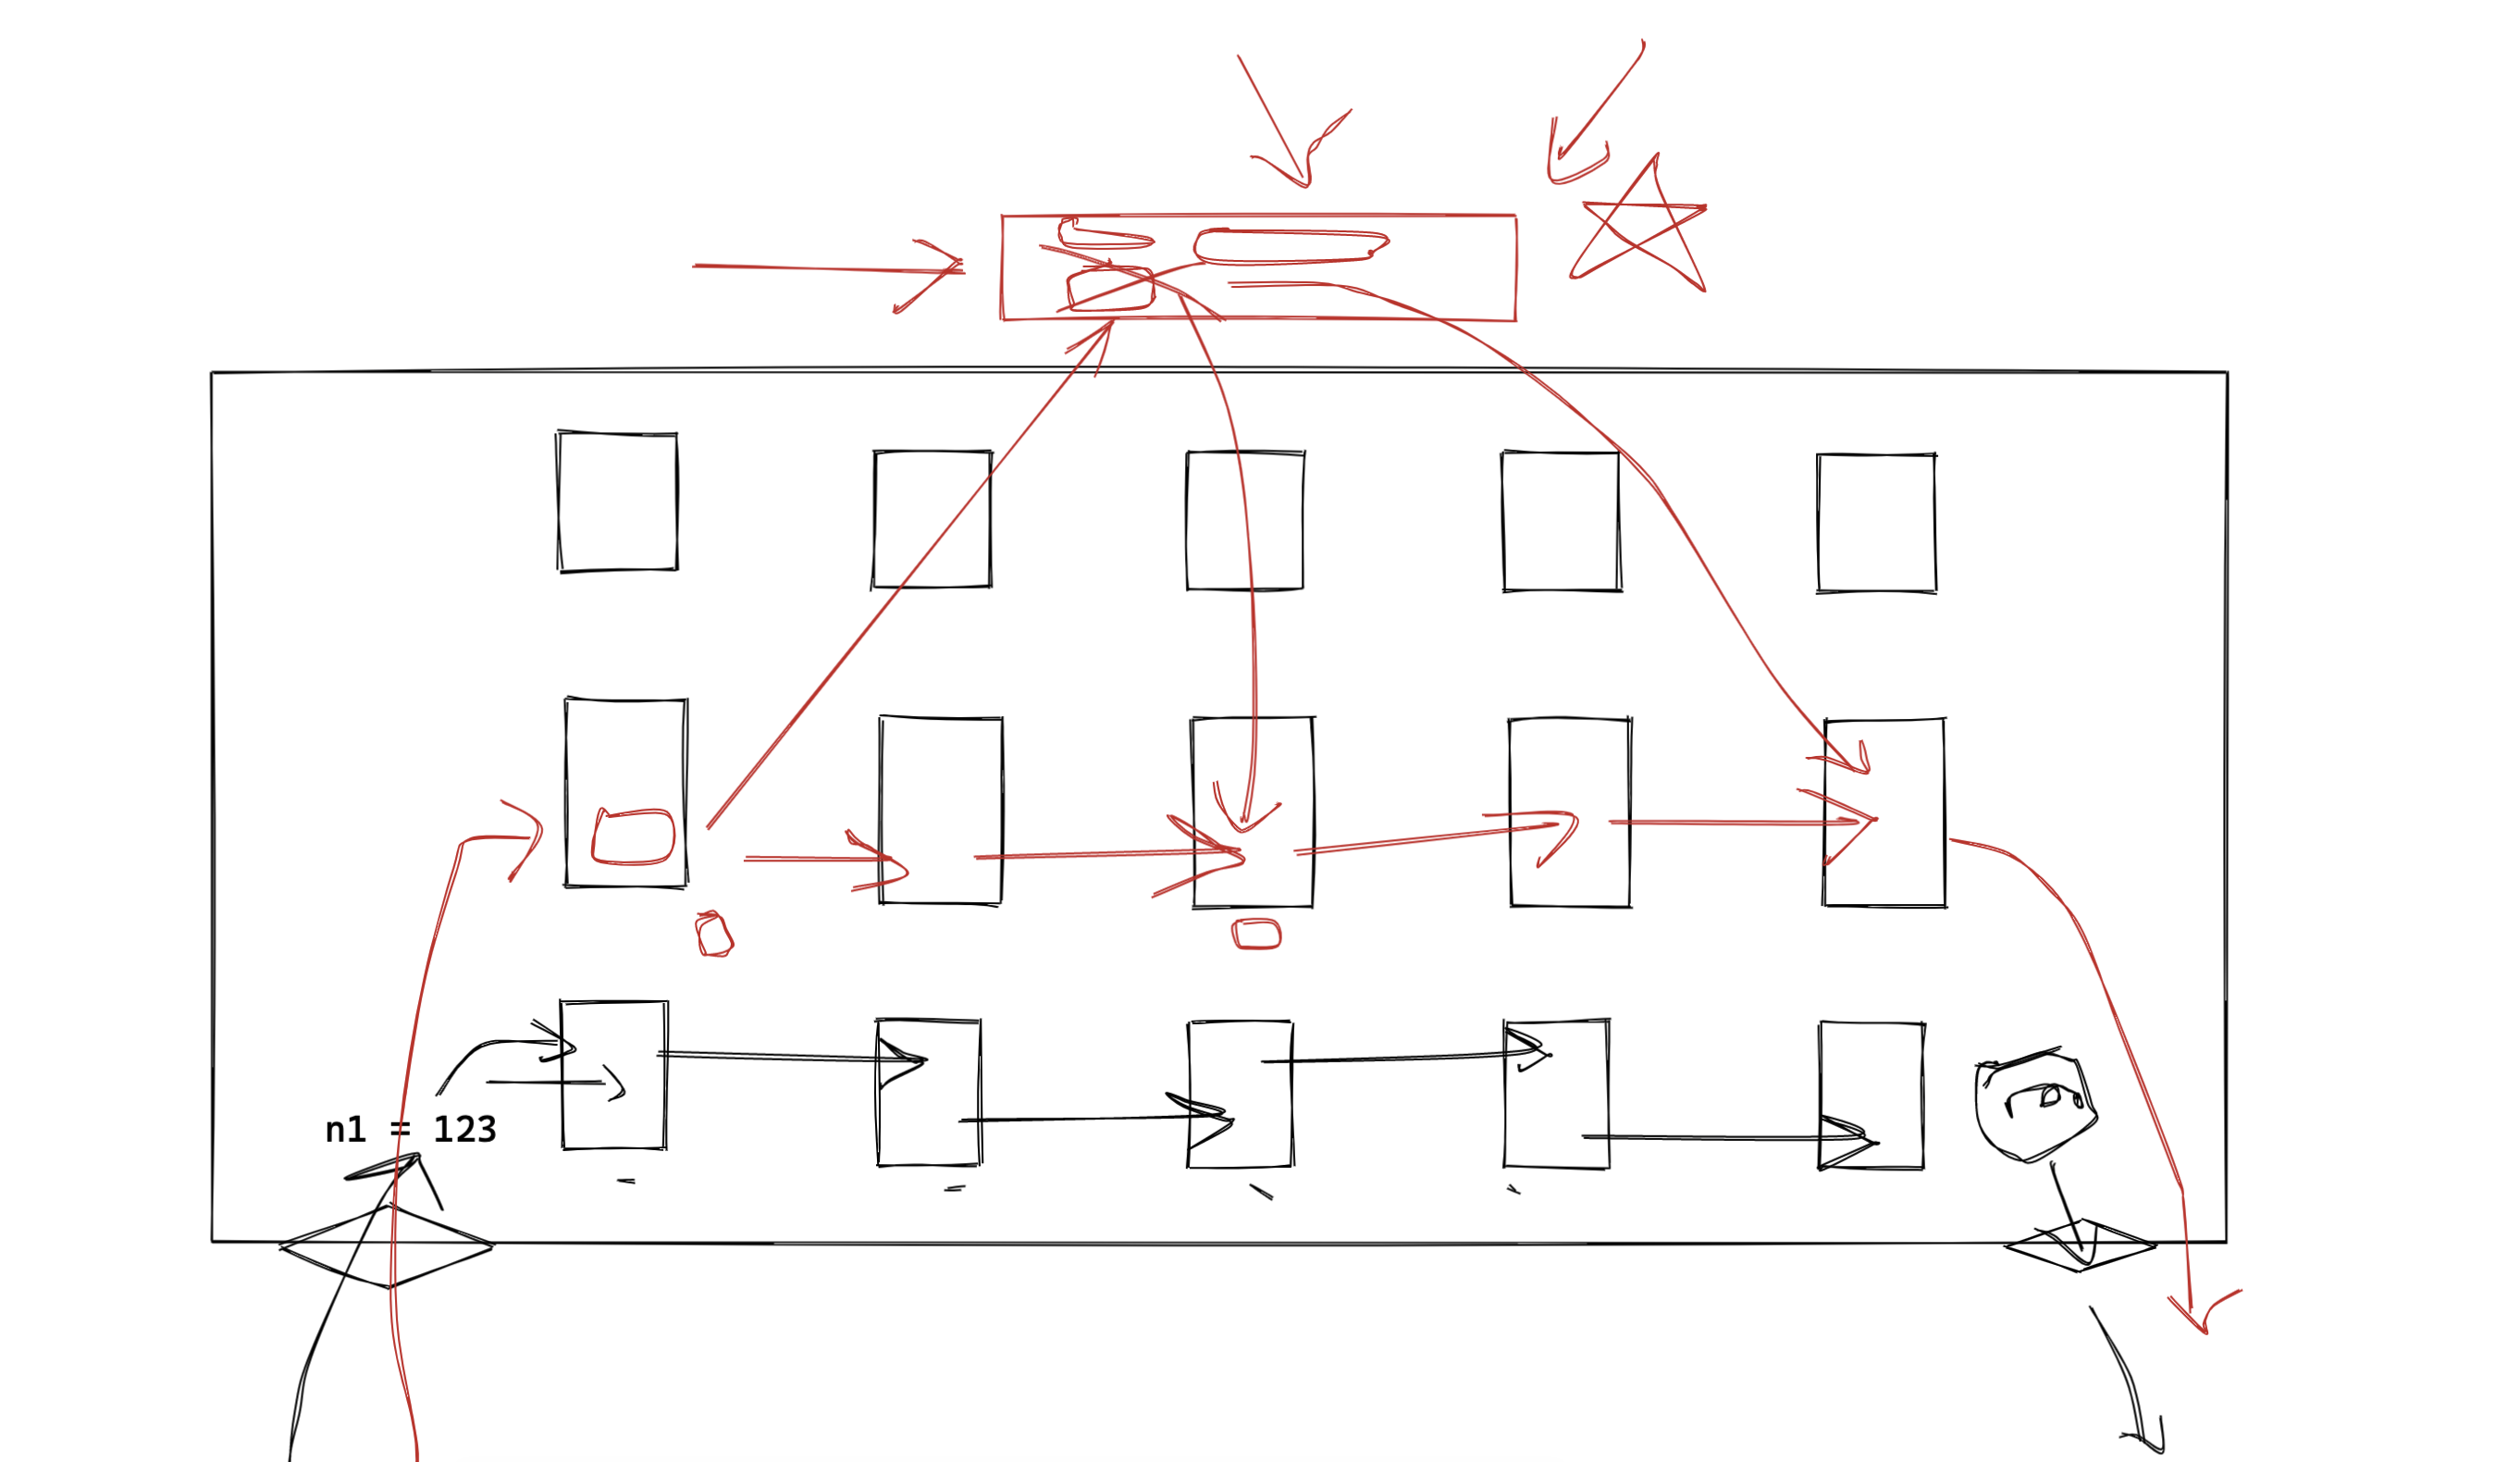
注意:Flask的多app + with上下文(离线脚本)。
- 长利