操作etcd
ETCD常用操作
拷贝etcdctl命令行工具:
[root@k8s-master manifests]# docker ps |grep etcd
823cb3a16fcd   0369cf4303ff                                                     "etcd --advertise-cl…"   27 hours ago   Up 27 hours             k8s_etcd_etcd-k8s-master_kube-system_59bcab4f5ce01027b607b7a978cd16b6_3
c4e6a0bc4fcb   registry.aliyuncs.com/google_containers/pause:3.4.1              "/pause"                 27 hours ago   Up 27 hours             k8s_POD_etcd-k8s-master_kube-system_59bcab4f5ce01027b607b7a978cd16b6_3
[root@k8s-master manifests]# docker cp 823cb3a16fcd:/usr/local/bin/etcdctl /usr/bin/etcdctl

# docker cp etcd_container:/usr/local/bin/etcdctl /usr/bin/etcdctl
查看etcd集群的成员节点:
$ export ETCDCTL_API=3
$ etcdctl --endpoints=https://[127.0.0.1]:2379 --cacert=/etc/kubernetes/pki/etcd/ca.crt --cert=/etc/kubernetes/pki/etcd/healthcheck-client.crt --key=/etc/kubernetes/pki/etcd/healthcheck-client.key member list -w table

$ alias etcdctl='etcdctl --endpoints=https://[127.0.0.1]:2379 --cacert=/etc/kubernetes/pki/etcd/ca.crt --cert=/etc/kubernetes/pki/etcd/healthcheck-client.crt --key=/etc/kubernetes/pki/etcd/healthcheck-client.key'

$ etcdctl member list -w table   # 查看etcd成员列表  table表格显示
查看etcd集群节点状态:
$ etcdctl endpoint status -w table
+--------------------------+------------------+---------+---------+-----------+------------+-----------+------------+--------------------+--------+
|         ENDPOINT         |        ID        | VERSION | DB SIZE | IS LEADER | IS LEARNER | RAFT TERM | RAFT INDEX | RAFT APPLIED INDEX | ERRORS |
+--------------------------+------------------+---------+---------+-----------+------------+-----------+------------+--------------------+--------+
| https://[127.0.0.1]:2379 | 1230b008312e9125 |  3.4.13 |  3.9 MB |      true |      false |         7 |     159386 |             159386 |        |
+--------------------------+------------------+---------+---------+-----------+------------+-----------+------------+--------------------+--------+
# etcd 是基于RAFT协议实现的分布式一致性数据库
$ etcdctl endpoint health -w table
设置key值:
查看所有key值:
# 匹配以/开头的 只显示key不显示value
$  etcdctl get / --prefix --keys-only
$  etcdctl get /registery/deployments --prefix --keys-only
$  etcdctl get /registery/pod --prefix --keys-only
查看具体的key对应的数据:
$ etcdctl get /registry/pods/jenkins/sonar-postgres-7fc5d748b6-gtmsb
$ etcdctl get /registry/namespaces/luffy
list-watch:
$ etcdctl watch /luffy/ --prefix   # 阻塞住了, 数据操作改动的数据会显示出来,监听/luffy 下的数据
$ etcdctl put /luffy/key1 val1
添加定时任务做数据快照(重要!)
恢复快照:
-
停止etcd和apiserver
-
移走etcd当前数据目录
- 恢复快照
$ etcdctl snapshot restore `hostname`-etcd_`date +%Y%m%d%H%M`.db --data-dir=/var/lib/etcd/

# 实战
[root@k8s-master manifests]# etcdctl snapshot restore ~/k8s-master-etcd_202210171504.db --data-dir=/var/lib/etcd
Error: data-dir "/var/lib/etcd" exists
[root@k8s-master manifests]# rm -rf /var/lib/etcd
[root@k8s-master manifests]# etcdctl snapshot restore ~/k8s-master-etcd_202210171504.db --data-dir=/var/lib/etcd
{"level":"info","ts":1665992378.418471,"caller":"snapshot/v3_snapshot.go:296","msg":"restoring snapshot","path":"/root/k8s-master-etcd_202210171504.db","wal-dir":"/var/lib/etcd/member/wal","data-dir":"/var/lib/etcd","snap-dir":"/var/lib/etcd/member/snap"}
{"level":"info","ts":1665992378.4408987,"caller":"mvcc/kvstore.go:380","msg":"restored last compact revision","meta-bucket-name":"meta","meta-bucket-name-key":"finishedCompactRev","restored-compact-revision":132393}
{"level":"info","ts":1665992378.445238,"caller":"membership/cluster.go:392","msg":"added member","cluster-id":"cdf818194e3a8c32","local-member-id":"0","added-peer-id":"8e9e05c52164694d","added-peer-peer-urls":["http://localhost:2380"]}
{"level":"info","ts":1665992378.448043,"caller":"snapshot/v3_snapshot.go:309","msg":"restored snapshot","path":"/root/k8s-master-etcd_202210171504.db","wal-dir":"/var/lib/etcd/member/wal","data-dir":"/var/lib/etcd","snap-dir":"/var/lib/etcd/member/snap"}
[root@k8s-master manifests]# ls /var/lib/etcd/
member
[root@k8s-master manifests]# ls /var/lib/etcd/member/
snap  wal
[root@k8s-master manifests]#
- 集群恢复
https://github.com/etcd-io/etcd/blob/release-3.3/Documentation/op-guide/recovery.md
- namespace删除问题
很多情况下,会出现namespace删除卡住的问题,此时可以通过操作etcd来删除数据:
状态一直显示 Terminationg
$ kubectl get ns
NAME                           STATUS                    AGE
business-java-backend4h99k   Terminationg          2d22h
$ etcdctl get / --prefix=true --keys-only|grep business-java-backend4h99k
$ etcdctl get / --prefix=true --keys-only
.
..
...
....
$ etcdctl del .  #复制上面查询到的数据
$ etcdctl del ..
$ etcdctl del ...
$ etcdctl del ....
$ kubectl get ns   # 再次查看已没有business-java-backend4h99k
问题 组件状态不健康
[root@k8s-master ~]# kubectl get cs   # 查看组件状态。scheduler  controller-manager 是unhealthy
Warning: v1 ComponentStatus is deprecated in v1.19+
NAME                 STATUS      MESSAGE                                                                                       ERROR
scheduler            Unhealthy   Get "http://127.0.0.1:10251/healthz": dial tcp 127.0.0.1:10251: connect: connection refused
controller-manager   Unhealthy   Get "http://127.0.0.1:10252/healthz": dial tcp 127.0.0.1:10252: connect: connection refused
etcd-0               Healthy     {"health":"true"}
[root@k8s-master ~]# kubectl get pods -A    # 查看所有pod运行状态
[root@k8s-master ~]# docker images   #查看所有images 版本
REPOSITORY                                                        TAG        IMAGE ID       CREATED         SIZE
rancher/mirrored-flannelcni-flannel                               v0.19.2    8b675dda11bb   6 weeks ago     62.3MB
rancher/mirrored-flannelcni-flannel-cni-plugin                    v1.1.0     fcecffc7ad4a   4 months ago    8.09MB
rancher/mirrored-flannelcni-flannel                               v0.16.1    404fc3ab6749   9 months ago    69.9MB
registry.aliyuncs.com/google_containers/kube-apiserver            v1.21.5    7b2ac941d4c3   13 months ago   126MB
registry.aliyuncs.com/google_containers/kube-proxy                v1.21.5    e08abd2be730   13 months ago   104MB
registry.aliyuncs.com/google_containers/kube-controller-manager   v1.21.5    184ef4d127b4   13 months ago   120MB
registry.aliyuncs.com/google_containers/kube-scheduler            v1.21.5    8e60ea3644d6   13 months ago   50.8MB
registry.aliyuncs.com/google_containers/pause                     3.4.1      0f8457a4c2ec   21 months ago   683kB
registry.aliyuncs.com/google_containers/coredns                   v1.8.0     296a6d5035e2   24 months ago   42.5MB
registry.aliyuncs.com/google_containers/etcd                      3.4.13-0   0369cf4303ff   2 years ago     253MB
[root@k8s-master ~]# netstat -lntup  #查看系统是否占用10251。10252 端口
[root@k8s-master ~]# cd /etc/kubernetes/manifests/
[root@k8s-master manifests]# ls
etcd.yaml  kube-apiserver.yaml  kube-controller-manager.yaml  kube-scheduler.yaml
[root@k8s-master manifests]# vim kube-controller-manager.yaml   # 去掉--port=0这行
[root@k8s-master manifests]# vim kube-scheduler.yaml            # 去掉--port=0这行
[root@k8s-master manifests]# systemctl restart kubelet          # 重启服务
[root@k8s-master manifests]# kubectl get cs
Warning: v1 ComponentStatus is deprecated in v1.19+
NAME                 STATUS    MESSAGE             ERROR
controller-manager   Healthy   ok
etcd-0               Healthy   {"health":"true"}
scheduler            Healthy   ok
参考:https://blog.csdn.net/xiaobao7865/article/details/107513957
Kubernetes调度
为何要控制Pod应该如何调度
- 集群中有些机器的配置高(SSD,更好的内存等),我们希望核心的服务(比如说数据库)运行在上面
- 某两个服务的网络传输很频繁,我们希望它们最好在同一台机器上
- ......
Kubernetes Scheduler 的作用是将待调度的 Pod 按照一定的调度算法和策略绑定到集群中一个合适的 Worker Node 上,并将绑定信息写入到 etcd 中,之后目标 Node 中 kubelet 服务通过 API Server 监听到 Scheduler 产生的 Pod 绑定事件获取 Pod 信息,然后下载镜像启动容器。
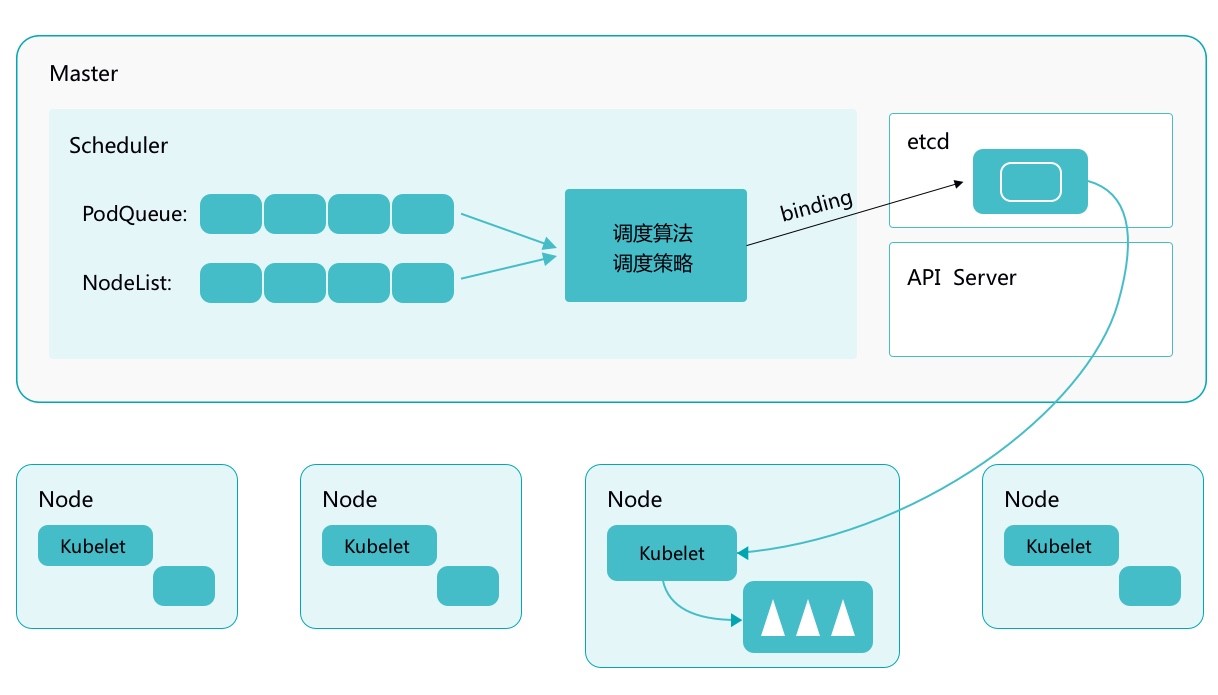
调度的过程
Scheduler 提供的调度流程分为预选 (Predicates) 和优选 (Priorities) 两个步骤:
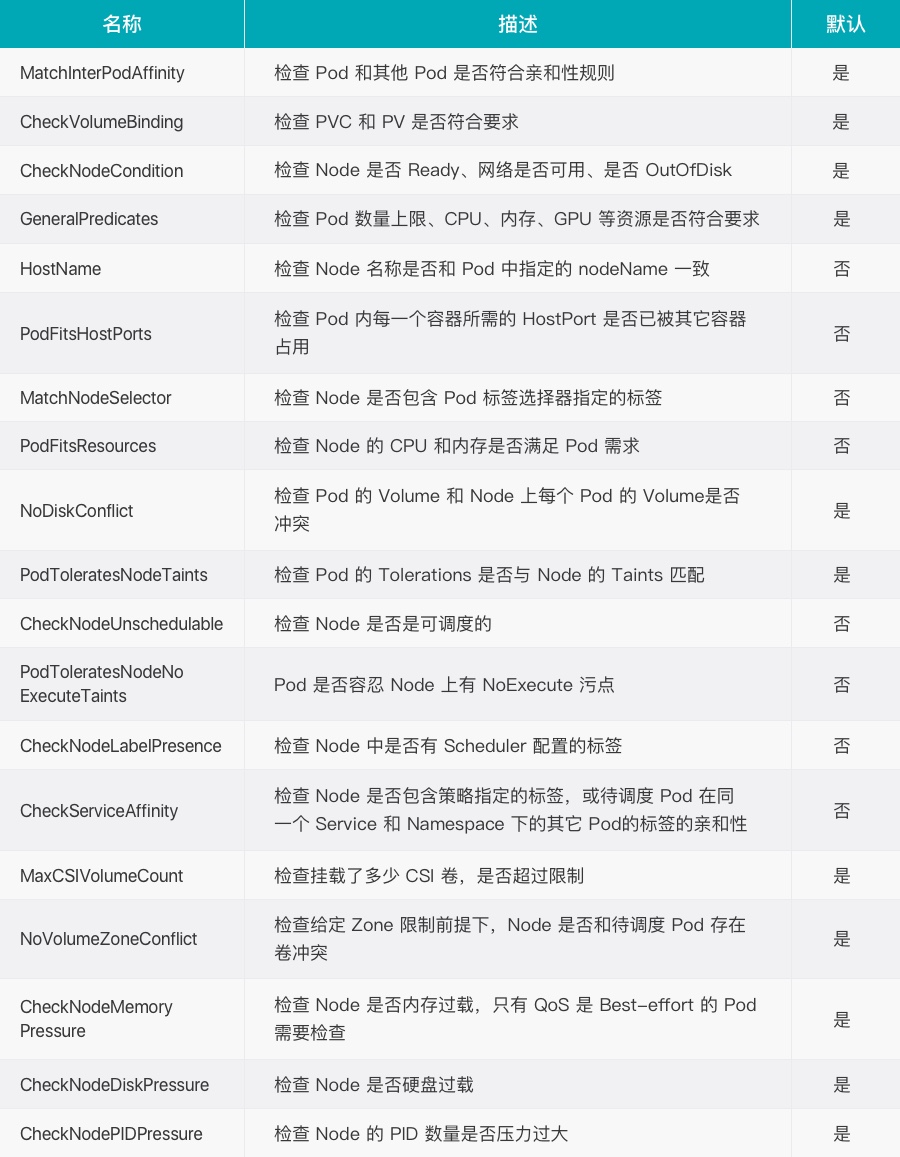
- 预选,K8S会遍历当前集群中的所有 Node,筛选出其中符合要求的 Node 作为候选
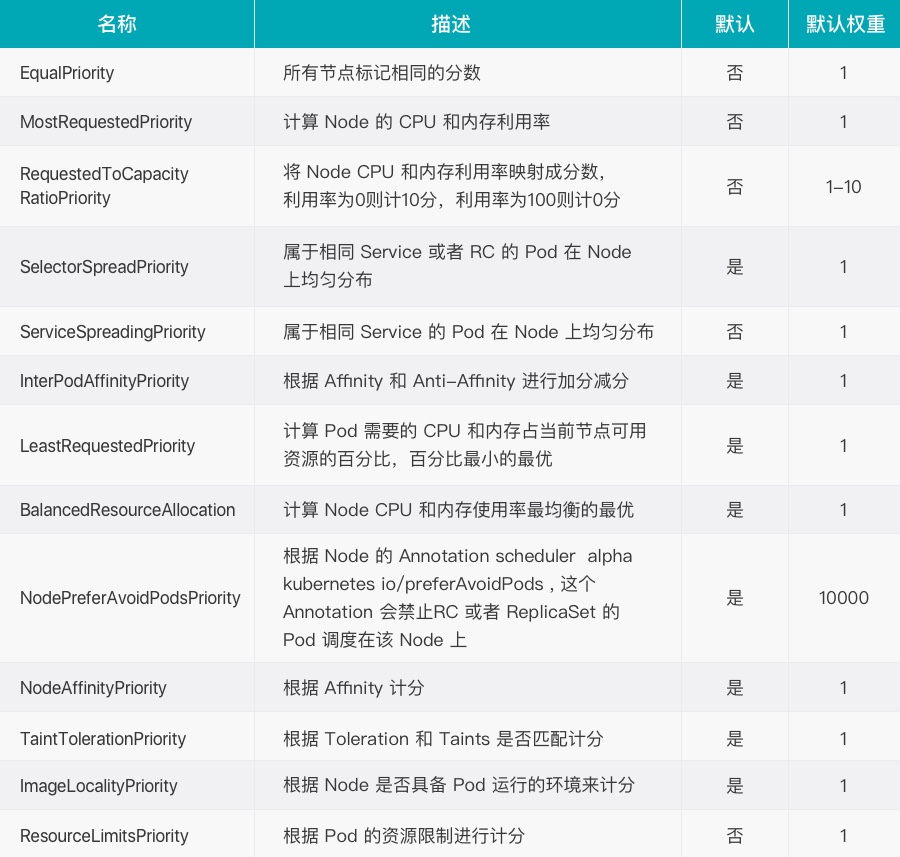
- 优选,K8S将对候选的 Node 进行打分
经过预选筛选和优选打分之后,K8S选择分数最高的 Node 来运行 Pod,如果最终有多个 Node 的分数最高,那么 Scheduler 将从当中随机选择一个 Node 来运行 Pod。
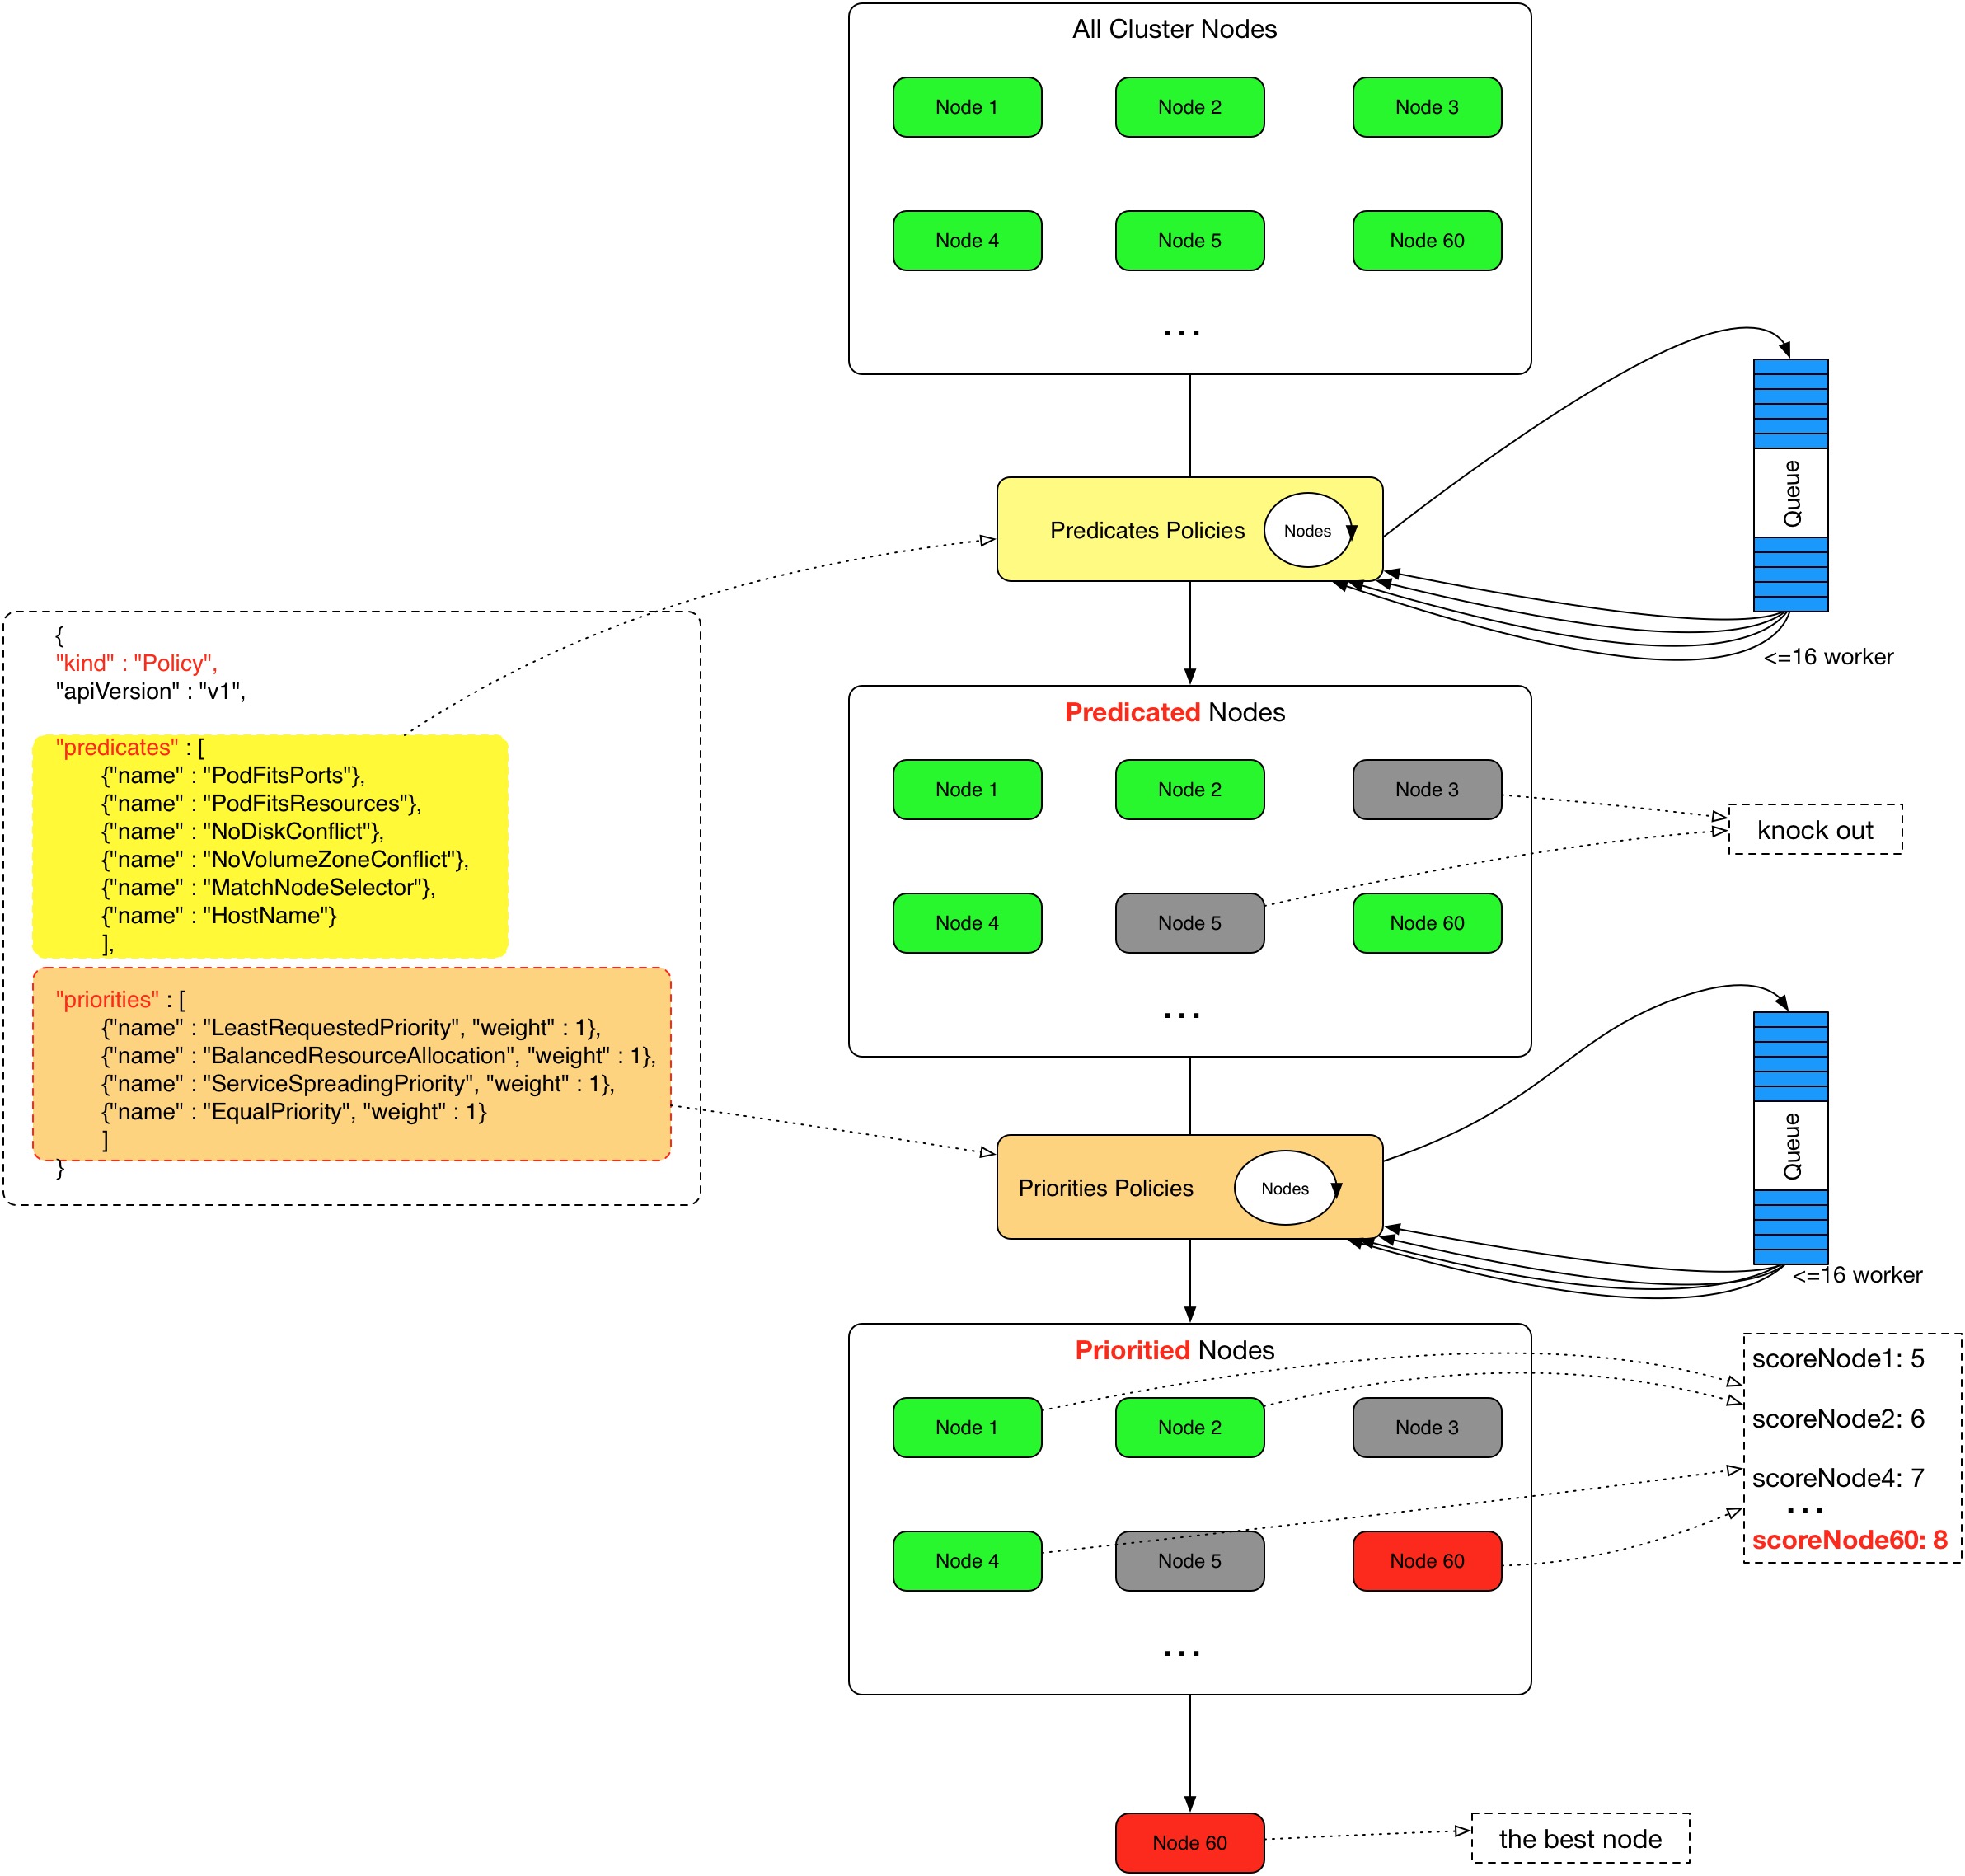
预选:
优选:
NodeSelector
label是kubernetes中一个非常重要的概念,用户可以非常灵活的利用 label 来管理集群中的资源,POD 的调度可以根据节点的 label 进行特定的部署。
查看节点的label:
为节点打label:
当 node 被打上了相关标签后,在调度的时候就可以使用这些标签了,只需要在spec 字段中添加nodeSelector字段,里面是我们需要被调度的节点的 label。
...
spec:
  hostNetwork: true    # 声明pod的网络模式为host模式,效果通docker run --net=host
  volumes:
  - name: mysql-data
    hostPath:
      path: /opt/mysql/data
  nodeSelector:   # 使用节点选择器将Pod调度到指定label的节点
    component: mysql
  containers:
  - name: mysql
      image: 172.21.51.143:5000/demo/mysql:5.7
...
nodeAffinity
Pod -> Node的标签
节点亲和性 , 比上面的nodeSelector更加灵活,它可以进行一些简单的逻辑组合,不只是简单的相等匹配 。分为两种,硬策略和软策略。
requiredDuringSchedulingIgnoredDuringExecution : 硬策略,如果没有满足条件的节点的话,就不断重试直到满足条件为止,简单说就是你必须满足我的要求,不然我就不会调度Pod。
preferredDuringSchedulingIgnoredDuringExecution:软策略,如果你没有满足调度要求的节点的话,Pod就会忽略这条规则,继续完成调度过程,说白了就是满足条件最好了,没有满足就忽略掉的策略。
#要求 Pod 不能运行在128和132两个节点上,如果有节点满足disktype=ssd或者sas的话就优先调度到这类节点上
...
spec:
      containers:
      - name: demo
        image: 172.21.51.143:5000/myblog:v1
        ports:
        - containerPort: 8002
      affinity:
          nodeAffinity:
            requiredDuringSchedulingIgnoredDuringExecution:
                nodeSelectorTerms:
                - matchExpressions:
                    - key: kubernetes.io/hostname
                      operator: NotIn
                      values:
                        - 192.168.136.128
                        - 192.168.136.132

            preferredDuringSchedulingIgnoredDuringExecution:
                - weight: 1
                  preference:
                    matchExpressions:
                    - key: disktype
                      operator: In
                      values:
                        - ssd
                        - sas
...
这里的匹配逻辑是 label 的值在某个列表中,现在Kubernetes提供的操作符有下面的几种:
- In:label 的值在某个列表中
- NotIn:label 的值不在某个列表中
- Gt:label 的值大于某个值
- Lt:label 的值小于某个值
- Exists:某个 label 存在
- DoesNotExist:某个 label 不存在
如果nodeSelectorTerms下面有多个选项的话,满足任何一个条件就可以了;如果matchExpressions有多个选项的话,则必须同时满足这些条件才能正常调度 Pod
pod亲和性和反亲和性
Pod -> Pod的标签
场景:
myblog 启动多副本,但是期望可以尽量分散到集群的可用节点中
分析:为了让myblog应用的多个pod尽量分散部署在集群中,可以利用pod的反亲和性,告诉调度器,如果某个节点中存在了myblog的pod,则可以根据实际情况,实现如下调度策略:
- 不允许同一个node节点,调度两个myblog的副本
- 可以允许同一个node节点中调度两个myblog的副本,前提是尽量把pod分散部署在集群中
... # AntiAffinity反亲和性 ,node节点有 标签 app=myblog  不要调度过去
    spec:
      affinity:
        podAntiAffinity:
          requiredDuringSchedulingIgnoredDuringExecution: #硬策略
          - labelSelector:
              matchExpressions:
              - key: app
                operator: In
                values:
                - myblog
            topologyKey: kubernetes.io/hostname
      containers:
...
# 如果某个节点中,存在了app=myblog的label的pod,那么 调度器一定不要给我调度过去
# AntiAffinity 反亲和性,标签app=myblog 不要优先调度
...
    spec:
      affinity:
        podAntiAffinity:
          preferredDuringSchedulingIgnoredDuringExecution:  #软策略
          - weight: 100
            podAffinityTerm:
              labelSelector:
                matchExpressions:
                - key: app
                  operator: In
                  values:
                  - myblog
              topologyKey: kubernetes.io/hostname
      containers:
...
# 如果某个节点中,存在了app=myblog的label的pod,那么调度器尽量不要调度过去
https://kubernetes.io/zh/docs/concepts/scheduling-eviction/assign-pod-node/
污点(Taints)与容忍(tolerations)
对于nodeAffinity无论是硬策略还是软策略方式,都是调度 Pod 到预期节点上,而Taints恰好与之相反,如果一个节点标记为 Taints ,除非 Pod 也被标识为可以容忍污点节点,否则该 Taints 节点不会被调度Pod。
Taints(污点)是Node的一个属性,设置了Taints(污点)后,因为有了污点,所以Kubernetes是不会将Pod调度到这个Node上的。于是Kubernetes就给Pod设置了个属性Tolerations(容忍),只要Pod能够容忍Node上的污点,那么Kubernetes就会忽略Node上的污点,就能够(不是必须)把Pod调度过去。
场景一:私有云服务中,某业务使用GPU进行大规模并行计算。为保证性能,希望确保该业务对服务器的专属性,避免将普通业务调度到部署GPU的服务器。
场景二:用户希望把 Master 节点保留给 Kubernetes 系统组件使用,或者把一组具有特殊资源预留给某些 Pod,则污点就很有用了,Pod 不会再被调度到 taint 标记过的节点。taint 标记节点举例如下:
设置污点:
$ kubectl taint node [node_name] key=value:[effect]
      其中[effect] 可取值: [ NoSchedule | PreferNoSchedule | NoExecute ]
       NoSchedule:一定不能被调度。
       PreferNoSchedule:尽量不要调度。
       NoExecute:不仅不会调度,还会驱逐Node上已有的Pod。
  示例:kubectl taint node k8s-slave1 smoke=true:NoSchedule
去除污点:
去除指定key及其effect:
     kubectl taint nodes [node_name] key:[effect]-    #这里的key不用指定value
     kubectl taint node k8s-slave1 smoke-
 去除指定key所有的effect:
     kubectl taint nodes node_name key-

 示例:
     kubectl taint node k8s-master smoke=true:NoSchedule
     kubectl taint node k8s-master smoke:NoExecute-
     kubectl taint node k8s-master smoke-
污点演示:
## 给k8s-slave1打上污点,smoke=true:NoSchedule
$ kubectl taint node k8s-master gamble=true:NoSchedule
$ kubectl taint node k8s-slave1 drunk=true:NoSchedule
$ kubectl taint node k8s-slave2 smoke=true:NoSchedule


## 扩容myblog的Pod,观察新Pod的调度情况
$ kuebctl -n luffy scale deploy myblog --replicas=3
$ kubectl -n luffy get po -w    ## pending
Pod容忍污点示例:myblog/deployment/deploy-myblog-taint.yaml
...
spec:
      containers:
      - name: demo
        image: 172.21.51.143:5000/myblog:v1
      tolerations: #设置容忍性
      - key: "smoke"
        operator: "Equal"  #不指定operator,默认为Equal
        value: "true"
        effect: "NoSchedule"
      - key: "drunk"
        operator: "Exists"  #如果操作符为Exists,那么value属性可省略,不指定operator,默认为Equal
      #意思是这个Pod要容忍的有污点的Node的key是smoke Equal true,效果是NoSchedule,
      #tolerations属性下各值必须使用引号,容忍的值都是设置Node的taints时给的值。
$ kubectl apply -f deploy-myblog-taint.yaml
spec:
      containers:
      - name: demo
        image: 172.21.51.143:5000/myblog:v1
      tolerations:
        - operator: "Exists"
NoExecute
Cordon
# 影响最小,只会将node调为SchedulingDisabled
# 之后再发创建pod,不会被调度到该节点
# 旧有的pod不会受到影响,仍正常对外提供服务
$ kubectl cordon k8s-slave2  # 停止调度  # 单词cordon 警戒线
# 恢复调度
$ kubectl uncordon k8s-node2

# drain 驱逐节点
# 首先,驱逐node上的pod,其他节点重新创建
# 接着,将节点调为** SchedulingDisabled**
$ kubectl drain k8s-slave2
# 若node节点上存在daemonsets控制器创建的pod,则需要使用--ignore-daemonsets忽略错误错误警告
# kubectl drain k8s-slave2 --ignore-daemonsets
drain的参数
--force
当一些pod不是经 ReplicationController, ReplicaSet, Job, DaemonSet 或者 StatefulSet 管理的时候
就需要用--force来强制执行 (例如:kube-proxy)

--ignore-daemonsets
无视DaemonSet管理下的Pod

--delete-local-data
如果有mount local volumn的pod,会强制杀掉该pod并把料清除掉
另外如果跟本身的配置讯息有冲突时,drain就不会执行
认证与鉴权
Kubernetes认证与授权
APIServer安全控制
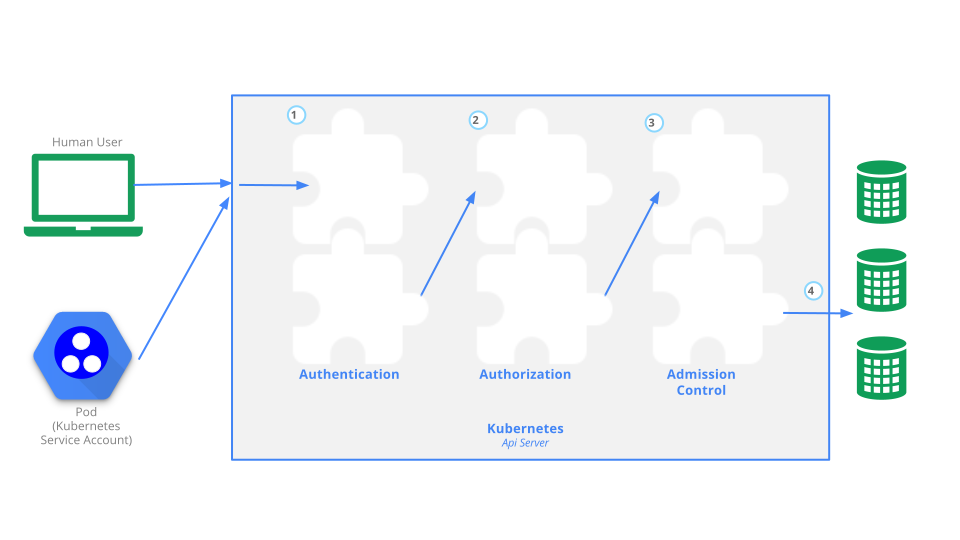
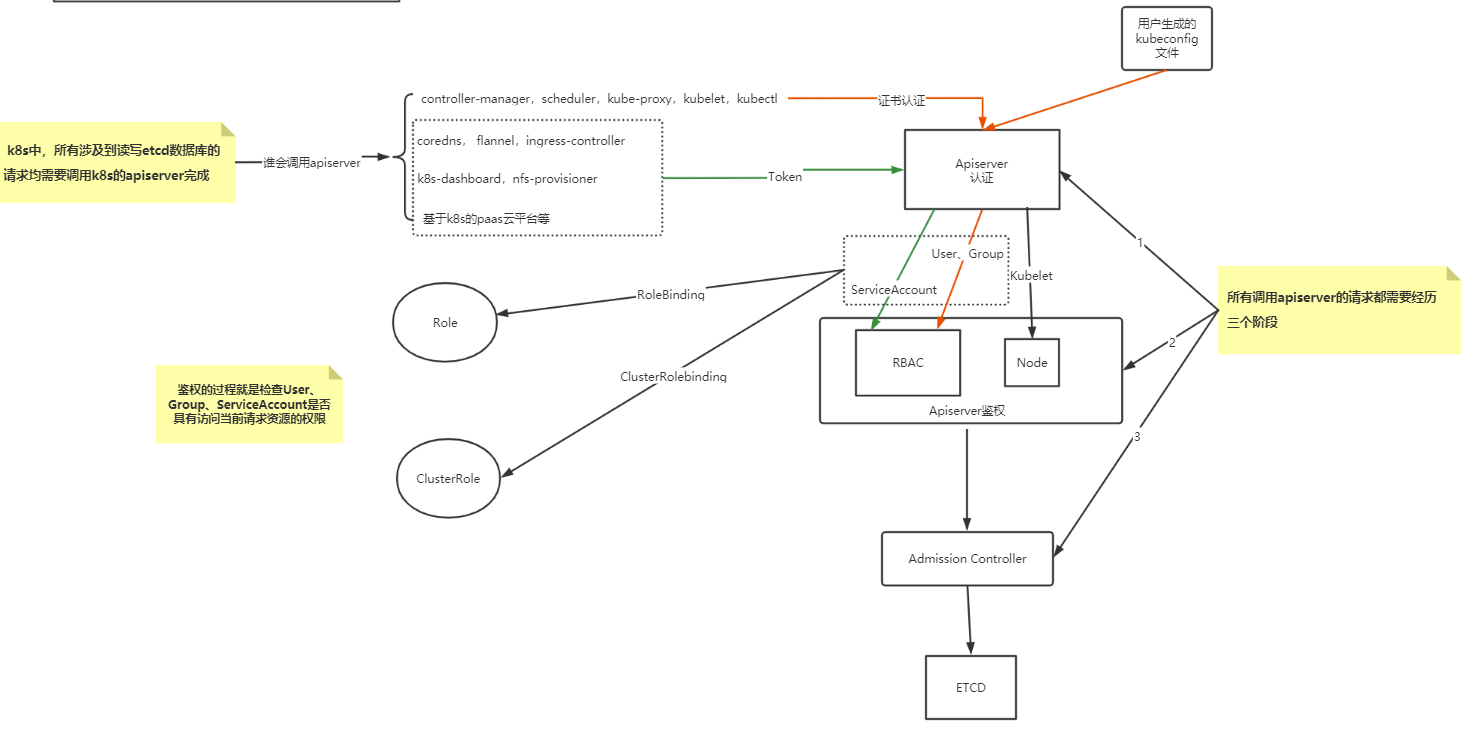
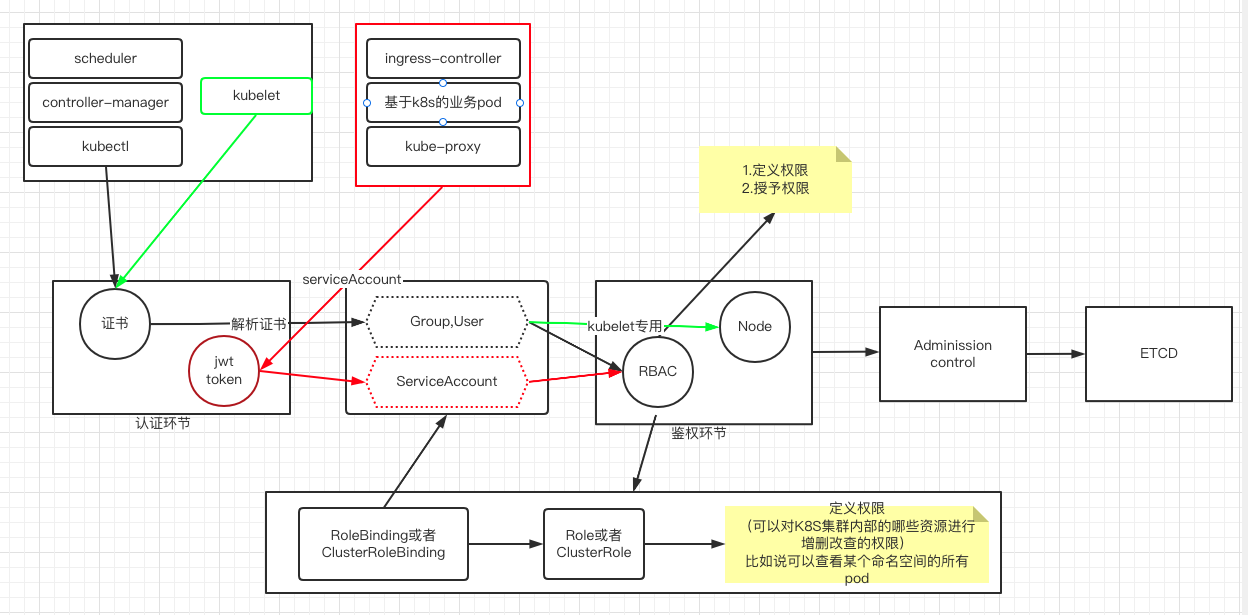
- Authentication:身份认证
- 这个环节它面对的输入是整个
http request,负责对来自client的请求进行身份校验,支持的方法包括:basic auth- client证书验证(https双向验证)
jwt token(用于serviceaccount)
- APIServer启动时,可以指定一种Authentication方法,也可以指定多种方法。如果指定了多种方法,那么APIServer将会逐个使用这些方法对客户端请求进行验证, 只要请求数据通过其中一种方法的验证,APIServer就会认为Authentication成功;
- 使用kubeadm引导启动的k8s集群,apiserver的初始配置中,默认支持
client证书验证和serviceaccount两种身份验证方式。 证书认证通过设置--client-ca-file根证书以及--tls-cert-file和--tls-private-key-file来开启。 - 在这个环节,apiserver会通过client证书或
http header中的字段(比如serviceaccount的jwt token)来识别出请求的用户身份,包括”user”、”group”等,这些信息将在后面的authorization环节用到。
- Authorization:鉴权,你可以访问哪些资源
- 这个环节面对的输入是
http request context中的各种属性,包括:user、group、request path(比如:/api/v1、/healthz、/version等)、request verb(比如:get、list、create等)。 - APIServer会将这些属性值与事先配置好的访问策略(
access policy)相比较。APIServer支持多种authorization mode,包括Node、RBAC、Webhook等。 - APIServer启动时,可以指定一种
authorization mode,也可以指定多种authorization mode,如果是后者,只要Request通过了其中一种mode的授权, 那么该环节的最终结果就是授权成功。在较新版本kubeadm引导启动的k8s集群的apiserver初始配置中,authorization-mode的默认配置是”Node,RBAC”。
-
Admission Control:准入控制,一个控制链(层层关卡),用于拦截请求的一种方式。偏集群安全控制、管理方面。
-
为什么需要?
认证与授权获取 http 请求 header 以及证书,无法通过body内容做校验。
Admission 运行在 API Server 的增删改查 handler 中,可以自然地操作 API resource
-
举个栗子
-
以NamespaceLifecycle为例, 该插件确保处于Termination状态的Namespace不再接收新的对象创建请求,并拒绝请求不存在的Namespace。该插件还可以防止删除系统保留的Namespace:default,kube-system,kube-public
-
LimitRanger,若集群的命名空间设置了LimitRange对象,若Pod声明时未设置资源值,则按照LimitRange的定义来为Pod添加默认值
apiVersion: v1
kind: LimitRange
metadata:
  name: mem-limit-range
  namespace: demo
spec:
  limits:
  - default:
      memory: 512Mi
    defaultRequest:
      memory: 256Mi
    type: Container
---
apiVersion: v1
kind: Pod
metadata:
  name: default-mem-demo
  namespace: demo
spec:
  containers:
  - name: default-mem-demo
    image: nginx:alpine
$ kubectl create ns demo $ kubectl apply -f 1m.yaml [root@k8s-master ~]# kubectl -n demo get pod -owide NAME READY STATUS RESTARTS AGE IP NODE NOMINATED NODE READINESS GATES default-mem-demo 1/1 Running 0 51s 10.244.1.18 k8s-slave1 <none> <none> [root@k8s-master ~]# kubectl -n demo get po default-mem-demo -oyaml apiVersion: v1 kind: Pod metadata: annotations: kubectl.kubernetes.io/last-applied-configuration: | {"apiVersion":"v1","kind":"Pod","metadata":{"annotations":{},"name":"default-mem-demo","namespace":"demo"},"spec":{"containers":[{"image":"nginx:alpine","name":"default-mem-demo"}]}} kubernetes.io/limit-ranger: 'LimitRanger plugin set: memory request for container default-mem-demo; memory limit for container default-mem-demo' creationTimestamp: "2022-10-18T06:44:44Z" name: default-mem-demo namespace: demo resourceVersion: "169530" uid: cf164b39-94c0-4855-aead-ad6e5d1d4c1e spec: containers: - image: nginx:alpine imagePullPolicy: IfNotPresent name: default-mem-demo resources: limits: # 默认设置上了 memory: 512Mi requests: memory: 256Mi terminationMessagePath: /dev/termination-log terminationMessagePolicy: File volumeMounts: - mountPath: /var/run/secrets/kubernetes.io/serviceaccount name: kube-api-access-m88bn readOnly: true dnsPolicy: ClusterFirst enableServiceLinks: true nodeName: k8s-slave1 preemptionPolicy: PreemptLowerPriority priority: 0 restartPolicy: Always schedulerName: default-scheduler securityContext: {} serviceAccount: default serviceAccountName: default terminationGracePeriodSeconds: 30 tolerations: - effect: NoExecute key: node.kubernetes.io/not-ready operator: Exists tolerationSeconds: 300 - effect: NoExecute key: node.kubernetes.io/unreachable operator: Exists tolerationSeconds: 300 volumes: - name: kube-api-access-m88bn projected: defaultMode: 420 sources: - serviceAccountToken: expirationSeconds: 3607 path: token - configMap: items: - key: ca.crt path: ca.crt name: kube-root-ca.crt - downwardAPI: items: - fieldRef: apiVersion: v1 fieldPath: metadata.namespace path: namespace status: conditions: - lastProbeTime: null lastTransitionTime: "2022-10-18T06:44:44Z" status: "True" type: Initialized - lastProbeTime: null lastTransitionTime: "2022-10-18T06:45:10Z" status: "True" type: Ready - lastProbeTime: null lastTransitionTime: "2022-10-18T06:45:10Z" status: "True" type: ContainersReady - lastProbeTime: null lastTransitionTime: "2022-10-18T06:44:44Z" status: "True" type: PodScheduled containerStatuses: - containerID: docker://a312e76b0b54b2adcab6c4c9d2cf573f72c260d41806cc6fd69b2bad5f63a5d1 image: nginx:alpine imageID: docker-pullable://nginx@sha256:eb05700fe7baa6890b74278e39b66b2ed1326831f9ec3ed4bdc6361a4ac2f333 lastState: {} name: default-mem-demo ready: true restartCount: 0 started: true state: running: startedAt: "2022-10-18T06:45:09Z" hostIP: 10.211.55.26 phase: Running podIP: 10.244.1.18 podIPs: - ip: 10.244.1.18 qosClass: Burstable startTime: "2022-10-18T06:44:44Z" -
-
NodeRestriction, 此插件限制kubelet修改Node和Pod对象,这样的kubelets只允许修改绑定到Node的Pod API对象,以后版本可能会增加额外的限制 。开启Node授权策略后,默认会打开该项
-
怎么用?
APIServer启动时通过 --enable-admission-plugins --disable-admission-plugins 指定需要打开或者关闭的 Admission Controller
-
场景
-
自动注入sidecar容器或者initContainer容器
- webhook admission,实现业务自定义的控制需求
kubectl的认证授权
kubectl的日志调试级别:
| 信息 | 描述 |
|---|---|
| v=0 | 通常,这对操作者来说总是可见的。 |
| v=1 | 当您不想要很详细的输出时,这个是一个合理的默认日志级别。 |
| v=2 | 有关服务和重要日志消息的有用稳定状态信息,这些信息可能与系统中的重大更改相关。这是大多数系统推荐的默认日志级别。 |
| v=3 | 关于更改的扩展信息。 |
| v=4 | 调试级别信息。 |
| v=6 | 显示请求资源。 |
| v=7 | 显示 HTTP 请求头。 |
| v=8 | 显示 HTTP 请求内容。 |
| v=9 | 显示 HTTP 请求内容,并且不截断内容。 |
$ kubectl get nodes -v=7
I0329 20:20:08.633065    3979 loader.go:359] Config loaded from file /root/.kube/config
I0329 20:20:08.633797    3979 round_trippers.go:416] GET https://172.21.51.143:6443/api/v1/nodes?limit=500
[root@k8s-master ~]# cat /root/.kube/config
apiVersion: v1
clusters:
- cluster:
    certificate-authority-data: LS0tLS1CRUdJTiBDRVJUSUZJQ0FURS0tLS0tCk1JSUM1ekNDQWMrZ0F3SUJBZ0lCQURBTkJna3Foa2lHOXcwQkFRc0ZBREFWTVJNd0VRWURWUVFERXdwcmRXSmwKY201bGRHVnpNQjRYRFRJeU1UQXhNREF6TURjek0xb1hEVE15TVRBd056QXpNRGN6TTFvd0ZURVRNQkVHQTFVRQpBeE1LYTNWaVpYSnVaWFJsY3pDQ0FTSXdEUVlKS29aSWh2Y05BUUVCQlFBRGdnRVBBRENDQVFvQ2dnRUJBTFI5CldQazUvRFYyZTJZWEx0NUcySW03ajNoSGRrSndiTUVqRFFLd1FyMXZNVUc0WWw4dmQxMk9odjIvYkRHUlh6T0sKRTR6ZEhRVEZKV1dLRTNhSHJYcGpUSnBuOWNBc2YxN2VFcy9RWHczVk03bmllZzIxY204bjc4akRUaTdaQUI0ZApmTWRYNmJscWx3U05LOGc0RUV5L1BFZjhjdzhOY25oTjZGSkJzc3p6MTMzVkFFM0w5QWVuUlppUklFNDNnaEhaCkJQRFY4aEpkQ3cyMDlTaHBranNvRXM1YWJyL3JQV1F6OVgvdzRlNGgyU1FXb2xXUERQckdIeStqeDloa2RkMDQKa1EvYnZaOEdFZDl3aWhaYXNvelA0VmNOYk5UR0ZQbmpNUjM0dkE0U3BTQ2U1VFZWZkQ0ZitFRW9IM3NET25vbgpldGM3NldsSUpkMkY3Q2Q3ZWpFQ0F3RUFBYU5DTUVBd0RnWURWUjBQQVFIL0JBUURBZ0trTUE4R0ExVWRFd0VCCi93UUZNQU1CQWY4d0hRWURWUjBPQkJZRUZJSGlTWFZDNXRXRmJZWUwxdm1ya3VjMlJseVNNQTBHQ1NxR1NJYjMKRFFFQkN3VUFBNElCQVFCL2NZMVFtd3ZZN09EeDQ1WVcveExTRWlmcTRvc08xTFF6bXdJcFBodW5FWEFoa3NWcAp3bkdCL3JTdjhjNzVwOVhmUG1pWTNNaXJpNENIU1lRSnBXWGY0YUZ1ZDJ0MnNvVmdkTkNGeE50QlNzU1NBY1JmCk5LdkJLZzZtS1YxUUEvaG5HbklMU1Rhd2YxdGdrVERMNmEwQTkzSk1NMENZNWRwK084RnhDOEN3RFlWelRCQXoKa3RIS3p1RU9QbCszWGhSSFJldGJjUHM1L2pPbVBicmZHK1JReWhtSmJhZE5BRGV2QVBFZnNhajFQVTNWTU1DVQpVWFlDc2JMU1ZaSEhRT2Yyd202L0JBWS93Zkdaclo1OXpVUndUZnFJSTd4Q2R3Qnc4ZG5CL24rcDhtQUs3SnFUCkZwYWZPdUgralRxQnlJR0VSWUFPRzhwVS9NQkpHckphRjM2ZQotLS0tLUVORCBDRVJUSUZJQ0FURS0tLS0tCg==
    server: https://10.211.55.25:6443
  name: kubernetes
contexts:
- context:
    cluster: kubernetes
    user: kubernetes-admin
  name: kubernetes-admin@kubernetes
current-context: kubernetes-admin@kubernetes
kind: Config
preferences: {}
users:
- name: kubernetes-admin
  user:
    client-certificate-data: LS0tLS1CRUdJTiBDRVJUSUZJQ0FURS0tLS0tCk1JSUM4ekNDQWR1Z0F3SUJBZ0lKQUp5dWdZbEdzTXMwTUEwR0NTcUdTSWIzRFFFQkN3VUFNQlV4RXpBUkJnTlYKQkFNVENtdDFZbVZ5Ym1WMFpYTXdIaGNOTWpJeE1ERXdNRFV4TlRJMVdoY05Nekl4TURBM01EVXhOVEkxV2pBMApNUmN3RlFZRFZRUUtEQTV6ZVhOMFpXMDZiV0Z6ZEdWeWN6RVpNQmNHQTFVRUF3d1FhM1ZpWlhKdVpYUmxjeTFoClpHMXBiakNDQVNJd0RRWUpLb1pJaHZjTkFRRUJCUUFEZ2dFUEFEQ0NBUW9DZ2dFQkFNaVJyaWhJMUk0L0xkWWQKVkRBQkFqUkpEa3lPR3dRT2NVblRsNUVJS29nZ09rZGZ2azRrTkJlUWlLNmd4cUlUY3M0SEQ3ZmhqSW9tUkU1Ugpyd00wa2lQVmhJb2VvVVl2dXE0eEJxY2ZGenRtU0E4Ni9aSEk5Q2FaOW93RnNNZmpXRDZ0QlRlUUwwdDVWWG13ClBmemxkbFI1VmVBV3lzZVV4blNtOU1oYkJJY2pjc0lwbnpuQzM5WmNjY2IwZko5a0V1V21JUTVZMng1TEFRdXAKUEY4ODNUYWpXOGw5OTFZV0ZVY1FnRG9iVjhySGRGdTZaMHcwM1BpdFRQRXliTitlQ3o1dEI4cnhlbFhhQXR5SQpoQ2hwU2FsakIvRkVJMGl1OUNRN3UzMmVJZExtcUE3cklScmYxMjdqcXRVelhpUjZHVzNjc1ZubjE3L3R4YytDClFsSjlnajhDQXdFQUFhTW5NQ1V3RGdZRFZSMFBBUUgvQkFRREFnV2dNQk1HQTFVZEpRUU1NQW9HQ0NzR0FRVUYKQndNQ01BMEdDU3FHU0liM0RRRUJDd1VBQTRJQkFRQk8zSVRsbFhCOUNNVk1ITzJlOXJ0eWMrM1R5VHdMK0ltawp4SCtyT3pZYWF6Tm1ZN0FyZmpHME1hdlBidW9aOW50dmExWDBSaXIzT3FtL1RwYzV1OHpKVW1raytiZmluS2dmCndaRFNQVEdHR0taQUp5UXBwbGREenJpVm9GQi9GYlgya0ozblBlZWwrb0F6aVpGYitYendpcFJ5TnVGR0g3REcKK2JXTi9yZ1BxalRNcXRzaG9rMFdMM1JHRW8xSmVWYmY1akMycHM5cXFJZWs5SVJJenI1TEMvQ1VSaDNKTW9WZQpFVmtOY283d25qR2pCbzh2b1o0b0hSOW9IeHN1T3BmSjN0SVRjNE0zK3kzRUM3cG5IRnA0R2EvVXlhVFdRMWNYCnRqNVNiVWtSdUJLdzZuTm9CVlo2dUlUQStTcjJlYkZkZEExYjBmY2JVcXduanNHL1N0NXkKLS0tLS1FTkQgQ0VSVElGSUNBVEUtLS0tLQo=
    client-key-data: LS0tLS1CRUdJTiBSU0EgUFJJVkFURSBLRVktLS0tLQpNSUlFb3dJQkFBS0NBUUVBeUpHdUtFalVqajh0MWgxVU1BRUNORWtPVEk0YkJBNXhTZE9Ya1FncWlDQTZSMSsrClRpUTBGNUNJcnFER29oTnl6Z2NQdCtHTWlpWkVUbEd2QXpTU0k5V0VpaDZoUmkrNnJqRUdweDhYTzJaSUR6cjkKa2NqMEpwbjJqQVd3eCtOWVBxMEZONUF2UzNsVmViQTkvT1YyVkhsVjRCYkt4NVRHZEtiMHlGc0VoeU55d2ltZgpPY0xmMWx4eHh2UjhuMlFTNWFZaERsamJIa3NCQzZrOFh6emROcU5ieVgzM1ZoWVZSeENBT2h0WHlzZDBXN3BuClREVGMrSzFNOFRKczM1NExQbTBIeXZGNlZkb0MzSWlFS0dsSnFXTUg4VVFqU0s3MEpEdTdmWjRoMHVhb0R1c2gKR3QvWGJ1T3ExVE5lSkhvWmJkeXhXZWZYdiszRno0SkNVbjJDUHdJREFRQUJBb0lCQUZwL3VVaCtERUtlNlV5NgpjUmt6NjAyeVJSeHY1bXEvSllqOVMxOXFndDVuUkVTZVE5MDRZclRiUjRFY0ZHUmZTQ2NFY3FneXdsbzNpQXlhCnVOQkdjVVp2K2x6a0V6cjdJRTJtMjJ5ZkQ3bUNuak1aRi84bTRGdG1qeU9CRWRJdmw4cTRBU21nQ21jUXVXdXUKQlZwT0kwVmNkazRsbXB2UlduYWFPc3NJbnBObXMzZW1yN2U0RnhEODFXVXVBK21JbW1TUXIwUnY4azQ1WkRnVgp0MWZkcC9YVEV1Z3VSUTQ0THBudi9nOU00YUNwcFU2dk5ScU5WNnh0d0wwcmVPRS95djVTcFpIK3E3RTducGJZCkdSYWNtTkVnZzNvSTJBSlBlOStWS00vV01zRk1aZUJoNXNnSnZzNS8xa0dwcURrc3pad3VjZzl2cDR4RGRaWjAKVDVudWFwRUNnWUVBNys3cmtzOFNFbXpEaVZyTmNXZnJpZFErZzNqZS9INmtjc0lSeXNOSmVGdjhrZDZ1N0hyVgpMRzk5dVc5WGtybnQ5SHJuMS9mMjB5Z3lvVTJteFlOQXBKWmhnTWZyWTFjK1RuZTBxbmx1SlVERjBURkordkl4CmRPOStEdkpwelFycExxbzBzc1AwT3BMbmJqTFZxOVBSWkdqZHN6UCt1SzRiUzNPQm9JNDhaUWtDZ1lFQTFmLzAKZ3ZzMjVRQ2puUXR5NVpSU29HRlRvdWd2Tm5kUG5maFdHSmR1aHB6ZGcwWFllZ1M0R2pyZnlCOXFKdHhYZkt3VwpZK3lmREZYb2FDUE94OXl4UEF1RytHZndHRUprRHVRNFRMSXRvSHdxN3p5OXIrZzh4a3c4Yjl0NUpuWVZiVTBoCjdOakJaS3dqOHdCREVYVlpBdXpYbWNsNDVpejRpMjZYRjZQWGh3Y0NnWUF4dTBQNDJoTFUzdFpvMGZsaldEYnEKQ3FRcWZCTThJc1BUUllhS2tJL1o4cmNYUlNEY3cxa01MTS9TYjlHbkNBTGFlZDgwVktGRWcwQjdUcTBTbzNIeQpxM2pxU0lYeHdWT1kwQmNTZnJqbDM5Y2cxU2FRYlVMekNmRUhDQmdGK0F6OUx5cGRJMkNzQTJjVTRGU0ptUTM5CjBmNmg5bFVGMHBDMXd1dExiQy80Z1FLQmdCbkFHTjRCK0pNSnhxWkpFR1JMdXIyTnVKQ3J1N0trSExKM2hYU2sKRkNxaWlZMFlSSG82UXlUMDNLU3FFdzNtQ2FqNDFDRG1BaVZyMlBGZkRhekRBNWlrRW5PbG5pQnRMTGtXQVNoSgpjSEFWUU4xVXc4WjgvWU1tL1ViQWRBMkt1LzFSQUxvTlF3Z29KcE5BL3RFRSs5YjhSTjArZnd2RGNZemxtOHkrCmJGclZBb0dCQUp3TmdINkgrWEZFcGx6bFpILzZvbEJoa3ljcnBiOTZGTmN3eXA5cGNSUXhsaC9tZGNFd2lBSDYKbXhDUG1IY2JlcEZlejNlVGpaUnJOeFdRMFp6UGQyVk5VbFZXUE1uV3Vadk0wWFJhRng5YmdqY2hLUERhU0N4SwpXaTYxcHFKcUZVSlRzQjM5WWdjZk1TTjI3WVBzbHVEWlI1MkVrTDFlT3Nkb2pBTm54R0VqCi0tLS0tRU5EIFJTQSBQUklWQVRFIEtFWS0tLS0tCg==
[root@k8s-master ~]# echo LS0tLS1CRUdJTiBDRVJUSUZJQ0FURS0tLS0tCk1JSUM4ekNDQWR1Z0F3SUJBZ0lKQUp5dWdZbEdzTXMwTUEwR0NTcUdTSWIzRFFFQkN3VUFNQlV4RXpBUkJnTlYKQkFNVENtdDFZbVZ5Ym1WMFpYTXdIaGNOTWpJeE1ERXdNRFV4TlRJMVdoY05Nekl4TURBM01EVXhOVEkxV2pBMApNUmN3RlFZRFZRUUtEQTV6ZVhOMFpXMDZiV0Z6ZEdWeWN6RVpNQmNHQTFVRUF3d1FhM1ZpWlhKdVpYUmxjeTFoClpHMXBiakNDQVNJd0RRWUpLb1pJaHZjTkFRRUJCUUFEZ2dFUEFEQ0NBUW9DZ2dFQkFNaVJyaWhJMUk0L0xkWWQKVkRBQkFqUkpEa3lPR3dRT2NVblRsNUVJS29nZ09rZGZ2azRrTkJlUWlLNmd4cUlUY3M0SEQ3ZmhqSW9tUkU1Ugpyd00wa2lQVmhJb2VvVVl2dXE0eEJxY2ZGenRtU0E4Ni9aSEk5Q2FaOW93RnNNZmpXRDZ0QlRlUUwwdDVWWG13ClBmemxkbFI1VmVBV3lzZVV4blNtOU1oYkJJY2pjc0lwbnpuQzM5WmNjY2IwZko5a0V1V21JUTVZMng1TEFRdXAKUEY4ODNUYWpXOGw5OTFZV0ZVY1FnRG9iVjhySGRGdTZaMHcwM1BpdFRQRXliTitlQ3o1dEI4cnhlbFhhQXR5SQpoQ2hwU2FsakIvRkVJMGl1OUNRN3UzMmVJZExtcUE3cklScmYxMjdqcXRVelhpUjZHVzNjc1ZubjE3L3R4YytDClFsSjlnajhDQXdFQUFhTW5NQ1V3RGdZRFZSMFBBUUgvQkFRREFnV2dNQk1HQTFVZEpRUU1NQW9HQ0NzR0FRVUYKQndNQ01BMEdDU3FHU0liM0RRRUJDd1VBQTRJQkFRQk8zSVRsbFhCOUNNVk1ITzJlOXJ0eWMrM1R5VHdMK0ltawp4SCtyT3pZYWF6Tm1ZN0FyZmpHME1hdlBidW9aOW50dmExWDBSaXIzT3FtL1RwYzV1OHpKVW1raytiZmluS2dmCndaRFNQVEdHR0taQUp5UXBwbGREenJpVm9GQi9GYlgya0ozblBlZWwrb0F6aVpGYitYendpcFJ5TnVGR0g3REcKK2JXTi9yZ1BxalRNcXRzaG9rMFdMM1JHRW8xSmVWYmY1akMycHM5cXFJZWs5SVJJenI1TEMvQ1VSaDNKTW9WZQpFVmtOY283d25qR2pCbzh2b1o0b0hSOW9IeHN1T3BmSjN0SVRjNE0zK3kzRUM3cG5IRnA0R2EvVXlhVFdRMWNYCnRqNVNiVWtSdUJLdzZuTm9CVlo2dUlUQStTcjJlYkZkZEExYjBmY2JVcXduanNHL1N0NXkKLS0tLS1FTkQgQ0VSVElGSUNBVEUtLS0tLQo=|base64 -d
-----BEGIN CERTIFICATE-----
MIIC8zCCAdugAwIBAgIJAJyugYlGsMs0MA0GCSqGSIb3DQEBCwUAMBUxEzARBgNV
BAMTCmt1YmVybmV0ZXMwHhcNMjIxMDEwMDUxNTI1WhcNMzIxMDA3MDUxNTI1WjA0
MRcwFQYDVQQKDA5zeXN0ZW06bWFzdGVyczEZMBcGA1UEAwwQa3ViZXJuZXRlcy1h
ZG1pbjCCASIwDQYJKoZIhvcNAQEBBQADggEPADCCAQoCggEBAMiRrihI1I4/LdYd
VDABAjRJDkyOGwQOcUnTl5EIKoggOkdfvk4kNBeQiK6gxqITcs4HD7fhjIomRE5R
rwM0kiPVhIoeoUYvuq4xBqcfFztmSA86/ZHI9CaZ9owFsMfjWD6tBTeQL0t5VXmw
PfzldlR5VeAWyseUxnSm9MhbBIcjcsIpnznC39Zcccb0fJ9kEuWmIQ5Y2x5LAQup
PF883TajW8l991YWFUcQgDobV8rHdFu6Z0w03PitTPEybN+eCz5tB8rxelXaAtyI
hChpSaljB/FEI0iu9CQ7u32eIdLmqA7rIRrf127jqtUzXiR6GW3csVnn17/txc+C
QlJ9gj8CAwEAAaMnMCUwDgYDVR0PAQH/BAQDAgWgMBMGA1UdJQQMMAoGCCsGAQUF
BwMCMA0GCSqGSIb3DQEBCwUAA4IBAQBO3ITllXB9CMVMHO2e9rtyc+3TyTwL+Imk
xH+rOzYaazNmY7ArfjG0MavPbuoZ9ntva1X0Rir3Oqm/Tpc5u8zJUmkk+bfinKgf
wZDSPTGGGKZAJyQppldDzriVoFB/FbX2kJ3nPeel+oAziZFb+XzwipRyNuFGH7DG
+bWN/rgPqjTMqtshok0WL3RGEo1JeVbf5jC2ps9qqIek9IRIzr5LC/CURh3JMoVe
EVkNco7wnjGjBo8voZ4oHR9oHxsuOpfJ3tITc4M3+y3EC7pnHFp4Ga/UyaTWQ1cX
tj5SbUkRuBKw6nNoBVZ6uITA+Sr2ebFddA1b0fcbUqwnjsG/St5y
-----END CERTIFICATE-----
[root@k8s-master ~]# echo LS0tLS1CRUdJTiBDRVJUSUZJQ0FURS0tLS0tCk1JSUM4ekNDQWR1Z0F3SUJBZ0lKQUp5dWdZbEdzTXMwTUEwR0NTcUdTSWIzRFFFQkN3VUFNQlV4RXpBUkJnTlYKQkFNVENtdDFZbVZ5Ym1WMFpYTXdIaGNOTWpJeE1ERXdNRFV4TlRJMVdoY05Nekl4TURBM01EVXhOVEkxV2pBMApNUmN3RlFZRFZRUUtEQTV6ZVhOMFpXMDZiV0Z6ZEdWeWN6RVpNQmNHQTFVRUF3d1FhM1ZpWlhKdVpYUmxjeTFoClpHMXBiakNDQVNJd0RRWUpLb1pJaHZjTkFRRUJCUUFEZ2dFUEFEQ0NBUW9DZ2dFQkFNaVJyaWhJMUk0L0xkWWQKVkRBQkFqUkpEa3lPR3dRT2NVblRsNUVJS29nZ09rZGZ2azRrTkJlUWlLNmd4cUlUY3M0SEQ3ZmhqSW9tUkU1Ugpyd00wa2lQVmhJb2VvVVl2dXE0eEJxY2ZGenRtU0E4Ni9aSEk5Q2FaOW93RnNNZmpXRDZ0QlRlUUwwdDVWWG13ClBmemxkbFI1VmVBV3lzZVV4blNtOU1oYkJJY2pjc0lwbnpuQzM5WmNjY2IwZko5a0V1V21JUTVZMng1TEFRdXAKUEY4ODNUYWpXOGw5OTFZV0ZVY1FnRG9iVjhySGRGdTZaMHcwM1BpdFRQRXliTitlQ3o1dEI4cnhlbFhhQXR5SQpoQ2hwU2FsakIvRkVJMGl1OUNRN3UzMmVJZExtcUE3cklScmYxMjdqcXRVelhpUjZHVzNjc1ZubjE3L3R4YytDClFsSjlnajhDQXdFQUFhTW5NQ1V3RGdZRFZSMFBBUUgvQkFRREFnV2dNQk1HQTFVZEpRUU1NQW9HQ0NzR0FRVUYKQndNQ01BMEdDU3FHU0liM0RRRUJDd1VBQTRJQkFRQk8zSVRsbFhCOUNNVk1ITzJlOXJ0eWMrM1R5VHdMK0ltawp4SCtyT3pZYWF6Tm1ZN0FyZmpHME1hdlBidW9aOW50dmExWDBSaXIzT3FtL1RwYzV1OHpKVW1raytiZmluS2dmCndaRFNQVEdHR0taQUp5UXBwbGREenJpVm9GQi9GYlgya0ozblBlZWwrb0F6aVpGYitYendpcFJ5TnVGR0g3REcKK2JXTi9yZ1BxalRNcXRzaG9rMFdMM1JHRW8xSmVWYmY1akMycHM5cXFJZWs5SVJJenI1TEMvQ1VSaDNKTW9WZQpFVmtOY283d25qR2pCbzh2b1o0b0hSOW9IeHN1T3BmSjN0SVRjNE0zK3kzRUM3cG5IRnA0R2EvVXlhVFdRMWNYCnRqNVNiVWtSdUJLdzZuTm9CVlo2dUlUQStTcjJlYkZkZEExYjBmY2JVcXduanNHL1N0NXkKLS0tLS1FTkQgQ0VSVElGSUNBVEUtLS0tLQo=|base64 -d > auth/kubectl.crt
[root@k8s-master ~]# mkdir auth
[root@k8s-master ~]# mv kubectl.crt auth/
[root@k8s-master ~]# ll /etc/kubernetes/pki/ca.crt
-rw-r--r--. 1 root root 1066 10月 10 11:07 /etc/kubernetes/pki/ca.crt
# 验证证书是否是合法,
[root@k8s-master ~]# openssl verify -CAfile /etc/kubernetes/pki/ca.crt auth/kubectl.crt
auth/kubectl.crt: OK
# 证书解析
[root@k8s-master ~]# openssl x509 -in auth/kubectl.crt -text
Certificate:
    Data:
        Version: 3 (0x2)
        Serial Number:
            9c:ae:81:89:46:b0:cb:34
    Signature Algorithm: sha256WithRSAEncryption
        Issuer: CN=kubernetes
        Validity
            Not Before: Oct 10 05:15:25 2022 GMT
            Not After : Oct  7 05:15:25 2032 GMT
        Subject: O=system:masters, CN=kubernetes-admin  # o: Group CN:user
        Subject Public Key Info:
            Public Key Algorithm: rsaEncryption
                Public-Key: (2048 bit)
                ....
kubeadm init启动完master节点后,会默认输出类似下面的提示内容:
... ...
Your Kubernetes master has initialized successfully!

To start using your cluster, you need to run the following as a regular user:
  mkdir -p $HOME/.kube
  sudo cp -i /etc/kubernetes/admin.conf $HOME/.kube/config
  sudo chown $(id -u):$(id -g) $HOME/.kube/config
... ...
这些信息是在告知我们如何配置kubeconfig文件。按照上述命令配置后,master节点上的kubectl就可以直接使用$HOME/.kube/config的信息访问k8s cluster了。 并且,通过这种配置方式,kubectl也拥有了整个集群的管理员(root)权限。
很多K8s初学者在这里都会有疑问:
- 当
kubectl使用这种kubeconfig方式访问集群时,Kubernetes的kube-apiserver是如何对来自kubectl的访问进行身份验证(authentication)和授权(authorization)的呢? - 为什么来自
kubectl的请求拥有最高的管理员权限呢?
查看/root/.kube/config文件:
前面提到过apiserver的authentication支持通过tls client certificate、basic auth、token等方式对客户端发起的请求进行身份校验, 从kubeconfig信息来看,kubectl显然在请求中使用了tls client certificate的方式,即客户端的证书。
证书base64解码:
说明在认证阶段,apiserver会首先使用--client-ca-file配置的CA证书去验证kubectl提供的证书的有效性,基本的方式 :
除了认证身份,还会取出必要的信息供授权阶段使用,文本形式查看证书内容:
$ openssl x509 -in kubectl.crt -text
Certificate:
    Data:
        Version: 3 (0x2)
        Serial Number: 4736260165981664452 (0x41ba9386f52b74c4)
    Signature Algorithm: sha256WithRSAEncryption
        Issuer: CN=kubernetes
        Validity
            Not Before: Feb 10 07:33:39 2020 GMT
            Not After : Feb  9 07:33:40 2021 GMT
        Subject: O=system:masters, CN=kubernetes-admin
        ...
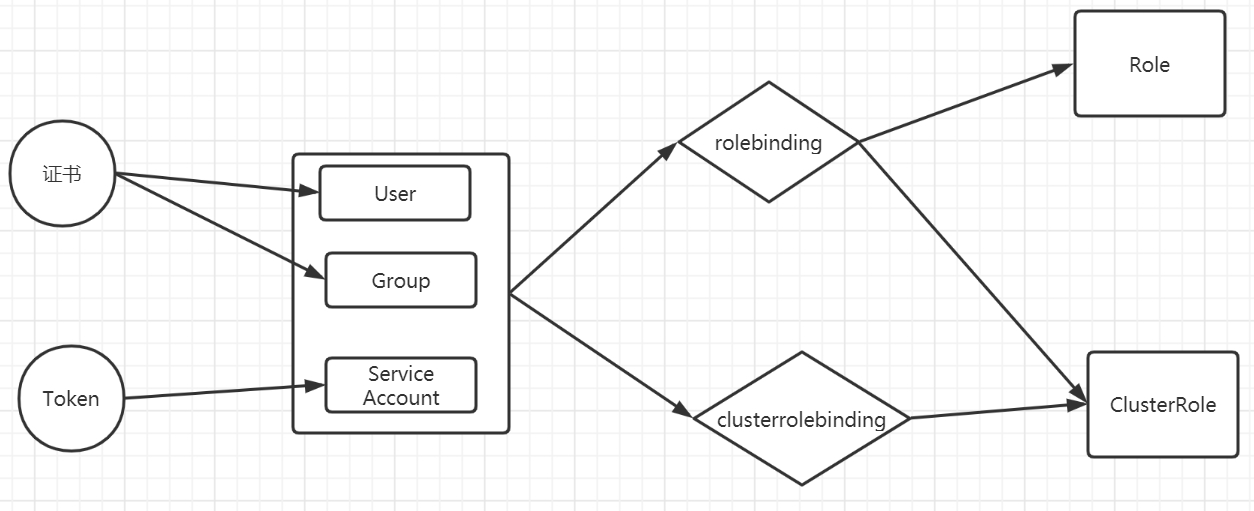
认证通过后,提取出签发证书时指定的CN(Common Name),kubernetes-admin,作为请求的用户名 (User Name), 从证书中提取O(Organization)字段作为请求用户所属的组 (Group),group = system:masters,然后传递给后面的授权模块。
kubeadm在init初始引导集群启动过程中,创建了许多默认的RBAC规则, 在k8s有关RBAC的官方文档中,我们看到下面一些default clusterrole列表:
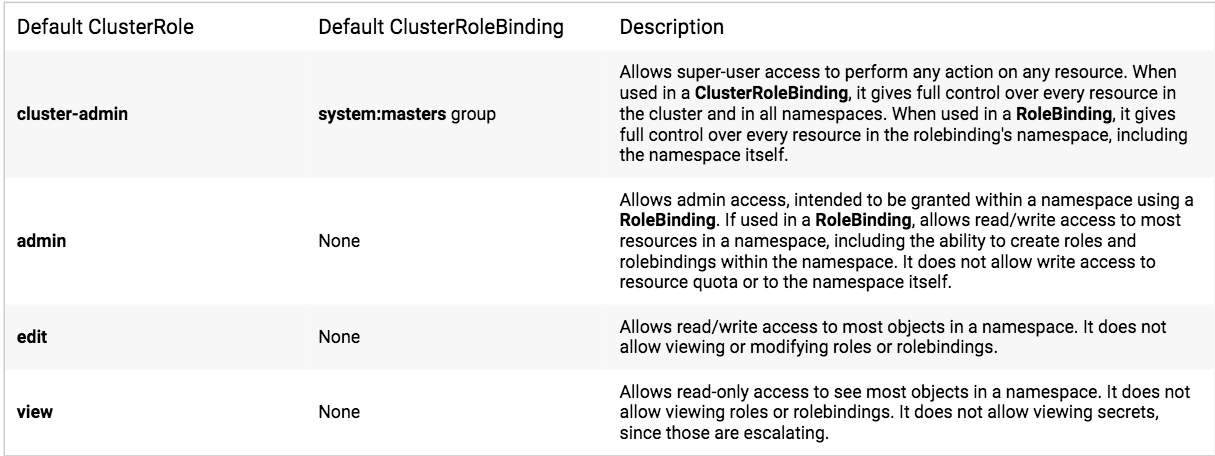
其中第一个cluster-admin这个cluster role binding绑定了system:masters group,这和authentication环节传递过来的身份信息不谋而合。 沿着system:masters group对应的cluster-admin clusterrolebinding“追查”下去,真相就会浮出水面。
我们查看一下这一binding:
$ kubectl describe clusterrolebinding cluster-admin
Name:         cluster-admin
Labels:       kubernetes.io/bootstrapping=rbac-defaults
Annotations:  rbac.authorization.kubernetes.io/autoupdate: true
Role:
  Kind:  ClusterRole
  Name:  cluster-admin
Subjects:
  Kind   Name            Namespace
  ----   ----            ---------
  Group  system:masters
我们看到在kube-system名字空间中,一个名为cluster-admin的clusterrolebinding将cluster-admin cluster role与system:masters Group绑定到了一起, 赋予了所有归属于system:masters Group中用户cluster-admin角色所拥有的权限。
我们再来查看一下cluster-admin这个role的具体权限信息:
$ kubectl describe clusterrole cluster-admin
Name:         cluster-admin
Labels:       kubernetes.io/bootstrapping=rbac-defaults
Annotations:  rbac.authorization.kubernetes.io/autoupdate: true
PolicyRule:
  Resources  Non-Resource URLs  Resource Names  Verbs
  ---------  -----------------  --------------  -----
  *.*        []                 []              [*]
             [*]                []              [*]
非资源类,如查看集群健康状态。
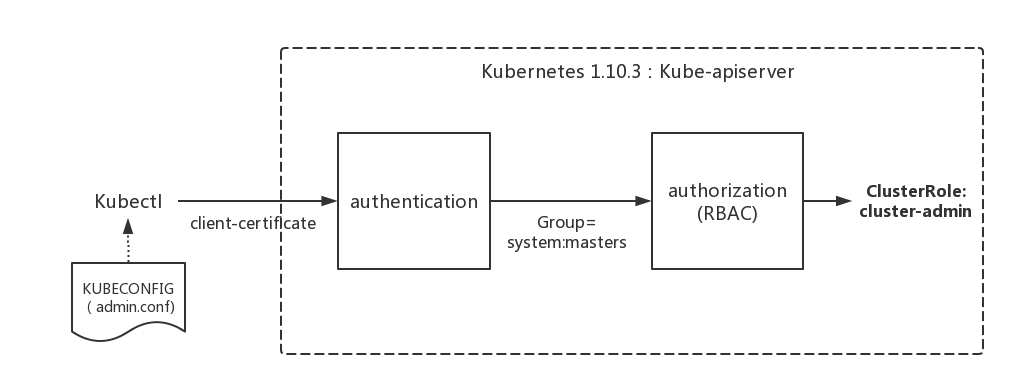
RBAC
Role-Based Access Control,基于角色的访问控制, apiserver启动参数添加--authorization-mode=RBAC 来启用RBAC认证模式,kubeadm安装的集群默认已开启。官方介绍
查看开启:
RBAC模式引入了4个资源类型:
- Role,角色
一个Role只能授权访问单个namespace
## 示例定义一个名为pod-reader的角色,该角色具有读取demo这个命名空间下的pods的权限
kind: Role
apiVersion: rbac.authorization.k8s.io/v1
metadata:
  namespace: demo
  name: pod-reader
rules:
- apiGroups: [""] # "" indicates the core API group
  resources: ["pods"]
  verbs: ["get", "watch", "list"]

## apiGroups: "","apps", "autoscaling", "batch", kubectl api-versions
## resources: "services", "pods","deployments"... kubectl api-resources
## verbs: "get", "list", "watch", "create", "update", "patch", "delete", "exec"

## https://kubernetes.io/docs/reference/generated/kubernetes-api/v1.19/
- ClusterRole
一个ClusterRole能够授予和Role一样的权限,但是它是集群范围内的。
## 定义一个集群角色,名为secret-reader,该角色可以读取所有的namespace中的secret资源
kind: ClusterRole
apiVersion: rbac.authorization.k8s.io/v1
metadata:
  # "namespace" omitted since ClusterRoles are not namespaced
  name: secret-reader
rules:
- apiGroups: [""]
  resources: ["secrets"]
  verbs: ["get", "watch", "list"]

# User,Group,ServiceAccount
- Rolebinding
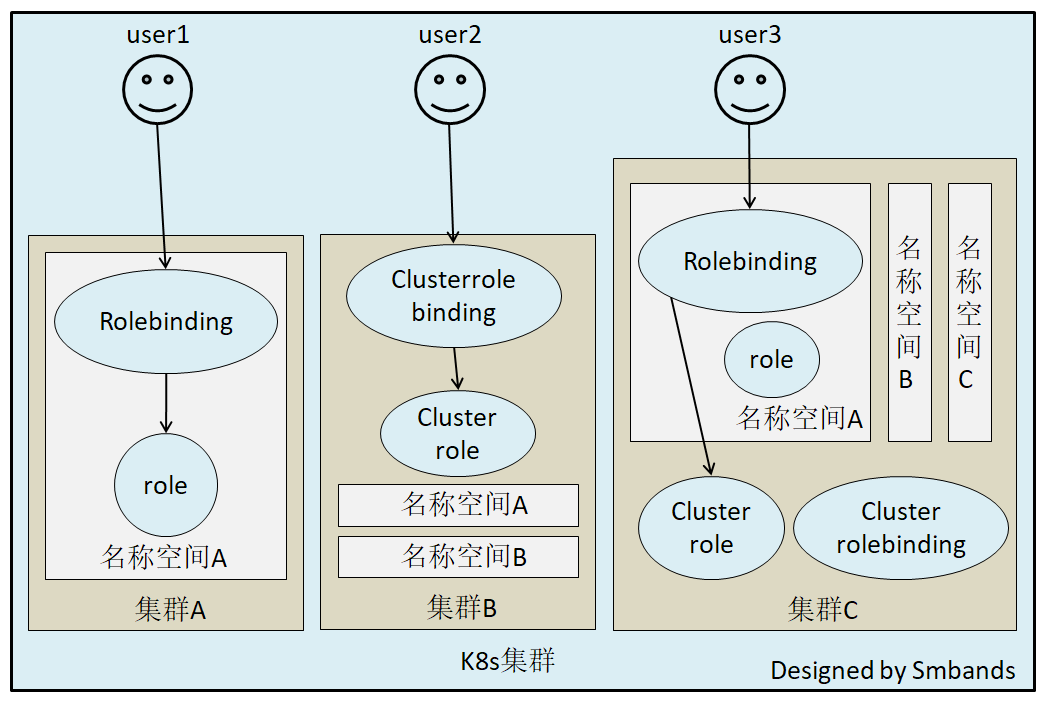
将role中定义的权限分配给用户和用户组。RoleBinding包含主题(users,groups,或service accounts)和授予角色的引用。对于namespace内的授权使用RoleBinding,集群范围内使用ClusterRoleBinding。
## 定义一个角色绑定,将pod-reader这个role的权限授予给jane这个User,使得jane可以在读取default这个命名空间下的所有的pod数据
kind: RoleBinding
apiVersion: rbac.authorization.k8s.io/v1
metadata:
  name: read-pods
  namespace: demo
subjects:
- kind: User   #这里可以是User,Group,ServiceAccount
  name: jane
  apiGroup: rbac.authorization.k8s.io
roleRef:
  kind: ClusterRole #这里可以是Role或者ClusterRole,若是ClusterRole,则权限也仅限于rolebinding的内部
  name: secret-reader # match the name of the Role or ClusterRole you wish to bind to
  apiGroup: rbac.authorization.k8s.io
注意:rolebinding既可以绑定role,也可以绑定clusterrole,当绑定clusterrole的时候,subject的权限也会被限定于rolebinding定义的namespace内部,若想跨namespace,需要使用clusterrolebinding
## 定义一个角色绑定,将dave这个用户和secret-reader这个集群角色绑定,虽然secret-reader是集群角色,但是因为是使用rolebinding绑定的,因此dave的权限也会被限制在development这个命名空间内
apiVersion: rbac.authorization.k8s.io/v1
# This role binding allows "dave" to read secrets in the "development" namespace.
# You need to already have a ClusterRole named "secret-reader".
kind: RoleBinding
metadata:
  name: read-secrets
  #
  # The namespace of the RoleBinding determines where the permissions are granted.
  # This only grants permissions within the "development" namespace.
  namespace: development
subjects:
- kind: User
  name: dave # Name is case sensitive
  apiGroup: rbac.authorization.k8s.io
- kind: ServiceAccount
  name: dave # Name is case sensitive
  namespace: luffy
roleRef:
  kind: ClusterRole
  name: secret-reader
  apiGroup: rbac.authorization.k8s.io
考虑一个场景: 如果集群中有多个namespace分配给不同的管理员,每个namespace的权限是一样的,就可以只定义一个clusterrole,然后通过rolebinding将不同的namespace绑定到管理员身上,否则就需要每个namespace定义一个Role,然后做一次rolebinding。
- ClusterRolebingding
允许跨namespace进行授权
apiVersion: rbac.authorization.k8s.io/v1
# This cluster role binding allows anyone in the "manager" group to read secrets in any namespace.
kind: ClusterRoleBinding
metadata:
  name: read-secrets-global
subjects:
- kind: Group
  name: manager # Name is case sensitive  |名称区分大小写
  apiGroup: rbac.authorization.k8s.io
roleRef:
  kind: ClusterRole
  name: secret-reader
  apiGroup: rbac.authorization.k8s.io
kubelet的认证授权
查看kubelet进程
$ systemctl status kubelet
● kubelet.service - kubelet: The Kubernetes Node Agent
   Loaded: loaded (/usr/lib/systemd/system/kubelet.service; enabled; vendor preset: disabled)
  Drop-In: /usr/lib/systemd/system/kubelet.service.d
           └─10-kubeadm.conf
   Active: active (running) since Sun 2020-07-05 19:33:36 EDT; 1 day 12h ago
     Docs: https://kubernetes.io/docs/
 Main PID: 10622 (kubelet)
    Tasks: 24
   Memory: 60.5M
   CGroup: /system.slice/kubelet.service
           └─851 /usr/bin/kubelet --bootstrap-kubeconfig=/etc/kubernetes/bootstrap-kubelet.conf --kubeconfig=/etc/kubernetes/kubelet.conf
查看/etc/kubernetes/kubelet.conf,解析证书:
$ echo xxxxx |base64 -d >kubelet.crt
$ openssl x509 -in kubelet.crt -text
Certificate:
    Data:
        Version: 3 (0x2)
        Serial Number: 9059794385454520113 (0x7dbadafe23185731)
    Signature Algorithm: sha256WithRSAEncryption
        Issuer: CN=kubernetes
        Validity
            Not Before: Feb 10 07:33:39 2020 GMT
            Not After : Feb  9 07:33:40 2021 GMT
        Subject: O=system:nodes, CN=system:node:master-1
得到我们期望的内容:
我们知道,k8s会把O作为Group来进行请求,因此如果有权限绑定给这个组,肯定在clusterrolebinding的定义中可以找得到。因此尝试去找一下绑定了system:nodes组的clusterrolebinding
$ kubectl get clusterrolebinding -oyaml|grep -n10 system:nodes
178-    resourceVersion: "225"
179-    selfLink: /apis/rbac.authorization.k8s.io/v1/clusterrolebindings/kubeadm%3Anode-autoapprove-certificate-rotation
180-    uid: b4303542-d383-4b62-a1e9-02f2cefa2c20
181-  roleRef:
182-    apiGroup: rbac.authorization.k8s.io
183-    kind: ClusterRole
184-    name: system:certificates.k8s.io:certificatesigningrequests:selfnodeclient
185-  subjects:
186-  - apiGroup: rbac.authorization.k8s.io
187-    kind: Group
188:    name: system:nodes
189-- apiVersion: rbac.authorization.k8s.io/v1
190-  kind: ClusterRoleBinding
191-  metadata:
192-    creationTimestamp: "2021-06-06T02:39:46Z"
193-    managedFields:
194-    - apiVersion: rbac.authorization.k8s.io/v1
195-      fieldsType: FieldsV1
196-      fieldsV1:
197-        f:roleRef:
198-          f:apiGroup: {}

$ kubectl describe clusterrole system:certificates.k8s.io:certificatesigningrequests:selfnodeclient
Name:         system:certificates.k8s.io:certificatesigningrequests:selfnodeclient
Labels:       kubernetes.io/bootstrapping=rbac-defaults
Annotations:  rbac.authorization.kubernetes.io/autoupdate: true
PolicyRule:
  Resources                                                      Non-Resource URLs  Resource Names  Verbs
  ---------                                                      -----------------  --------------  -----
  certificatesigningrequests.certificates.k8s.io/selfnodeclient  []                 []              [create]
结局有点意外,除了system:certificates.k8s.io:certificatesigningrequests:selfnodeclient外,没有找到system相关的rolebindings,显然和我们的理解不一样。 尝试去找资料,发现了这么一段 :
| Default ClusterRole | Default ClusterRoleBinding | Description |
|---|---|---|
| system:kube-scheduler | system:kube-scheduler user | Allows access to the resources required by the schedulercomponent. |
| system:volume-scheduler | system:kube-scheduler user | Allows access to the volume resources required by the kube-scheduler component. |
| system:kube-controller-manager | system:kube-controller-manager user | Allows access to the resources required by the controller manager component. The permissions required by individual controllers are detailed in the controller roles. |
| system:node | None | Allows access to resources required by the kubelet, including read access to all secrets, and write access to all pod status objects. You should use the Node authorizer and NodeRestriction admission plugin instead of the system:node role, and allow granting API access to kubelets based on the Pods scheduled to run on them. The system:node role only exists for compatibility with Kubernetes clusters upgraded from versions prior to v1.8. |
| system:node-proxier | system:kube-proxy user | Allows access to the resources required by the kube-proxycomponent. |
大致意思是说:之前会定义system:node这个角色,目的是为了kubelet可以访问到必要的资源,包括所有secret的读权限及更新pod状态的写权限。如果1.8版本后,是建议使用 Node authorizer and NodeRestriction admission plugin 来代替这个角色的。
我们目前使用1.19,查看一下授权策略:
$ ps axu|grep apiserver
kube-apiserver --authorization-mode=Node,RBAC  --enable-admission-plugins=NodeRestriction
查看一下官网对Node authorizer的介绍:
Node authorization is a special-purpose authorization mode that specifically authorizes API requests made by kubelets.
In future releases, the node authorizer may add or remove permissions to ensure kubelets have the minimal set of permissions required to operate correctly.
In order to be authorized by the Node authorizer, kubelets must use a credential that identifies them as being in the system:nodes group, with a username of system:node:<nodeName>
Service Account及K8S Api调用
前面说,认证可以通过证书,也可以通过使用ServiceAccount(服务账户)的方式来做认证。大多数时候,我们在基于k8s做二次开发时都是选择通过ServiceAccount + RBAC 的方式。我们之前访问dashboard的时候,是如何做的?
## 新建一个名为admin的serviceaccount,并且把名为cluster-admin的这个集群角色的权限授予新建的
#serviceaccount
apiVersion: v1
kind: ServiceAccount
metadata:
  name: admin
  namespace: kubernetes-dashboard
---
kind: ClusterRoleBinding
apiVersion: rbac.authorization.k8s.io/v1
metadata:
  name: admin
  annotations:
    rbac.authorization.kubernetes.io/autoupdate: "true"
roleRef:
  kind: ClusterRole
  name: cluster-admin
  apiGroup: rbac.authorization.k8s.io
subjects:
- kind: ServiceAccount
  name: admin
  namespace: kubernetes-dashboard
我们查看一下:
$ kubectl -n kubernetes-dashboard get sa admin -o yaml
apiVersion: v1
kind: ServiceAccount
metadata:
  creationTimestamp: "2020-04-01T11:59:21Z"
  name: admin
  namespace: kubernetes-dashboard
  resourceVersion: "1988878"
  selfLink: /api/v1/namespaces/kubernetes-dashboard/serviceaccounts/admin
  uid: 639ecc3e-74d9-11ea-a59b-000c29dfd73f
secrets:
- name: admin-token-lfsrf
注意到serviceaccount上默认绑定了一个名为admin-token-lfsrf的secret,我们查看一下secret
$ kubectl -n kubernetes-dashboard describe secret admin-token-lfsrf
Name:         admin-token-lfsrf
Namespace:    kubernetes-dashboard
Labels:       <none>
Annotations:  kubernetes.io/service-account.name: admin
              kubernetes.io/service-account.uid: 639ecc3e-74d9-11ea-a59b-000c29dfd73f

Type:  kubernetes.io/service-account-token
Data
====
ca.crt:     1025 bytes
namespace:  4 bytes
token:      eyJhbGciOiJSUzI1NiIsImtpZCI6IiJ9.eyJpc3MiOiJrdWJlcm5ldGVzL3NlcnZpY2VhY2NvdW50Iiwia3ViZXJuZXRlcy5pby9zZXJ2aWNlYWNjb3VudC9uYW1lc3BhY2UiOiJkZW1vIiwia3ViZXJuZXRlcy5pby9zZXJ2aWNlYWNjb3VudC9zZWNyZXQubmFtZSI6ImFkbWluLXRva2VuLWxmc3JmIiwia3ViZXJuZXRlcy5pby9zZXJ2aWNlYWNjb3VudC9zZXJ2aWNlLWFjY291bnQubmFtZSI6ImFkbWluIiwia3ViZXJuZXRlcy5pby9zZXJ2aWNlYWNjb3VudC9zZXJ2aWNlLWFjY291bnQudWlkIjoiNjM5ZWNjM2UtNzRkOS0xMWVhLWE1OWItMDAwYzI5ZGZkNzNmIiwic3ViIjoic3lzdGVtOnNlcnZpY2VhY2NvdW50OmRlbW86YWRtaW4ifQ.ffGCU4L5LxTsMx3NcNixpjT6nLBi-pmstb4I-W61nLOzNaMmYSEIwAaugKMzNR-2VwM14WbuG04dOeO67niJeP6n8-ALkl-vineoYCsUjrzJ09qpM3TNUPatHFqyjcqJ87h4VKZEqk2qCCmLxB6AGbEHpVFkoge40vHs56cIymFGZLe53JZkhu3pwYuS4jpXytV30Ad-HwmQDUu_Xqcifni6tDYPCfKz2CZlcOfwqHeGIHJjDGVBKqhEeo8PhStoofBU6Y4OjObP7HGuTY-Foo4QindNnpp0QU6vSb7kiOiQ4twpayybH8PTf73dtdFt46UF6mGjskWgevgolvmO8A
只允许访问luffy命名空间的pod资源:
$ cat luffy-admin-rbac.yaml
apiVersion: v1
kind: ServiceAccount
metadata:
  name: luffy-pods-admin
  namespace: luffy

---
kind: Role
apiVersion: rbac.authorization.k8s.io/v1
metadata:
  namespace: luffy
  name: pods-reader-writer
rules:
- apiGroups: [""] # "" indicates the core API group
  resources: ["pods"]
  verbs: ["*"]
---
kind: RoleBinding
apiVersion: rbac.authorization.k8s.io/v1
metadata:
  name: pods-reader-writer
  namespace: luffy
subjects:
- kind: ServiceAccount   #这里可以是User,Group,ServiceAccount
  name: luffy-pods-admin
  namespace: luffy
roleRef:
  kind: Role #这里可以是Role或者ClusterRole,若是ClusterRole,则权限也仅限于rolebinding的内部
  name: pods-reader-writer
  apiGroup: rbac.authorization.k8s.io
演示权限:
$ kubectl -n luffy describe secrets luffy-pods-admin-token-prr25
...
token:      eyJhbGciOiJSUzI1NiIsImtpZCI6InBtQUZfRl8ycC03TTBYaUUwTnJVZGpvQWU0cXZ5M2FFbjR2ZjkzZVcxOE0ifQ.eyJpc3MiOiJrdWJlcm5ldGVzL3NlcnZpY2VhY2NvdW50Iiwia3ViZXJuZXRlcy5pby9zZXJ2aWNlYWNjb3VudC9uYW1lc3BhY2UiOiJsdWZmeSIsImt1YmVybmV0ZXMuaW8vc2VydmljZWFjY291bnQvc2VjcmV0Lm5hbWUiOiJsdWZmeS1hZG1pbi10b2tlbi1wcnIyNSIsImt1YmVybmV0ZXMuaW8vc2VydmljZWFjY291bnQvc2VydmljZS1hY2NvdW50Lm5hbWUiOiJsdWZmeS1hZG1pbiIsImt1YmVybmV0ZXMuaW8vc2VydmljZWFjY291bnQvc2VydmljZS1hY2NvdW50LnVpZCI6ImFhZDA0MTU3LTliNzMtNDJhZC1hMGU4LWVmOTZlZDU3Yzg1ZiIsInN1YiI6InN5c3RlbTpzZXJ2aWNlYWNjb3VudDpsdWZmeTpsdWZmeS1hZG1pbiJ9.YWckylE5wlKITKrVltXY4VPKvZP9ar5quIT5zq9N-0_FnDkLIBX7xOyFvZA5Wef0wSFSZe3e9FwrO1UbPsmK7cZn74bhH8cNdoH_YVbIVT3-6tIOlCA_Bc8YypGE1gl-ZvLOIPV7WnRQsWpWtZtqfKBSkwLAHgWoxcx_d1bOcyTOdPmsW224xcBxjYwi6iRUtjTJST0LzOcAOCPDZq6-lqYUwnxLO_afxwg71BGX4etE48Iny8TxSEIs1VJRahoabC7hVOs17ujEm5loTDSpfuhae51qSDg8xeYwRHdM42aLUmc-wOvBWauHa5EHbH9rWPAnpaGIwF8QvnLszqp4QQ
...
$ curl -k  -H "Authorization: Bearer eyJhbGciOiJSUzI1NiIsImtpZCI6InBtQUZfRl8ycC03TTBYaUUwTnJVZGpvQWU0cXZ5M2FFbjR2ZjkzZVcxOE0ifQ.eyJpc3MiOiJrdWJlcm5ldGVzL3NlcnZpY2VhY2NvdW50Iiwia3ViZXJuZXRlcy5pby9zZXJ2aWNlYWNjb3VudC9uYW1lc3BhY2UiOiJsdWZmeSIsImt1YmVybmV0ZXMuaW8vc2VydmljZWFjY291bnQvc2VjcmV0Lm5hbWUiOiJsdWZmeS1hZG1pbi10b2tlbi1wcnIyNSIsImt1YmVybmV0ZXMuaW8vc2VydmljZWFjY291bnQvc2VydmljZS1hY2NvdW50Lm5hbWUiOiJsdWZmeS1hZG1pbiIsImt1YmVybmV0ZXMuaW8vc2VydmljZWFjY291bnQvc2VydmljZS1hY2NvdW50LnVpZCI6ImFhZDA0MTU3LTliNzMtNDJhZC1hMGU4LWVmOTZlZDU3Yzg1ZiIsInN1YiI6InN5c3RlbTpzZXJ2aWNlYWNjb3VudDpsdWZmeTpsdWZmeS1hZG1pbiJ9.YWckylE5wlKITKrVltXY4VPKvZP9ar5quIT5zq9N-0_FnDkLIBX7xOyFvZA5Wef0wSFSZe3e9FwrO1UbPsmK7cZn74bhH8cNdoH_YVbIVT3-6tIOlCA_Bc8YypGE1gl-ZvLOIPV7WnRQsWpWtZtqfKBSkwLAHgWoxcx_d1bOcyTOdPmsW224xcBxjYwi6iRUtjTJST0LzOcAOCPDZq6-lqYUwnxLO_afxwg71BGX4etE48Iny8TxSEIs1VJRahoabC7hVOs17ujEm5loTDSpfuhae51qSDg8xeYwRHdM42aLUmc-wOvBWauHa5EHbH9rWPAnpaGIwF8QvnLszqp4QQ" https://172.21.51.143:6443/api/v1/namespaces/luffy/pods?limit=500

$ curl -k  -H "Authorization: Bearer eyJhbGciOiJSUzI1NiIsImtpZCI6Ik9VMi1HX3FFMlBUT193OUo3ZWI4eDh3aE9pc0dTYXMyQWRMNnRHNHJtMWsifQ.eyJpc3MiOiJrdWJlcm5ldGVzL3NlcnZpY2VhY2NvdW50Iiwia3ViZXJuZXRlcy5pby9zZXJ2aWNlYWNjb3VudC9uYW1lc3BhY2UiOiJrdWJlcm5ldGVzLWRhc2hib2FyZCIsImt1YmVybmV0ZXMuaW8vc2VydmljZWFjY291bnQvc2VjcmV0Lm5hbWUiOiJhZG1pbi10b2tlbi03Y2xyeiIsImt1YmVybmV0ZXMuaW8vc2VydmljZWFjY291bnQvc2VydmljZS1hY2NvdW50Lm5hbWUiOiJhZG1pbiIsImt1YmVybmV0ZXMuaW8vc2VydmljZWFjY291bnQvc2VydmljZS1hY2NvdW50LnVpZCI6IjhjNjRkMjFmLWJkYzYtNDYxMC05YmIxLWRkYjIyMDE3ZmVkMCIsInN1YiI6InN5c3RlbTpzZXJ2aWNlYWNjb3VudDprdWJlcm5ldGVzLWRhc2hib2FyZDphZG1pbiJ9.a7UIMu1PfZ3e4j51R2qIiWZm0yZgdn5TNoUOwNLtMKdGX0LsUQP7NhUJQY_uX4ymtjqQj3aBXY7t3fWamGSBxqkf7nD5s34ibBES-ve6IXUNgQYQg3o1kJWwen20VzjCcQbNcq8Ba6W7Zz37kx6IQQNCAq41Tzq030APZ2JsGnzL8HIkHxQ5SAu8HzKsUTg1Zu7r6aDh97CwRych3Wcr09BzF6R0gB3Gb2KvqAbWItusysdt1YYw_Vmu7YbUdmi437Zcsw6JBLDLrdnSEs4AYyXdSG5_63OevHKaWpDjx4uTCawt7fhP-MpzktOctUK-RpCAAp9dbr4VINwbOj51Tg" https://10.211.55.25:6443/api/v1/namespaces/luffy/pods?limit=500

# https://172.21.51.143:6443/api/v1/nodes
认证、鉴权图鉴
创建用户认证授权的kubeconfig文件
签发证书对: 生成一个只对luffy命名空间有操作权限的密钥
# 生成私钥
$ openssl genrsa -out luffy.key 2048

# 生成证书请求文件
$ openssl req -new -key luffy.key -out luffy.csr -subj "/O=admin:luffy/CN=luffy-admin"

# 证书拓展属性
$ cat extfile.conf
[ v3_ca ]
keyUsage = critical, digitalSignature, keyEncipherment
extendedKeyUsage = clientAuth

# 生成luffy.crt证书
$ openssl x509 -req -in luffy.csr -CA /etc/kubernetes/pki/ca.crt -CAkey /etc/kubernetes/pki/ca.key -CAcreateserial -sha256 -out luffy.crt -extensions v3_ca -extfile extfile.conf -days 3650

[root@k8s-master cert]# openssl x509 -in luffy.crt -text
配置kubeconfig文件:
# 创建kubeconfig文件,指定集群名称和ip地址
$ kubectl config set-cluster luffy-cluster --certificate-authority=/etc/kubernetes/pki/ca.crt --embed-certs=true --server=https://172.21.51.143:6443 --kubeconfig=luffy.kubeconfig

# 为kubeconfig文件添加认证信息
$ kubectl config set-credentials luffy-admin --client-certificate=luffy.crt --client-key=luffy.key --embed-certs=true --kubeconfig=luffy.kubeconfig

# 为kubeconfig添加上下文配置 注意:--user 和上面创建的user一样
$ kubectl config set-context luffy-context --cluster=luffy-cluster --user=luffy-admin --kubeconfig=luffy.kubeconfig

# 设置默认的上下文
$ kubectl config use-context luffy-context --kubeconfig=luffy.kubeconfig
验证:
# 设置当前kubectl使用的config文件
$ export KUBECONFIG=luffy.kubeconfig

# 当前不具有任何权限,因为没有为用户或者组设置RBAC规则
$ kubectl get po
Error from server (Forbidden): pods is forbidden: User "luffy-admin" cannot list resource "pods" in API group "" in the namespace "default"
为luffy-admin用户添加luffy命名空间访问权限:
# 定义role,具有luffy命名空间的所有权限
$ cat luffy-admin-role.yaml
apiVersion: rbac.authorization.k8s.io/v1
kind: Role
metadata:
  namespace: luffy
  name: luffy-admin
rules:
- apiGroups: ["*"] # "" 指定核心 API 组
  resources: ["*"]
  verbs: ["*"]

#定义rolebinding,为luffy用户绑定luffy-admin这个role,这样luffy用户就有操作luffy命名空间的所有权限
$ cat luffy-admin-rolebinding.yaml
apiVersion: rbac.authorization.k8s.io/v1
kind: RoleBinding
metadata:
  name: luffy-admin
  namespace: luffy
subjects:
- kind: User
  name: luffy-admin # Name is case sensitive
  apiGroup: rbac.authorization.k8s.io
roleRef:
  kind: Role #this must be Role or ClusterRole
  name: luffy-admin # 这里的名称必须与你想要绑定的 Role 或 ClusterRole 名称一致
  apiGroup: rbac.authorization.k8s.io
[root@k8s-master cert]# export KUBECONFIG=/root/cert/luffy.kubeconfig
[root@k8s-master cert]# kubectl -n luffy get po
Error from server (Forbidden): pods is forbidden: User "luffy-admin" cannot list resource "pods" in API group "" in the namespace "default"
[root@k8s-master cert]# vi luffy-admin-role.yaml
[root@k8s-master cert]# kubectl apply -f luffy-admin-role.yaml
Error from server (Forbidden): error when retrieving current configuration of:
Resource: "rbac.authorization.k8s.io/v1, Resource=roles", GroupVersionKind: "rbac.authorization.k8s.io/v1, Kind=Role"
Name: "luffy-admin", Namespace: "luffy"
from server for: "luffy-admin-role.yaml": roles.rbac.authorization.k8s.io "luffy-admin" is forbidden: User "luffy-admin" cannot get resource "roles" in API group "rbac.authorization.k8s.io" in the namespace "luffy"
[root@k8s-master cert]# export KUBECONFIG=
[root@k8s-master cert]# kubectl apply -f luffy-admin-role.yaml
role.rbac.authorization.k8s.io/luffy-admin created
[root@k8s-master cert]# kubectl apply -f luffy-admin-rolebinding.yaml
rolebinding.rbac.authorization.k8s.io/luffy-admin created
[root@k8s-master cert]# export KUBECONFIG=/root/cert/luffy.kubeconfig
[root@k8s-master cert]# kubectl -n luffy get po
NAME                      READY   STATUS             RESTARTS   AGE
myblog-759fcb796d-p4ctm   1/1     Running            3          7d5h
myblog-759fcb796d-t56t6   1/1     Running            3          7d5h
myblog-759fcb796d-tttrv   1/1     Running            3          7d5h
mysql-56b9db9c6-5cz5p     1/1     Running            3          7d5h
pod-lifecycle             0/1     CrashLoopBackOff   270        7d7h
[root@k8s-master cert]# kubectl -n luffy get deployments.apps
NAME     READY   UP-TO-DATE   AVAILABLE   AGE
myblog   3/3     3            3           7d5h
mysql    1/1     1            1           7d5h
HPA实现自动扩展容
通过HPA实现业务应用的动态扩缩容
HPA控制器介绍
当系统资源过高的时候,我们可以使用如下命令来实现 Pod 的扩缩容功能
但是这个过程是手动操作的。在实际项目中,我们需要做到是的是一个自动化感知并自动扩容的操作。Kubernetes 也为提供了这样的一个资源对象:Horizontal Pod Autoscaling(Pod 水平自动伸缩),简称HPA
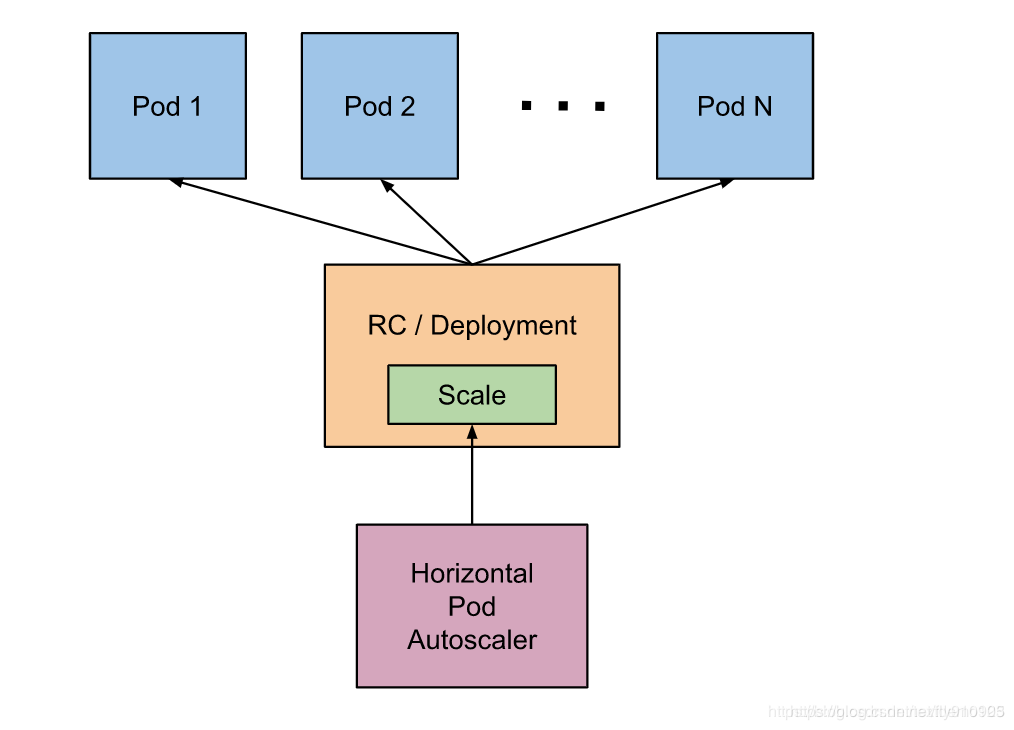
基本原理:HPA 通过监控分析控制器控制的所有 Pod 的负载变化情况来确定是否需要调整 Pod 的副本数量
HPA的实现有两个版本:
- autoscaling/v1,只包含了根据CPU指标的检测,稳定版本
- autoscaling/v2beta2,支持根据memory或者用户自定义指标进行伸缩
如何获取Pod的监控数据?
- k8s 1.8以下:使用heapster,1.11版本完全废弃
- k8s 1.8以上:使用metric-server
思考:为什么之前用 heapster ,现在废弃了项目,改用 metric-server ?
heapster时代,apiserver 会直接将metric请求通过apiserver proxy 的方式转发给集群内的 hepaster 服务,采用这种 proxy 方式是有问题的:
-
bash http://kubernetes_master_address/api/v1/namespaces/namespace_name/services/service_name[:port_name]/proxy -
proxy只是代理请求,一般用于问题排查,不够稳定,且版本不可控
-
heapster的接口不能像apiserver一样有完整的鉴权以及client集成
-
pod 的监控数据是核心指标(HPA调度),应该和 pod 本身拥有同等地位,即 metric应该作为一种资源存在,如metrics.k8s.io 的形式,称之为 Metric Api
于是官方从 1.8 版本开始逐步废弃 heapster,并提出了上边 Metric api 的概念,而 metrics-server 就是这种概念下官方的一种实现,用于从 kubelet获取指标,替换掉之前的 heapster。
Metrics Server 可以通过标准的 Kubernetes API 把监控数据暴露出来,比如获取某一Pod的监控数据:
https://172.21.51.143:6443/apis/metrics.k8s.io/v1beta1/namespaces/<namespace-name>/pods/<pod-name>

# https://172.21.51.143:6443/api/v1/namespaces/luffy/pods?limit=500

# 安装jq命令。--nogpgcheck 跳过公钥检查安装
[root@k8s-master deployment]# yum install -y jq --nogpgcheck
[root@k8s-master deployment]# kubectl get pod -v=7
[root@k8s-master deployment]# kubectl get --raw /api/v1/namespaces/default/pods|jq
[root@k8s-master deployment]# kubectl -n luffy get po
NAME                      READY   STATUS    RESTARTS   AGE
myblog-76d54c49b6-26br5   1/1     Running   2          9h
myblog-76d54c49b6-bfkvf   1/1     Running   0          5h14m
mysql-864b4c85b5-9cdds    1/1     Running   0          9h
[root@k8s-master deployment]# kubectl -n luffy get deploy
NAME     READY   UP-TO-DATE   AVAILABLE   AGE
myblog   2/2     2            2           9h
mysql    1/1     1            1           9h
[root@k8s-master deployment]# kubectl get --raw /apis/metrics.k8s.io/v1beta1/namespaces/luffy/pods/myblog-76d54c49b6-26br5|jq
{
  "kind": "PodMetrics",
  "apiVersion": "metrics.k8s.io/v1beta1",
  "metadata": {
    "name": "myblog-76d54c49b6-26br5",
    "namespace": "luffy",
    "selfLink": "/apis/metrics.k8s.io/v1beta1/namespaces/luffy/pods/myblog-76d54c49b6-26br5",
    "creationTimestamp": "2022-10-19T19:00:03Z"
  },
  "timestamp": "2022-10-19T18:59:17Z",
  "window": "30s",
  "containers": [
    {
      "name": "myblog", # 容器名
      "usage": {
        "cpu": "761897n",  # cpu使用量
        "memory": "68432Ki"# 内存使用量
      }
    }
  ]
}

# hpa 获取api数据是由 metrics-server提供的
# hpa -> /apis/metrics.k8s.io/v1beta1/namespaces/luffy/pods/myblog-76d54c49b6-26br5 <- metrics-server
目前的采集流程:
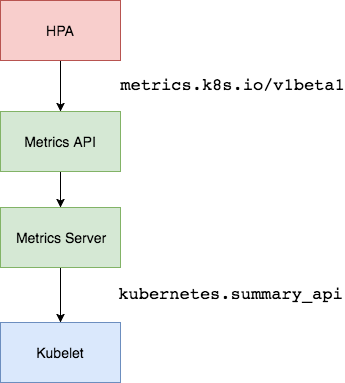
Metric Server
...
Metric server collects metrics from the Summary API, exposed by Kubelet on each node.

Metrics Server registered in the main API server through Kubernetes aggregator, which was introduced in Kubernetes 1.7
...
安装
官方代码仓库地址:https://github.com/kubernetes-sigs/metrics-server
Depending on your cluster setup, you may also need to change flags passed to the Metrics Server container. Most useful flags:
--kubelet-preferred-address-types- The priority of node address types used when determining an address for connecting to a particular node (default [Hostname,InternalDNS,InternalIP,ExternalDNS,ExternalIP])--kubelet-insecure-tls- Do not verify the CA of serving certificates presented by Kubelets. For testing purposes only.--requestheader-client-ca-file- Specify a root certificate bundle for verifying client certificates on incoming requests.
修改args参数:
...
130       containers:
131       - args:
132         - --cert-dir=/tmp
133         - --secure-port=4443
134         - --kubelet-insecure-tls   # 增加
135         - --kubelet-preferred-address-types=InternalIP,ExternalIP,Hostname
136         - --kubelet-use-node-status-port
137         image: willdockerhub/metrics-server:v0.4.4   # 修改国内地址
138         imagePullPolicy: IfNotPresent
...
执行安装:
[root@k8s-master hpa]# kubectl apply -f components.yaml
[root@k8s-master hpa]# kubectl -n kube-system get pods
[root@k8s-master hpa]# kubectl top nodes
kubelet的指标采集
无论是 heapster还是 metric-server,都只是数据的中转和聚合,两者都是调用的 kubelet 的 api 接口获取的数据,而 kubelet 代码中实际采集指标的是 cadvisor 模块,你可以在 node 节点访问 10250 端口获取监控数据:
- Kubelet Summary metrics: https://127.0.0.1:10250/metrics,暴露 node、pod 汇总数据
- Cadvisor metrics: https://127.0.0.1:10250/metrics/cadvisor,暴露 container 维度数据
调用示例:
$ curl -k  -H "Authorization: Bearer eyJhbGciOiJSUzI1NiIsImtpZCI6InhXcmtaSG5ZODF1TVJ6dUcycnRLT2c4U3ZncVdoVjlLaVRxNG1wZ0pqVmcifQ.eyJpc3MiOiJrdWJlcm5ldGVzL3NlcnZpY2VhY2NvdW50Iiwia3ViZXJuZXRlcy5pby9zZXJ2aWNlYWNjb3VudC9uYW1lc3BhY2UiOiJrdWJlcm5ldGVzLWRhc2hib2FyZCIsImt1YmVybmV0ZXMuaW8vc2VydmljZWFjY291bnQvc2VjcmV0Lm5hbWUiOiJhZG1pbi10b2tlbi1xNXBueiIsImt1YmVybmV0ZXMuaW8vc2VydmljZWFjY291bnQvc2VydmljZS1hY2NvdW50Lm5hbWUiOiJhZG1pbiIsImt1YmVybmV0ZXMuaW8vc2VydmljZWFjY291bnQvc2VydmljZS1hY2NvdW50LnVpZCI6ImViZDg2ODZjLWZkYzAtNDRlZC04NmZlLTY5ZmE0ZTE1YjBmMCIsInN1YiI6InN5c3RlbTpzZXJ2aWNlYWNjb3VudDprdWJlcm5ldGVzLWRhc2hib2FyZDphZG1pbiJ9.iEIVMWg2mHPD88GQ2i4uc_60K4o17e39tN0VI_Q_s3TrRS8hmpi0pkEaN88igEKZm95Qf1qcN9J5W5eqOmcK2SN83Dd9dyGAGxuNAdEwi0i73weFHHsjDqokl9_4RGbHT5lRY46BbIGADIphcTeVbCggI6T_V9zBbtl8dcmsd-lD_6c6uC2INtPyIfz1FplynkjEVLapp_45aXZ9IMy76ljNSA8Uc061Uys6PD3IXsUD5JJfdm7lAt0F7rn9SdX1q10F2lIHYCMcCcfEpLr4Vkymxb4IU4RCR8BsMOPIO_yfRVeYZkG4gU2C47KwxpLsJRrTUcUXJktSEPdeYYXf9w" https://localhost:10250/metrics

---------------
# 获取token  会有多个token 复制 Name:admin-token-7clrz 的token
[root@k8s-master deployment]# kubectl -n kubernetes-dashboard describe secrets
[root@k8s-master deployment]# curl -k  -H "Authorization: Bearer eyJhbGciOiJSUzI1NiIsImtpZCI6Ik9VMi1HX3FFMlBUT193OUo3ZWI4eDh3aE9pc0dTYXMyQWRMNnRHNHJtMWsifQ.eyJpc3MiOiJrdWJlcm5ldGVzL3NlcnZpY2VhY2NvdW50Iiwia3ViZXJuZXRlcy5pby9zZXJ2aWNlYWNjb3VudC9uYW1lc3BhY2UiOiJrdWJlcm5ldGVzLWRhc2hib2FyZCIsImt1YmVybmV0ZXMuaW8vc2VydmljZWFjY291bnQvc2VjcmV0Lm5hbWUiOiJhZG1pbi10b2tlbi03Y2xyeiIsImt1YmVybmV0ZXMuaW8vc2VydmljZWFjY291bnQvc2VydmljZS1hY2NvdW50Lm5hbWUiOiJhZG1pbiIsImt1YmVybmV0ZXMuaW8vc2VydmljZWFjY291bnQvc2VydmljZS1hY2NvdW50LnVpZCI6IjhjNjRkMjFmLWJkYzYtNDYxMC05YmIxLWRkYjIyMDE3ZmVkMCIsInN1YiI6InN5c3RlbTpzZXJ2aWNlYWNjb3VudDprdWJlcm5ldGVzLWRhc2hib2FyZDphZG1pbiJ9.a7UIMu1PfZ3e4j51R2qIiWZm0yZgdn5TNoUOwNLtMKdGX0LsUQP7NhUJQY_uX4ymtjqQj3aBXY7t3fWamGSBxqkf7nD5s34ibBES-ve6IXUNgQYQg3o1kJWwen20VzjCcQbNcq8Ba6W7Zz37kx6IQQNCAq41Tzq030APZ2JsGnzL8HIkHxQ5SAu8HzKsUTg1Zu7r6aDh97CwRych3Wcr09BzF6R0gB3Gb2KvqAbWItusysdt1YYw_Vmu7YbUdmi437Zcsw6JBLDLrdnSEs4AYyXdSG5_63OevHKaWpDjx4uTCawt7fhP-MpzktOctUK-RpCAAp9dbr4VINwbOj51Tg" https://localhost:10250/metrics
kubelet虽然提供了 metric 接口,但实际监控逻辑由内置的cAdvisor模块负责,早期的时候,cadvisor是单独的组件,从k8s 1.12开始,cadvisor 监听的端口在k8s中被删除,所有监控数据统一由Kubelet的API提供。
cadvisor获取指标时实际调用的是 runc/libcontainer库,而libcontainer是对 cgroup文件 的封装,即 cadvsior也只是个转发者,它的数据来自于cgroup文件。
cgroup文件中的值是监控数据的最终来源
Metrics数据流:
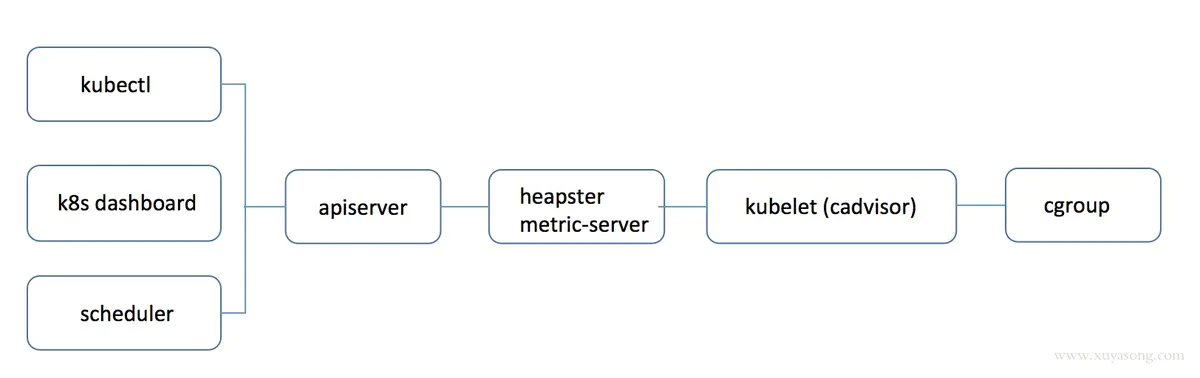
# cgroup 中容器使用量数据文件位置
[root@k8s-master deployment]# ll /sys/fs/cgroup/memory/kubepods/burstable/pod123c0877-3d9e-4d00-bbc8-5d3d894fcf2a/memory.usage_in_bytes
思考:
Metrics Server是独立的一个服务,只能服务内部实现自己的api,是如何做到通过标准的kubernetes 的API格式暴露出去的?
kube-aggregator聚合器及Metric-Server的实现
kube-aggregator是对 apiserver 的api的一种拓展机制,它允许开发人员编写一个自己的服务,并把这个服务注册到k8s的api里面,即扩展 API 。
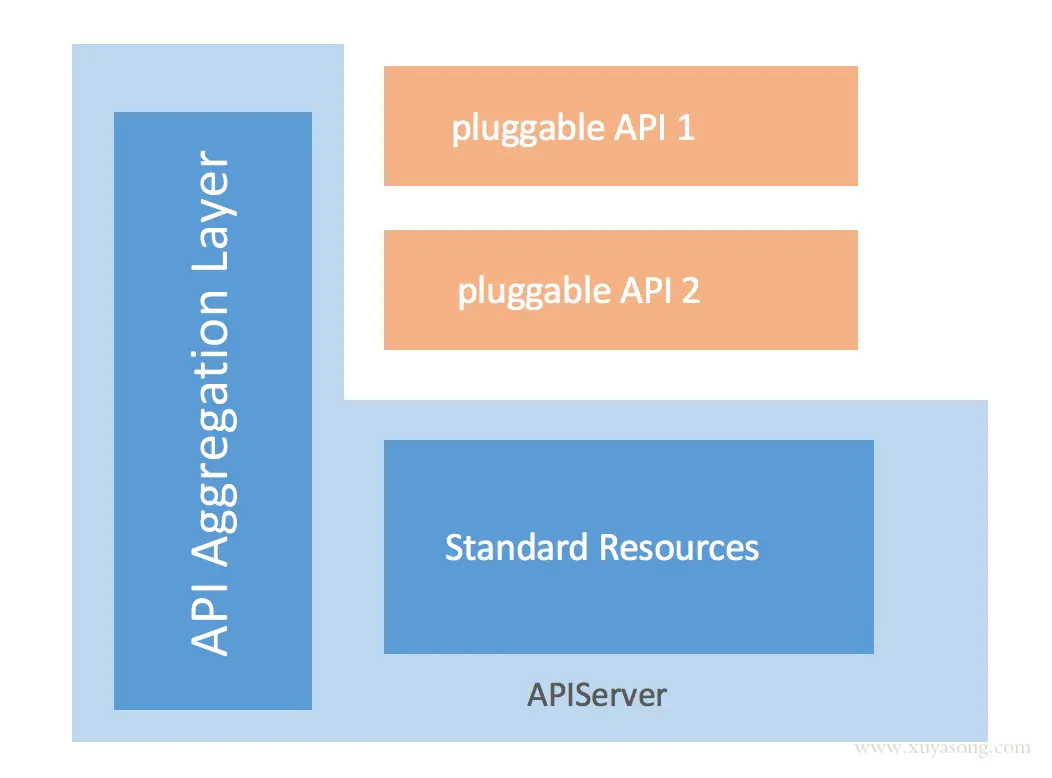
定义一个APIService对象:
apiVersion: apiregistration.k8s.io/v1
kind: APIService
metadata:
  name: v1beta1.luffy.k8s.io
spec:
  group: luffy.k8s.io
  groupPriorityMinimum: 100
  insecureSkipTLSVerify: true
  service:
    name: service-A       # 必须https访问
    namespace: luffy
    port: 443
  version: v1beta1
  versionPriority: 100
k8s会自动帮我们代理如下url的请求:
即:https://172.21.51.143:6443/apis/luffy.k8s.io/v1beta1/xxxx转到我们的service-A服务中,service-A中只需要实现 https://service-A/apis/luffy.k8s.io/v1beta1/xxxx 即可。
看下metric-server的实现:
$ kubectl get apiservice
NAME                       SERVICE                      AVAILABLE
v1beta1.metrics.k8s.io   kube-system/metrics-server        True

$ kubectl get apiservice v1beta1.metrics.k8s.io -oyaml
...
spec:
  group: metrics.k8s.io
  groupPriorityMinimum: 100
  insecureSkipTLSVerify: true
  service:
    name: metrics-server
    namespace: kube-system
    port: 443
  version: v1beta1
  versionPriority: 100
...

$ kubectl -n kube-system get svc metrics-server
NAME             TYPE        CLUSTER-IP       EXTERNAL-IP   PORT(S)   AGE
metrics-server   ClusterIP   10.110.111.146   <none>        443/TCP   11h

$ curl -k  -H "Authorization: Bearer xxxx" https://10.110.111.146
{
  "paths": [
    "/apis",
    "/apis/metrics.k8s.io",
    "/apis/metrics.k8s.io/v1beta1",
    "/healthz",
    "/healthz/healthz",
    "/healthz/log",
    "/healthz/ping",
    "/healthz/poststarthook/generic-apiserver-start-informers",
    "/metrics",
    "/openapi/v2",
    "/version"
  ]

# https://172.21.51.143:6443/apis/metrics.k8s.io/v1beta1/namespaces/<namespace-name>/pods/<pod-name>
# kubectl get --raw /apis/metrics.k8s.io/v1beta1/namespaces/luffy/pods/myblog-796dcdd8d5-rkzsm|jq
$ curl -k  -H "Authorization: Bearer xxxx" https://10.110.111.146/apis/metrics.k8s.io/v1beta1/namespaces/luffy/pods/myblog-5d9ff54d4b-4rftt

$ curl -k  -H "Authorization: Bearer xxxx" https://172.21.51.143:6443/apis/metrics.k8s.io/v1beta1/namespaces/luffy/pods/myblog-5d9ff54d4b-4rftt
HPA实践
基于CPU和内存的动态伸缩
创建hpa对象:
# 方式一
$ cat hpa-myblog.yaml
apiVersion: autoscaling/v2beta2
kind: HorizontalPodAutoscaler
metadata:
  name: hpa-myblog
  namespace: luffy
spec:
  maxReplicas: 3
  minReplicas: 1
  scaleTargetRef:
    apiVersion: apps/v1
    kind: Deployment
    name: myblog
  metrics:
    - type: Resource
      resource:
        name: memory
        target:
          type: Utilization
          averageUtilization: 80
    - type: Resource
      resource:
        name: cpu
        target:
          type: Utilization
          averageUtilization: 20

# 方式二
$ kubectl -n luffy autoscale deployment myblog --cpu-percent=10 --min=1 --max=3
[root@k8s-master hpa]# vi hpa-myblog.yaml
[root@k8s-master hpa]# kubectl apply -f hpa-myblog.yaml
horizontalpodautoscaler.autoscaling/hpa-myblog created
[root@k8s-master hpa]# kubectl -n luffy get hpa
NAME         REFERENCE           TARGETS          MINPODS   MAXPODS   REPLICAS   AGE
hpa-myblog   Deployment/myblog   4%/80%, 2%/20%   1         3         1          43s
                                                             内存使用率4%,cpu使用率2%
[root@k8s-master hpa]# kubectl top pod -n luffy
W1019 13:53:06.021793   10075 top_pod.go:140] Using json format to get metrics. Next release will switch to protocol-buffers, switch early by passing --use-protocol-buffers flag
NAME                      CPU(cores)   MEMORY(bytes)
myblog-759fcb796d-tttrv   0m           4Mi
mysql-56b9db9c6-5cz5p     2m           203Mi
pod-lifecycle             0m           0Mi
Deployment对象必须配置requests的参数,不然无法获取监控数据,也无法通过HPA进行动态伸缩
验证:
$ yum -y install httpd-tools
$ kubectl -n luffy get svc myblog
myblog   ClusterIP   10.96.51.241   <none>        80/TCP    6d18h

# 为了更快看到效果,先调整副本数为1
$ kubectl -n luffy scale deploy myblog --replicas=1

# 模拟1000个用户并发访问页面10万次
$ ab -n 100000 -c 1000 http://10.96.51.241/blog/index/

$ kubectl get hpa -n luffy
$ kubectl -n luffy get pods
压力降下来后,会有默认5分钟的scaledown的时间,可以通过controller-manager的如下参数设置:
--horizontal-pod-autoscaler-downscale-stabilization

The value for this option is a duration that specifies how long the autoscaler has to wait before another downscale operation can be performed after the current one has completed. The default value is 5 minutes (5m0s).
是一个逐步的过程,当前的缩放完成后,下次缩放的时间间隔,比如从3个副本降低到1个副本,中间大概会等待2*5min = 10分钟
基于自定义指标的动态伸缩
除了基于 CPU 和内存来进行自动扩缩容之外,我们还可以根据自定义的监控指标来进行。这个我们就需要使用 Prometheus Adapter,Prometheus 用于监控应用的负载和集群本身的各种指标,Prometheus Adapter 可以帮我们使用 Prometheus 收集的指标并使用它们来制定扩展策略,这些指标都是通过 APIServer 暴露的,而且 HPA 资源对象也可以很轻易的直接使用。
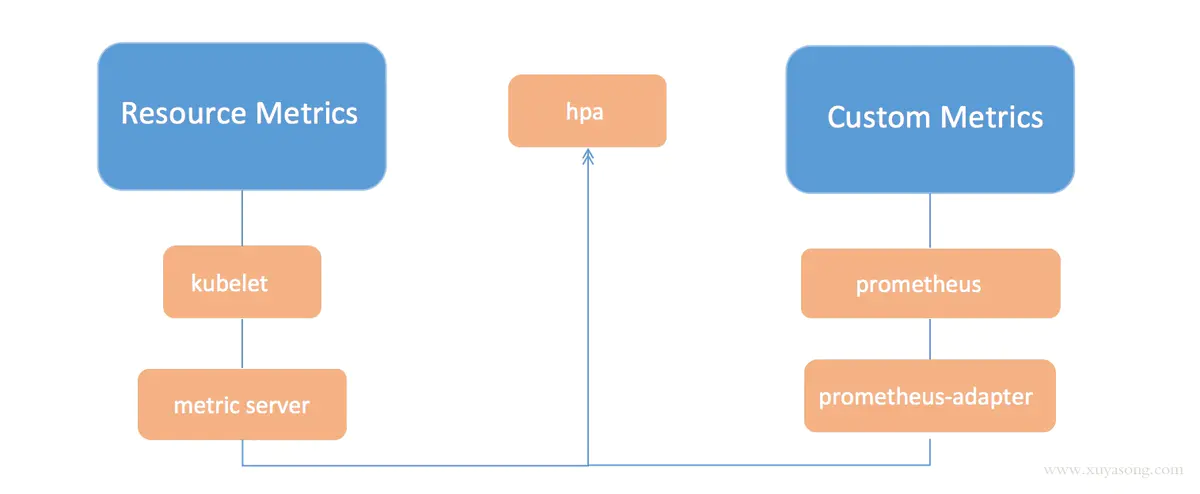
架构图:
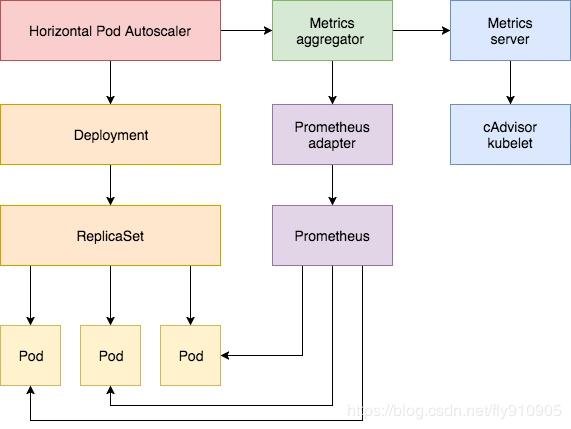
扩展
[root@k8s-master ~]# wget https://github.com/kubernetes-sigs/metrics-server/releases/download/v0.4.4/components.yaml
[root@k8s-master ~]# cat components.yaml
apiVersion: v1
kind: ServiceAccount
metadata:
  labels:
    k8s-app: metrics-server
  name: metrics-server
  namespace: kube-system
---
apiVersion: rbac.authorization.k8s.io/v1
kind: ClusterRole
metadata:
  labels:
    k8s-app: metrics-server
    rbac.authorization.k8s.io/aggregate-to-admin: "true"
    rbac.authorization.k8s.io/aggregate-to-edit: "true"
    rbac.authorization.k8s.io/aggregate-to-view: "true"
  name: system:aggregated-metrics-reader
rules:
- apiGroups:
  - metrics.k8s.io
  resources:
  - pods
  - nodes
  verbs:
  - get
  - list
  - watch
---
apiVersion: rbac.authorization.k8s.io/v1
kind: ClusterRole
metadata:
  labels:
    k8s-app: metrics-server
  name: system:metrics-server
rules:
- apiGroups:
  - ""
  resources:
  - pods
  - nodes
  - nodes/stats
  - namespaces
  - configmaps
  verbs:
  - get
  - list
  - watch
---
apiVersion: rbac.authorization.k8s.io/v1
kind: RoleBinding
metadata:
  labels:
    k8s-app: metrics-server
  name: metrics-server-auth-reader
  namespace: kube-system
roleRef:
  apiGroup: rbac.authorization.k8s.io
  kind: Role
  name: extension-apiserver-authentication-reader
subjects:
- kind: ServiceAccount
  name: metrics-server
  namespace: kube-system
---
apiVersion: rbac.authorization.k8s.io/v1
kind: ClusterRoleBinding
metadata:
  labels:
    k8s-app: metrics-server
  name: metrics-server:system:auth-delegator
roleRef:
  apiGroup: rbac.authorization.k8s.io
  kind: ClusterRole
  name: system:auth-delegator
subjects:
- kind: ServiceAccount
  name: metrics-server
  namespace: kube-system
---
apiVersion: rbac.authorization.k8s.io/v1
kind: ClusterRoleBinding
metadata:
  labels:
    k8s-app: metrics-server
  name: system:metrics-server
roleRef:
  apiGroup: rbac.authorization.k8s.io
  kind: ClusterRole
  name: system:metrics-server
subjects:
- kind: ServiceAccount
  name: metrics-server
  namespace: kube-system
---
apiVersion: v1
kind: Service
metadata:
  labels:
    k8s-app: metrics-server
  name: metrics-server
  namespace: kube-system
spec:
  ports:
  - name: https
    port: 443
    protocol: TCP
    targetPort: https
  selector:
    k8s-app: metrics-server
---
apiVersion: apps/v1
kind: Deployment
metadata:
  labels:
    k8s-app: metrics-server
  name: metrics-server
  namespace: kube-system
spec:
  selector:
    matchLabels:
      k8s-app: metrics-server
  strategy:
    rollingUpdate:
      maxUnavailable: 0
  template:
    metadata:
      labels:
        k8s-app: metrics-server
    spec:
      containers:
      - args:
        - --cert-dir=/tmp
        - --secure-port=4443
        - --kubelet-preferred-address-types=InternalIP,ExternalIP,Hostname
        - --kubelet-use-node-status-port
        image: k8s.gcr.io/metrics-server/metrics-server:v0.4.4
        imagePullPolicy: IfNotPresent
        livenessProbe:
          failureThreshold: 3
          httpGet:
            path: /livez
            port: https
            scheme: HTTPS
          periodSeconds: 10
        name: metrics-server
        ports:
        - containerPort: 4443
          name: https
          protocol: TCP
        readinessProbe:
          failureThreshold: 3
          httpGet:
            path: /readyz
            port: https
            scheme: HTTPS
          periodSeconds: 10
        securityContext:
          readOnlyRootFilesystem: true
          runAsNonRoot: true
          runAsUser: 1000
        volumeMounts:
        - mountPath: /tmp
          name: tmp-dir
      nodeSelector:
        kubernetes.io/os: linux
      priorityClassName: system-cluster-critical
      serviceAccountName: metrics-server
      volumes:
      - emptyDir: {}
        name: tmp-dir
---
apiVersion: apiregistration.k8s.io/v1
kind: APIService
metadata:
  labels:
    k8s-app: metrics-server
  name: v1beta1.metrics.k8s.io
spec:
  group: metrics.k8s.io
  groupPriorityMinimum: 100
  insecureSkipTLSVerify: true
  service:
    name: metrics-server
    namespace: kube-system
  version: v1beta1
  versionPriority: 100
对接外部存储
kubernetes对接分部式存储
PV与PVC快速入门
k8s存储的目的就是保证Pod重建后,数据不丢失。简单的数据持久化的下述方式:
- emptyDir
apiVersion: v1
kind: Pod
metadata:
  name: test-pod
spec:
  containers:
  - image: k8s.gcr.io/test-webserver
    name: webserver
    volumeMounts:
    - mountPath: /cache
      name: cache-volume
  - image: k8s.gcr.io/test-redis
    name: redis
    volumeMounts:
    - mountPath: /data
      name: cache-volume
volumes:
  - name: cache-volume
    emptyDir: {}
- Pod内的容器共享卷的数据
- 存在于Pod的生命周期,Pod销毁,数据丢失
-
Pod内的容器自动重建后,数据不会丢失
-
hostPath
apiVersion: v1
kind: Pod
metadata:
  name: test-pod
spec:
  containers:
  - image: k8s.gcr.io/test-webserver
    name: test-container
    volumeMounts:
    - mountPath: /test-pod
      name: test-volume
  volumes:
  - name: test-volume
    hostPath:
      # directory location on host
      path: /data
      # this field is optional
      type: Directory
通常配合nodeSelector使用
- nfs存储
...
  volumes:
  - name: redisdata             #卷名称
    nfs:                        #使用NFS网络存储卷
      server: 192.168.31.241    #NFS服务器地址
      path: /data/redis         #NFS服务器共享的目录
      readOnly: false           #是否为只读
...
volume支持的种类众多(参考 https://kubernetes.io/docs/concepts/storage/volumes/#types-of-volumes ),每种对应不同的存储后端实现,因此为了屏蔽后端存储的细节,同时使得Pod在使用存储的时候更加简洁和规范,k8s引入了两个新的资源类型,PV和PVC。
PersistentVolume(持久化卷),是对底层的存储的一种抽象,它和具体的底层的共享存储技术的实现方式有关,比如 Ceph、GlusterFS、NFS 等,都是通过插件机制完成与共享存储的对接。如使用PV对接NFS存储:
apiVersion: v1
kind: PersistentVolume
metadata:
  name: nfs-pv
spec:
  capacity:
    storage: 1Gi
  accessModes:
  - ReadWriteMany
  persistentVolumeReclaimPolicy: Retain
  nfs:
    path: /data/k8s
    server: 172.21.51.55
- capacity,存储能力, 目前只支持存储空间的设置, 就是我们这里的 storage=1Gi,不过未来可能会加入 IOPS、吞吐量等指标的配置。
- accessModes,访问模式, 是用来对 PV 进行访问模式的设置,用于描述用户应用对存储资源的访问权限,访问权限包括下面几种方式:
- ReadWriteOnce(RWO):读写权限,但是只能被单个节点挂载
- ReadOnlyMany(ROX):只读权限,可以被多个节点挂载
- ReadWriteMany(RWX):读写权限,可以被多个节点挂载
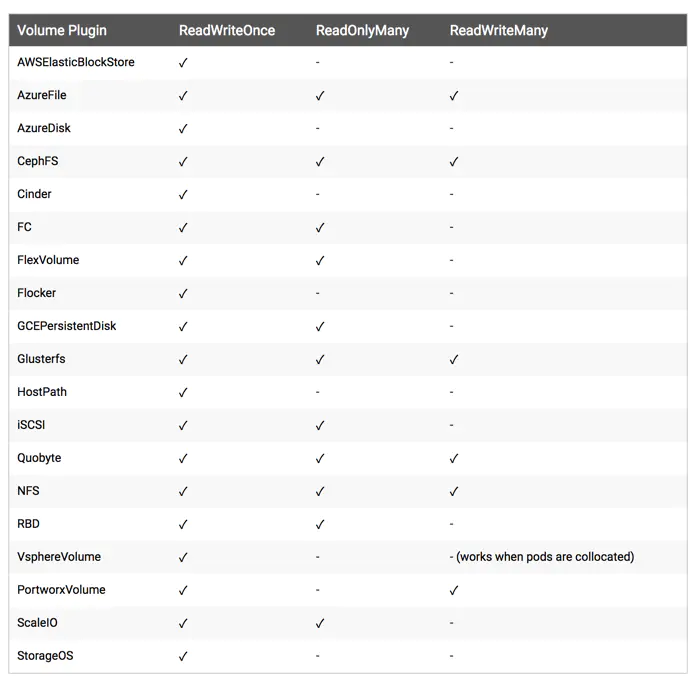
- persistentVolumeReclaimPolicy,pv的回收策略, 目前只有 NFS 和 HostPath 两种类型支持回收策略
- Retain(保留)- 保留数据,需要管理员手工清理数据
- Recycle(回收)- 清除 PV 中的数据,效果相当于执行 rm -rf /thevolume/*
- Delete(删除)- 与 PV 相连的后端存储完成 volume 的删除操作,当然这常见于云服务商的存储服务,比如 ASW EBS。
因为PV是直接对接底层存储的,就像集群中的Node可以为Pod提供计算资源(CPU和内存)一样,PV可以为Pod提供存储资源。因此PV不是namespaced的资源,属于集群层面可用的资源。Pod如果想使用该PV,需要通过创建PVC挂载到Pod中。
PVC全写是PersistentVolumeClaim(持久化卷声明),PVC 是用户存储的一种声明,创建完成后,可以和PV实现一对一绑定。对于真正使用存储的用户不需要关心底层的存储实现细节,只需要直接使用 PVC 即可。
apiVersion: v1
kind: PersistentVolumeClaim
metadata:
  name: pvc-nfs
  namespace: default
spec:
  accessModes:
  - ReadWriteMany
  resources:
    requests:
      storage: 1Gi
然后Pod中通过如下方式去使用:
...
    spec:
      containers:
      - name: nginx
        image: nginx:alpine
        imagePullPolicy: IfNotPresent
        ports:
        - containerPort: 80
          name: web
        volumeMounts:                        #挂载容器中的目录到pvc nfs中的目录
        - name: www
          mountPath: /usr/share/nginx/html
      volumes:
      - name: www
        persistentVolumeClaim:              #指定pvc
          claimName: pvc-nfs
...
PV与PVC管理NFS存储卷实践
环境准备
服务端:172.21.51.55
$ yum -y install nfs-utils rpcbind

# 共享目录
$ mkdir -p /data/k8s && chmod 755 /data/k8s

$ echo '/data/k8s  *(insecure,rw,sync,no_root_squash)'>>/etc/exports

$ systemctl enable rpcbind && systemctl start rpcbind
$ systemctl enable nfs && systemctl start nfs
客户端:k8s集群slave节点
PV与PVC演示
$ cat pv-nfs.yaml
apiVersion: v1
kind: PersistentVolume
metadata:
  name: nfs-pv
spec:
  capacity:
    storage: 1Gi
  accessModes:
  - ReadWriteMany
  persistentVolumeReclaimPolicy: Retain
  nfs:
    path: /data/k8s/nginx
    server: 172.21.51.55

$ kubectl create -f pv-nfs.yaml

$ kubectl get pv
NAME     CAPACITY   ACCESS MODES   RECLAIM POLICY   STATUS      CLAIM   STORAGECLASS
nfs-pv   1Gi        RWO            Retain           Available
一个 PV 的生命周期中,可能会处于4中不同的阶段:
- Available(可用):表示可用状态,还未被任何 PVC 绑定
- Bound(已绑定):表示 PV 已经被 PVC 绑定
- Released(已释放):PVC 被删除,但是资源还未被集群重新声明
- Failed(失败): 表示该 PV 的自动回收失败
$ cat pvc.yaml
apiVersion: v1
kind: PersistentVolumeClaim
metadata:
  name: pvc-nfs
  namespace: default
spec:
  accessModes:
  - ReadWriteMany
  resources:
    requests:
      storage: 1Gi

$ kubectl create -f pvc.yaml
$ kubectl get pvc
NAME      STATUS   VOLUME   CAPACITY   ACCESS MODES   STORAGECLASS   AGE
pvc-nfs   Bound    nfs-pv   1Gi        RWO                           3s
$ kubectl get pv
NAME     CAPACITY   ACCESS MODES   RECLAIM POLICY   STATUS   CLAIM
nfs-pv   1Gi        RWO            Retain           Bound    default/pvc-nfs

#访问模式,storage大小(pvc大小需要小于pv大小),以及 PV 和 PVC 的 storageClassName 字段必须一样,这样才能够进行绑定。

#PersistentVolumeController会不断地循环去查看每一个 PVC,是不是已经处于 Bound(已绑定)状态。如果不是,那它就会遍历所有的、可用的 PV,并尝试将其与未绑定的 PVC 进行绑定,这样,Kubernetes 就可以保证用户提交的每一个 PVC,只要有合适的 PV 出现,它就能够很快进入绑定状态。而所谓将一个 PV 与 PVC 进行“绑定”,其实就是将这个 PV 对象的名字,填在了 PVC 对象的 spec.volumeName 字段上。
[root@k8s-master pvc]# kubectl edit pvc pvc-nfs #查看到

[root@k8s-master pvc]# kubectl get pv
NAME     CAPACITY   ACCESS MODES   RECLAIM POLICY   STATUS     CLAIM             STORAGECLASS   REASON   AGE
nfs-pv   1Gi        RWX            Retain           Released   default/pvc-nfs                           34m
[root@k8s-master pvc]# vi pvc.yaml  # 修改名字pvc-nfs1
[root@k8s-master pvc]# kubectl create -f pvc.yaml
persistentvolumeclaim/pvc-nfs1 created
[root@k8s-master pvc]# kubectl get pvc  # 状态是Pending
NAME       STATUS    VOLUME   CAPACITY   ACCESS MODES   STORAGECLASS   AGE
pvc-nfs1   Pending                                                     13s
[root@k8s-master pvc]# kubectl get pv
NAME     CAPACITY   ACCESS MODES   RECLAIM POLICY   STATUS     CLAIM             STORAGECLASS   REASON   AGE
nfs-pv   1Gi        RWX            Retain           Released   default/pvc-nfs                           36m
[root@k8s-master pvc]# kubectl edit pv nfs-pv # 删除掉 claimRef 部分
  claimRef:
    apiVersion: v1
    kind: PersistentVolumeClaim
    name: pvc-nfs
    namespace: default
    resourceVersion: "394403"
    uid: 6bc2b18c-a918-440b-9513-6a6538795688
[root@k8s-master pvc]# kubectl get pv   # Available状态是可以绑定的状态
NAME     CAPACITY   ACCESS MODES   RECLAIM POLICY   STATUS      CLAIM   STORAGECLASS   REASON   AGE
nfs-pv   1Gi        RWX            Retain           Available                                   39m
[root@k8s-master pvc]# kubectl get pv  # 发现已被绑定上
NAME     CAPACITY   ACCESS MODES   RECLAIM POLICY   STATUS   CLAIM              STORAGECLASS   REASON   AGE
nfs-pv   1Gi        RWX            Retain           Bound    default/pvc-nfs1                           39m


# 查看nfs数据目录
$ ls /nfsdata
创建Pod挂载pvc
$ cat deployment.yaml
apiVersion: apps/v1
kind: Deployment
metadata:
  name: nfs-pvc
spec:
  replicas: 1
  selector:        #指定Pod的选择器
    matchLabels:
      app: nginx
  template:
    metadata:
      labels:
        app: nginx
    spec:
      containers:
      - name: nginx
        image: nginx:alpine
        imagePullPolicy: IfNotPresent
        ports:
        - containerPort: 80
          name: web
        volumeMounts:                        #挂载容器中的目录到pvc nfs中的目录
        - name: www
          mountPath: /usr/share/nginx/html
      volumes:
      - name: www
        persistentVolumeClaim:              #指定pvc
          claimName: pvc-nfs


$ kubectl create -f deployment.yaml

# 查看容器/usr/share/nginx/html目录
[root@k8s-master pvc]# kubectl get po
NAME                      READY   STATUS    RESTARTS   AGE
nfs-pvc-7bf65c788-h2sqk   1/1     Running   0          5s
[root@k8s-master pvc]#
[root@k8s-master pvc]# kubectl exec -ti nfs-pvc-7bf65c788-h2sqk -- bash
OCI runtime exec failed: exec failed: unable to start container process: exec: "bash": executable file not found in $PATH: unknown
command terminated with exit code 126
[root@k8s-master pvc]# kubectl exec -ti nfs-pvc-7bf65c788-h2sqk -- /bin/sh
/ # ls /usr/share/nginx/html  #这个目录就是挂载的nfs

# 删除pvc
[root@k8s-master pvc]# kubectl delete deploy nfs-pvc
deployment.apps "nfs-pvc" deleted
[root@k8s-master pvc]# kubectl delete pvc pvc-nfs
persistentvolumeclaim "pvc-nfs" deleted
[root@k8s-master pvc]# kubectl delete pv nfs-pv
persistentvolume "nfs-pv" deleted
storageClass实现动态挂载
创建pv及pvc过程是手动,且pv与pvc一一对应,手动创建很繁琐。因此,通过storageClass + provisioner的方式来实现通过PVC自动创建并绑定PV。
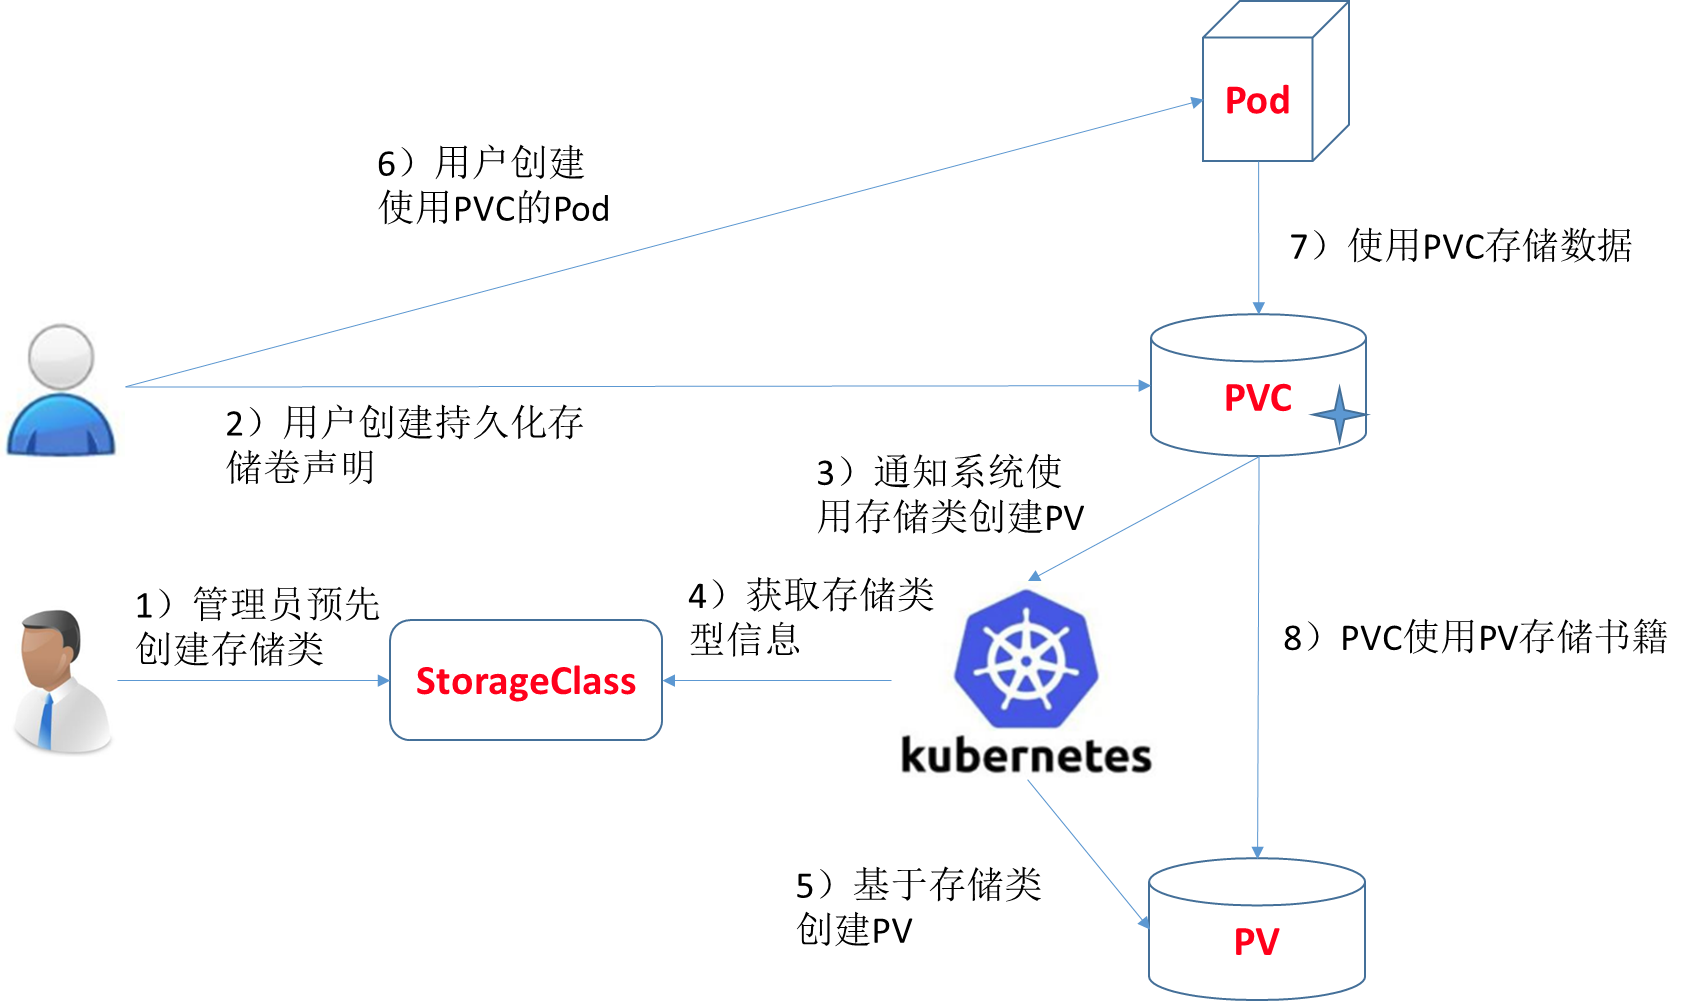
部署: https://github.com/kubernetes-retired/external-storage
部署之前,需要修改api-server的参数,否则会报错
为apiserver添加如下参数,重新启动即可:
- --feature-gates=RemoveSelfLink=false
--------------------操作记录
[root@k8s-master pvc]# vi /etc/kubernetes/manifests/kube-apiserver.yaml
spec:
  containers:
  - command:
    - kube-apiserver
    - --advertise-address=10.211.55.25
    - --allow-privileged=true
    - --authorization-mode=Node,RBAC
    - --feature-gates=RemoveSelfLink=false #添加内容

[root@k8s-master pvc]# kubectl get po  # 等待重启
[root@k8s-master pvc]# kubectl get po -n luffy
NAME                      READY   STATUS    RESTARTS   AGE
myblog-76d54c49b6-26br5   1/1     Running   2          33h
[root@k8s-master pvc]# kubectl -n luffy get po myblog-76d54c49b6-26br5 -oyaml
apiVersion: v1
kind: Pod
metadata:
  creationTimestamp: "2022-10-19T09:23:58Z"
  generateName: myblog-76d54c49b6-
  labels:
    app: myblog
    pod-template-hash: 76d54c49b6
  name: myblog-76d54c49b6-26br5
  namespace: luffy
  ownerReferences:
  - apiVersion: apps/v1
    blockOwnerDeletion: true
    controller: true
    kind: ReplicaSet
    name: myblog-76d54c49b6
    uid: c6c2957c-8ac1-4ba9-88ba-a731652b854c
  resourceVersion: "267739"
  selfLink: /api/v1/namespaces/luffy/pods/myblog-76d54c49b6-26br5 # 这里会多一个selfLink
apiVersion: apps/v1
kind: Deployment
metadata:
  name: nfs-client-provisioner
  labels:
    app: nfs-client-provisioner
  # replace with namespace where provisioner is deployed
  namespace: nfs-provisioner
spec:
  replicas: 1
  selector:
    matchLabels:
      app: nfs-client-provisioner
  strategy:
    type: Recreate
  selector:
    matchLabels:
      app: nfs-client-provisioner
  template:
    metadata:
      labels:
        app: nfs-client-provisioner
    spec:
      serviceAccountName: nfs-client-provisioner
      containers:
        - name: nfs-client-provisioner
          image: quay.io/external_storage/nfs-client-provisioner:latest
          volumeMounts:
            - name: nfs-client-root
              mountPath: /persistentvolumes
          env:
            - name: PROVISIONER_NAME
              value: luffy.com/nfs
            - name: NFS_SERVER
              value: 172.21.51.55   #修改nfs ip
            - name: NFS_PATH
              value: /data/k8s
      volumes:
        - name: nfs-client-root
          nfs:
            server: 172.21.51.55  #修改nfs ip
            path: /data/k8s
kind: ServiceAccount
apiVersion: v1
metadata:
  name: nfs-client-provisioner
  namespace: nfs-provisioner
---
kind: ClusterRole
apiVersion: rbac.authorization.k8s.io/v1
metadata:
  name: nfs-client-provisioner-runner
  namespace: nfs-provisioner
rules:
  - apiGroups: [""]
    resources: ["persistentvolumes"]
    verbs: ["get", "list", "watch", "create", "delete"]
  - apiGroups: [""]
    resources: ["persistentvolumeclaims"]
    verbs: ["get", "list", "watch", "update"]
  - apiGroups: ["storage.k8s.io"]
    resources: ["storageclasses"]
    verbs: ["get", "list", "watch"]
  - apiGroups: [""]
    resources: ["events"]
    verbs: ["create", "update", "patch"]
---
kind: ClusterRoleBinding
apiVersion: rbac.authorization.k8s.io/v1
metadata:
  name: run-nfs-client-provisioner
  namespace: nfs-provisioner
subjects:
  - kind: ServiceAccount
    name: nfs-client-provisioner
    namespace: nfs-provisioner
roleRef:
  kind: ClusterRole
  name: nfs-client-provisioner-runner
  apiGroup: rbac.authorization.k8s.io
---
kind: Role
apiVersion: rbac.authorization.k8s.io/v1
metadata:
  name: leader-locking-nfs-client-provisioner
  namespace: nfs-provisioner
rules:
  - apiGroups: [""]
    resources: ["endpoints"]
    verbs: ["get", "list", "watch", "create", "update", "patch"]
---
kind: RoleBinding
apiVersion: rbac.authorization.k8s.io/v1
metadata:
  name: leader-locking-nfs-client-provisioner
  namespace: nfs-provisioner
subjects:
  - kind: ServiceAccount
    name: nfs-client-provisioner
    # replace with namespace where provisioner is deployed
    namespace: nfs-provisioner
roleRef:
  kind: Role
  name: leader-locking-nfs-client-provisioner
  apiGroup: rbac.authorization.k8s.io
apiVersion: storage.k8s.io/v1
kind: StorageClass
metadata:
  annotations:
    storageclass.kubernetes.io/is-default-class: "true"   # 设置为default StorageClass
  name: nfs
provisioner: luffy.com/nfs
parameters:
  archiveOnDelete: "true"
# kubectl create ns nfs-provisioner
[root@k8s-master pvc]# kubectl create -f  provisioner.yaml
[root@k8s-master pvc]# kubectl create -f rbac.yaml
[root@k8s-master pvc]# kubectl create -f storage_class.yaml

[root@k8s-master pvc]# kubectl apply -f test_pvc.yaml
[root@k8s-master pvc]# kubectl get pvc
NAME         STATUS    VOLUME   CAPACITY   ACCESS MODES   STORAGECLASS   AGE
test-claim   Pending                                      nfs            8s
[root@k8s-master pvc]# kubectl -n nfs-provisioner get po
NAME                                     READY   STATUS    RESTARTS   AGE
nfs-client-provisioner-bf64d8dc4-87dh8   1/1     Running   0          3m58s
[root@k8s-master pvc]# kubectl -n nfs-provisioner logs -f nfs-client-provisioner-bf64d8dc4-87dh8
I1020 18:54:55.548746       1 leaderelection.go:185] attempting to acquire leader lease  nfs-provisioner/luffy.com-nfs...
E1020 18:54:55.569340       1 event.go:259] Could not construct reference to: '&v1.Endpoints{TypeMeta:v1.TypeMeta{Kind:"", APIVersion:""}, ObjectMeta:v1.ObjectMeta{Name:"luffy.com-nfs", GenerateName:"", Namespace:"nfs-provisioner", SelfLink:"", UID:"206aec52-9773-441a-ba54-26a8b26cb649", ResourceVersion:"414661", Generation:0, CreationTimestamp:v1.Time{Time:time.Time{wall:0x0, ext:63801888894, loc:(*time.Location)(0x1956800)}}, DeletionTimestamp:(*v1.Time)(nil), DeletionGracePeriodSeconds:(*int64)(nil), Labels:map[string]string(nil), Annotations:map[string]string{"control-plane.alpha.kubernetes.io/leader":"{\"holderIdentity\":\"nfs-client-provisioner-bf64d8dc4-87dh8_affa179f-50a8-11ed-950d-9a157f6f5bde\",\"leaseDurationSeconds\":15,\"acquireTime\":\"2022-10-20T18:54:55Z\",\"renewTime\":\"2022-10-20T18:54:55Z\",\"leaderTransitions\":0}"}, OwnerReferences:[]v1.OwnerReference(nil), Initializers:(*v1.Initializers)(nil), Finalizers:[]string(nil), ClusterName:""}, Subsets:[]v1.EndpointSubset(nil)}' due to: 'selfLink was empty, can't make reference'. Will not report event: 'Normal' 'LeaderElection' 'nfs-client-provisioner-bf64d8dc4-87dh8_affa179f-50a8-11ed-950d-9a157f6f5bde became leader'
I1020 18:54:55.569458       1 leaderelection.go:194] successfully acquired lease nfs-provisioner/luffy.com-nfs
I1020 18:54:55.569521       1 controller.go:631] Starting provisioner controller luffy.com/nfs_nfs-client-provisioner-bf64d8dc4-87dh8_affa179f-50a8-11ed-950d-9a157f6f5bde!
I1020 18:54:55.670797       1 controller.go:680] Started provisioner controller luffy.com/nfs_nfs-client-provisioner-bf64d8dc4-87dh8_affa179f-50a8-11ed-950d-9a157f6f5bde!
I1020 18:57:59.648099       1 controller.go:987] provision "default/test-claim" class "nfs": started
E1020 18:57:59.657397       1 controller.go:1004] provision "default/test-claim" class "nfs": unexpected error getting claim reference: selfLink was empty, can't make reference
# 回到上面做部署前的api-server参数添加

[root@k8s-master pvc]# kubectl get pv
NAME                                       CAPACITY   ACCESS MODES   RECLAIM POLICY   STATUS   CLAIM                STORAGECLASS   REASON   AGE
pvc-fa871a75-406d-4584-81ba-a39e0970da10   1Mi        RWX            Delete           Bound    default/test-claim   nfs                     6m31s
[root@k8s-master pvc]# kubectl get pvc
NAME         STATUS   VOLUME                                     CAPACITY   ACCESS MODES   STORAGECLASS   AGE
test-claim   Bound    pvc-fa871a75-406d-4584-81ba-a39e0970da10   1Mi        RWX            nfs            11m
pvc.yaml
kind: PersistentVolumeClaim
apiVersion: v1
metadata:
  name: test-claim
spec:
  accessModes:
    - ReadWriteMany
  resources:
    requests:
      storage: 1Mi
  storageClassName: nfs
对接Ceph存储实践
ceph的安装及使用参考 http://docs.ceph.org.cn/start/intro/
单点快速安装: https://blog.csdn.net/h106140873/article/details/90201379
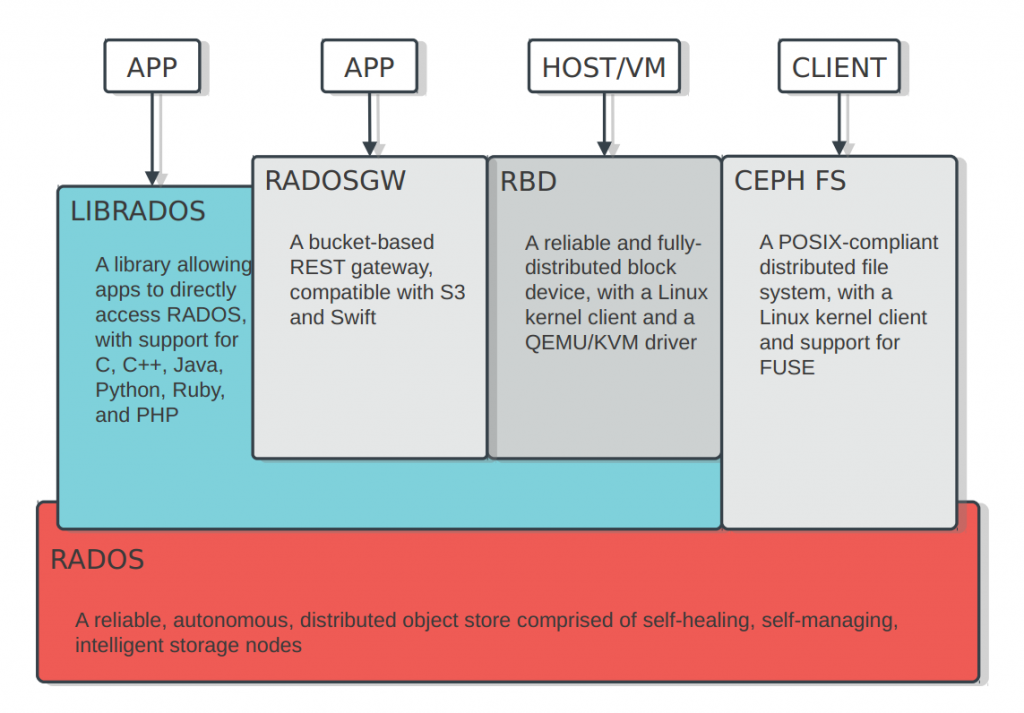
# CephFS需要使用两个Pool来分别存储数据和元数据
ceph osd pool create cephfs_data 128
ceph osd pool create cephfs_meta 128
ceph osd lspools

# 创建一个CephFS
ceph fs new cephfs cephfs_meta cephfs_data

# 查看
ceph fs ls

# ceph auth get-key client.admin
client.admin
        key: AQBPTstgc078NBAA78D1/KABglIZHKh7+G2X8w==
# 挂载
$ mount -t ceph 172.21.51.55:6789:/ /mnt/cephfs -o name=admin,secret=AQBPTstgc078NBAA78D1/KABglIZHKh7+G2X8w==
storageClass实现动态挂载
创建pv及pvc过程是手动,且pv与pvc一一对应,手动创建很繁琐。因此,通过storageClass + provisioner的方式来实现通过PVC自动创建并绑定PV。
比如,针对cephfs,可以创建如下类型的storageclass:
kind: StorageClass
apiVersion: storage.k8s.io/v1
metadata:
  name: dynamic-cephfs
provisioner: ceph.com/cephfs
parameters:
    monitors: 172.21.51.55:6789
    adminId: admin
    adminSecretName: ceph-admin-secret
    adminSecretNamespace: "kube-system"
    claimRoot: /volumes/kubernetes
NFS,ceph-rbd,cephfs均提供了对应的provisioner
部署cephfs-provisioner
$ cat external-storage-cephfs-provisioner.yaml
apiVersion: v1
kind: ServiceAccount
metadata:
  name: cephfs-provisioner
  namespace: kube-system
---
kind: ClusterRole
apiVersion: rbac.authorization.k8s.io/v1
metadata:
  name: cephfs-provisioner
rules:
  - apiGroups: [""]
    resources: ["persistentvolumes"]
    verbs: ["get", "list", "watch", "create", "delete"]
  - apiGroups: [""]
    resources: ["persistentvolumeclaims"]
    verbs: ["get", "list", "watch", "update"]
  - apiGroups: ["storage.k8s.io"]
    resources: ["storageclasses"]
    verbs: ["get", "list", "watch"]
  - apiGroups: [""]
    resources: ["events"]
    verbs: ["create", "update", "patch"]
  - apiGroups: [""]
    resources: ["endpoints"]
    verbs: ["get", "list", "watch", "create", "update", "patch"]
  - apiGroups: [""]
    resources: ["secrets"]
    verbs: ["create", "get", "delete"]
---
kind: ClusterRoleBinding
apiVersion: rbac.authorization.k8s.io/v1
metadata:
  name: cephfs-provisioner
subjects:
  - kind: ServiceAccount
    name: cephfs-provisioner
    namespace: kube-system
roleRef:
  kind: ClusterRole
  name: cephfs-provisioner
  apiGroup: rbac.authorization.k8s.io


---
apiVersion: apps/v1
kind: Deployment
metadata:
  name: cephfs-provisioner
  namespace: kube-system
spec:
  replicas: 1
  selector:
    matchLabels:
      app: cephfs-provisioner
  strategy:
    type: Recreate
  template:
    metadata:
      labels:
        app: cephfs-provisioner
    spec:
      containers:
      - name: cephfs-provisioner
        image: "quay.io/external_storage/cephfs-provisioner:latest"
        env:
        - name: PROVISIONER_NAME
          value: ceph.com/cephfs
        imagePullPolicy: IfNotPresent
        command:
        - "/usr/local/bin/cephfs-provisioner"
        args:
        - "-id=cephfs-provisioner-1"
        - "-disable-ceph-namespace-isolation=true"
      serviceAccount: cephfs-provisioner
在ceph monitor机器中查看admin账户的key
创建secret
$ echo -n AQBPTstgc078NBAA78D1/KABglIZHKh7+G2X8w==|base64
QVFCUFRzdGdjMDc4TkJBQTc4RDEvS0FCZ2xJWkhLaDcrRzJYOHc9PQ==
$ cat ceph-admin-secret.yaml
apiVersion: v1
data:
  key: QVFCUFRzdGdjMDc4TkJBQTc4RDEvS0FCZ2xJWkhLaDcrRzJYOHc9PQ==
kind: Secret
metadata:
  name: ceph-admin-secret
  namespace: kube-system
type: Opaque
创建storageclass
$ cat cephfs-storage-class.yaml
kind: StorageClass
apiVersion: storage.k8s.io/v1
metadata:
  name: dynamic-cephfs
provisioner: ceph.com/cephfs
parameters:
    monitors: 172.21.51.55:6789
    adminId: admin
    adminSecretName: ceph-admin-secret
    adminSecretNamespace: "kube-system"
    claimRoot: /volumes/kubernetes
动态pvc验证及实现分析
使用流程: 创建pvc,指定storageclass和存储大小,即可实现动态存储。
创建pvc测试自动生成pv
$ cat cephfs-pvc-test.yaml
kind: PersistentVolumeClaim
apiVersion: v1
metadata:
  name: cephfs-claim
spec:
  accessModes:
    - ReadWriteOnce
  storageClassName: dynamic-cephfs
  resources:
    requests:
      storage: 2Gi

$ kubectl create -f cephfs-pvc-test.yaml

$ kubectl get pv
pvc-2abe427e-7568-442d-939f-2c273695c3db   2Gi        RWO            Delete           Bound      default/cephfs-claim   dynamic-cephfs            1s
创建Pod使用pvc挂载cephfs数据盘
$ cat test-pvc-cephfs.yaml
apiVersion: v1
kind: Pod
metadata:
  name: nginx-pod
  labels:
    name: nginx-pod
spec:
  containers:
  - name: nginx-pod
    image: nginx:alpine
    ports:
    - name: web
      containerPort: 80
    volumeMounts:
    - name: cephfs
      mountPath: /usr/share/nginx/html
  volumes:
  - name: cephfs
    persistentVolumeClaim:
      claimName: cephfs-claim

$ kubectl create -f test-pvc-cephfs.yaml
我们所说的容器的持久化,实际上应该理解为宿主机中volume的持久化,因为Pod是支持销毁重建的,所以只能通过宿主机volume持久化,然后挂载到Pod内部来实现Pod的数据持久化。
宿主机上的volume持久化,因为要支持数据漂移,所以通常是数据存储在分布式存储中,宿主机本地挂载远程存储(NFS,Ceph,OSS),这样即使Pod漂移也不影响数据。
k8s的pod的挂载盘通常的格式为:
查看nginx-pod的挂载盘,
$ df -TH
/var/lib/kubelet/pods/61ba43c5-d2e9-4274-ac8c-008854e4fa8e/volumes/kubernetes.io~cephfs/pvc-2abe427e-7568-442d-939f-2c273695c3db/

$ findmnt /var/lib/kubelet/pods/61ba43c5-d2e9-4274-ac8c-008854e4fa8e/volumes/kubernetes.io~cephfs/pvc-2abe427e-7568-442d-939f-2c273695c3db/

172.21.51.55:6789:/volumes/kubernetes/kubernetes/kubernetes-dynamic-pvc-ffe3d84d-c433-11ea-b347-6acc3cf3c15f
集群网络
Kubernetes集群的网络实现
CNI介绍及集群网络选型
容器网络接口(Container Network Interface),实现kubernetes集群的Pod网络通信及管理。包括:
- CNI Plugin负责给容器配置网络,它包括两个基本的接口: 配置网络: AddNetwork(net NetworkConfig, rt RuntimeConf) (types.Result, error) 清理网络: DelNetwork(net NetworkConfig, rt RuntimeConf) error
- IPAM Plugin负责给容器分配IP地址,主要实现包括host-local和dhcp。
以上两种插件的支持,使得k8s的网络可以支持各式各样的管理模式,当前在业界也出现了大量的支持方案,其中比较流行的比如flannel、calico等。
kubernetes配置了cni网络插件后,其容器网络创建流程为:
-
kubelet先创建pause容器生成对应的network namespace
-
调用网络driver,因为配置的是CNI,所以会调用CNI相关代码,识别CNI的配置目录为/etc/cni/net.d
-
CNI driver根据配置调用具体的CNI插件,二进制调用,可执行文件目录为/opt/cni/bin,项目
-
CNI插件给pause容器配置正确的网络,pod中其他的容器都是用pause的网络
可以在此查看社区中的CNI实现,https://github.com/containernetworking/cni
通用类型:flannel、calico等,部署使用简单
其他:根据具体的网络环境及网络需求选择,比如
- 公有云机器,可以选择厂商与网络插件的定制Backend,如AWS、阿里、腾讯针对flannel均有自己的插件,也有AWS ECS CNI
- 私有云厂商,比如Vmware NSX-T等
- 网络性能等,MacVlan
Flannel网络模型实现剖析
flannel的网络有多种实现:
- udp
- vxlan
- host-gw
- ...
不特殊指定的话,默认会使用vxlan技术作为Backend,可以通过如下查看:
$ kubectl -n kube-system exec  kube-flannel-ds-amd64-cb7hs cat /etc/kube-flannel/net-conf.json
{
  "Network": "10.244.0.0/16",
  "Backend": {
    "Type": "vxlan"
  }
}
vxlan介绍及点对点通信的实现
VXLAN 全称是虚拟可扩展的局域网( Virtual eXtensible Local Area Network),它是一种 overlay 技术,通过三层的网络来搭建虚拟的二层网络。
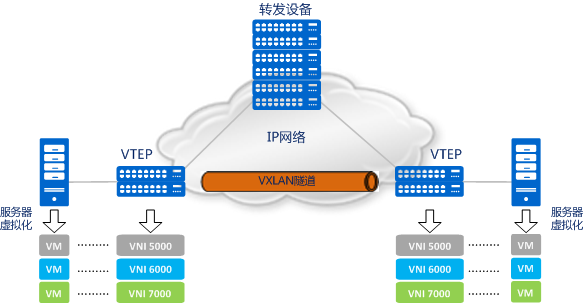
它创建在原来的 IP 网络(三层)上,只要是三层可达(能够通过 IP 互相通信)的网络就能部署 vxlan。在每个端点上都有一个 vtep 负责 vxlan 协议报文的封包和解包,也就是在虚拟报文上封装 vtep 通信的报文头部。物理网络上可以创建多个 vxlan 网络,这些 vxlan 网络可以认为是一个隧道,不同节点的虚拟机能够通过隧道直连。每个 vxlan 网络由唯一的 VNI 标识,不同的 vxlan 可以不相互影响。
- VTEP(VXLAN Tunnel Endpoints):vxlan 网络的边缘设备,用来进行 vxlan 报文的处理(封包和解包)。vtep 可以是网络设备(比如交换机),也可以是一台机器(比如虚拟化集群中的宿主机)
- VNI(VXLAN Network Identifier):VNI 是每个 vxlan 的标识,一共有 2^24 = 16,777,216,一般每个 VNI 对应一个租户,也就是说使用 vxlan 搭建的公有云可以理论上可以支撑千万级别的租户
演示:在k8s-slave1和k8s-slave2两台机器间,利用vxlan的点对点能力,实现虚拟二层网络的通信
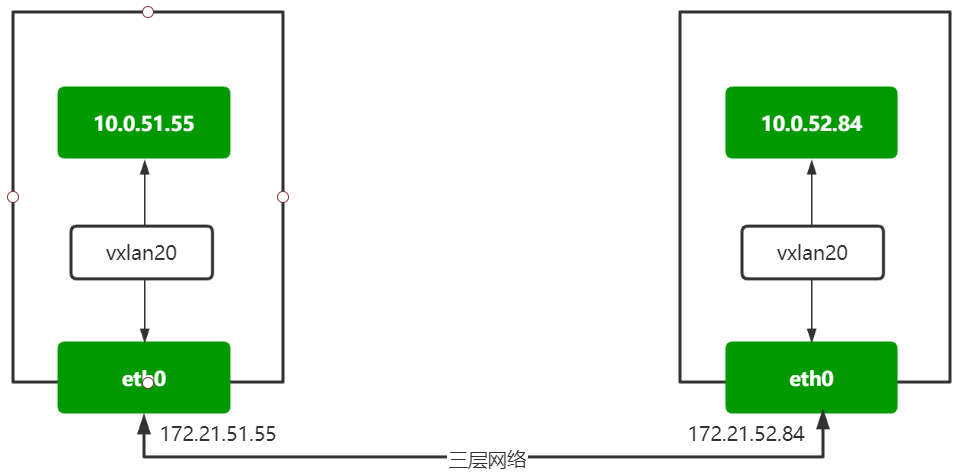
172.21.51.55节点:
# 创建vTEP设备,对端指向172.21.52.84节点,指定VNI及underlay网络使用的网卡
$ ip link add vxlan20 type vxlan id 20 remote 172.21.52.84 dstport 4789 dev eth0

$ ip -d link show vxlan20

# 启动设备
$ ip link set vxlan20 up

# 设置ip地址
$ ip addr add 10.0.51.55/24 dev vxlan20
172.21.52.84节点:
# 创建VTEP设备,对端指向k8s-slave1节点,指定VNI及underlay网络使用的网卡
$ ip link add vxlan20 type vxlan id 20 remote 172.21.51.55 dstport 4789 dev eth0

# 启动设备
$ ip link set vxlan20 up

# 设置ip地址
$ ip addr add 10.0.52.84/24 dev vxlan20
在172.21.51.55节点:
$ ping 10.0.52.84

# 走vtep封包解包

$ ip route add 10.0.52.0/24 dev vxlan20

# 在172.21.52.84机器
$ ip route add 10.0.51.0/24 dev vxlan20

# 再次ping
$ ping 10.0.52.84

#
$ tcpdump -i vxlan20 icmp
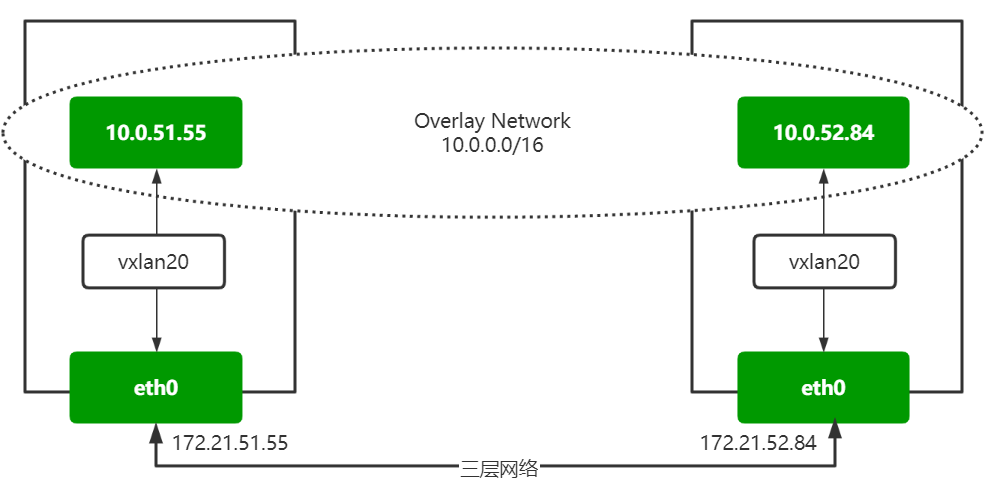
隧道是一个逻辑上的概念,在 vxlan 模型中并没有具体的物理实体想对应。隧道可以看做是一种虚拟通道,vxlan 通信双方(图中的虚拟机)认为自己是在直接通信,并不知道底层网络的存在。从整体来说,每个 vxlan 网络像是为通信的虚拟机搭建了一个单独的通信通道,也就是隧道。
实现的过程:
虚拟机的报文通过 vtep 添加上 vxlan 以及外部的报文层,然后发送出去,对方 vtep 收到之后拆除 vxlan 头部然后根据 VNI 把原始报文发送到目的虚拟机。
# 查看172.21.51.55主机路由
$ route -n
10.0.51.0       0.0.0.0         255.255.255.0   U     0      0        0 vxlan20
10.0.52.0       0.0.0.0         255.255.255.0   U     0      0        0 vxlan20

# 到了vxlan的设备后,
$ ip -d link show vxlan20
    vxlan id 20 remote 172.21.51.55 dev eth0 srcport 0 0 dstport 4789 ...

# 查看fdb地址表,主要由MAC地址、VLAN号、端口号和一些标志域等信息组成,vtep 对端地址为 172.21.51.55,换句话说,如果接收到的报文添加上 vxlan 头部之后都会发到 172.21.51.55
$ bridge fdb show dev vxlan20
00:00:00:00:00:00 dst 172.21.52.84 via eth0 self permanent
a6:61:05:84:20:c6 dst 172.21.52.84 self
在172.21.52.84机器抓包,查看vxlan封装后的包:
# 在172.21.52.84机器执行
$ tcpdump -i eth0 host 172.21.51.55 -w vxlan.cap

# 在172.21.51.55机器执行
$ ping 10.0.52.84
使用wireshark分析ICMP类型的数据包
清理:
跨主机容器网络的通信
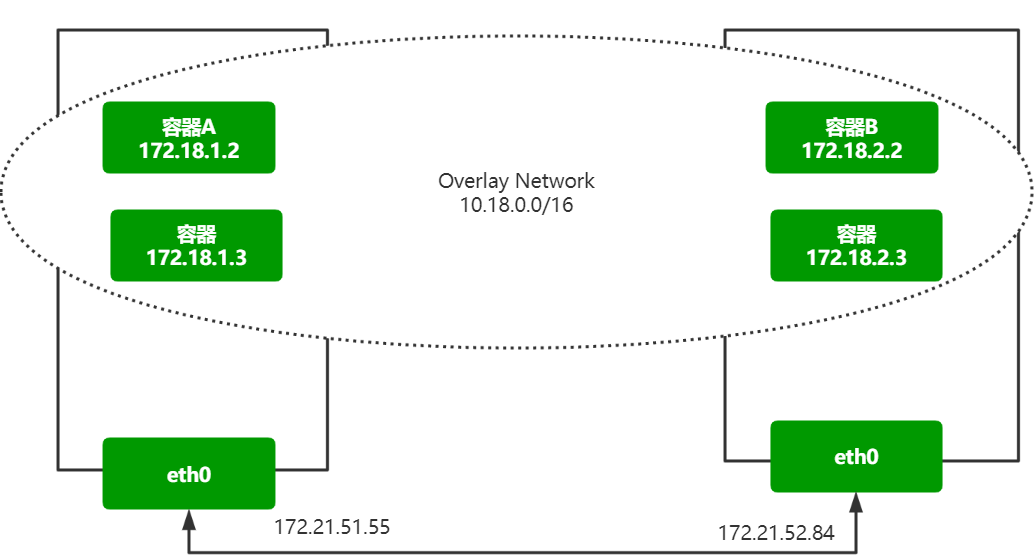
思考:容器网络模式下,vxlan设备该接在哪里?
基本的保证:目的容器的流量要通过vtep设备进行转发!
演示:利用vxlan实现跨主机容器网络通信
为了不影响已有的网络,因此创建一个新的网桥,创建容器接入到新的网桥来演示效果
在172.21.51.55节点:
# 创建新网桥,指定cidr段
$ docker network create --subnet 172.18.1.0/24  network-luffy

# 查看网桥
$ brctl show
# 新建容器,接入到新网桥
$ docker run -d --name vxlan-test --net network-luffy --ip 172.18.1.2 nginx:alpine

$ docker exec vxlan-test ifconfig
在172.21.52.84节点:
# 创建新网桥,指定cidr段
$ docker network create --subnet 172.18.2.0/24  network-luffy

# 新建容器,接入到新网桥
$ docker run -d --name vxlan-test --net network-luffy --ip 172.18.2.2 nginx:alpine
此时执行ping测试:
分析:数据到了网桥后,出不去。结合前面的示例,因此应该将流量由vtep设备转发,联想到网桥的特性,接入到桥中的端口,会由网桥负责转发数据,因此,相当于所有容器发出的数据都会经过到vxlan的端口,vxlan将流量转到对端的vtep端点,再次由网桥负责转到容器中。
172.21.51.55节点:
# 删除旧的vtep
$ ip link del vxlan20

# 新建vtep
$ ip link add vxlan_docker type vxlan id 100 remote 172.21.52.84 dstport 4789 dev eth0
$ ip link set vxlan_docker up
# 不用设置ip,因为目标是可以转发容器的数据即可

$ brctl show
br-0fdb78d3b486         8000.02421452871b       no              vethfffdd2f
# 接入到网桥中
$ brctl addif br-0fdb78d3b486 vxlan_docker

# 设置路由转发
$ ip route add 172.18.2.0/24 dev br-0fdb78d3b486
172.21.52.84节点:
# 删除旧的vtep
$ ip link del vxlan20

# 新建vtep
$ ip link add vxlan_docker type vxlan id 100 remote 172.21.51.55 dstport 4789 dev eth0
$ ip link set vxlan_docker up
# 不用设置ip,因为目标是可以转发容器的数据即可

# 接入到网桥中
$ brctl show
$ brctl addif br-c6660fe2dc53 vxlan_docker

# 设置路由转发
$ ip route add 172.18.1.0/24 dev br-c6660fe2dc53
再次执行ping测试:
Flannel的vxlan实现精讲
思考:k8s集群的网络环境和手动实现的跨主机的容器通信有哪些差别?
- CNI要求,集群中的每个Pod都必须分配唯一的Pod IP
-
k8s集群内的通信不是vxlan点对点通信,因为集群内的所有节点之间都需要互联 - 没法创建点对点的vxlan模型
-
集群节点动态添加
flannel如何为每个节点分配Pod地址段:
$ kubectl -n kube-system exec kube-flannel-ds-amd64-cb7hs cat /etc/kube-flannel/net-conf.json
{
  "Network": "10.244.0.0/16",
  "Backend": {
    "Type": "vxlan"
  }
}

#查看节点的pod ip
[root@k8s-master bin]# kd get po -o wide
NAME                      READY   STATUS    RESTARTS   AGE     IP            NODE
myblog-5d9ff54d4b-4rftt   1/1     Running   1          33h     10.244.2.19   k8s-slave2
myblog-5d9ff54d4b-n447p   1/1     Running   1          33h     10.244.1.32   k8s-slave1

#查看k8s-slave1主机分配的地址段
$ cat /run/flannel/subnet.env
FLANNEL_NETWORK=10.244.0.0/16
FLANNEL_SUBNET=10.244.1.1/24
FLANNEL_MTU=1450
FLANNEL_IPMASQ=true

# kubelet启动容器的时候就可以按照本机的网段配置来为pod设置IP地址
vtep的设备在哪:
Pod的流量如何转到vtep设备中
$ brctl show cni0

# 每个Pod都会使用Veth pair来实现流量转到cni0网桥

$ route -n
10.244.0.0      10.244.0.0      255.255.255.0   UG    0      0        0 flannel.1
10.244.1.0      0.0.0.0         255.255.255.0   U     0      0        0 cni0
10.244.2.0      10.244.2.0      255.255.255.0   UG    0      0        0 flannel.1
vtep封包的时候,如何拿到目的vetp端的IP及MAC信息
演示跨主机Pod通信的流量详细过程:
$ kubectl -n luffy get po -o wide
myblog-5d9ff54d4b-4rftt   1/1     Running   1          25h    10.244.2.19   k8s-slave2
myblog-5d9ff54d4b-n447p   1/1     Running   1          25h    10.244.1.32   k8s-slave1

$ kubectl -n luffy exec myblog-5d9ff54d4b-n447p -- ping 10.244.2.19 -c 2
PING 10.244.2.19 (10.244.2.19) 56(84) bytes of data.
64 bytes from 10.244.2.19: icmp_seq=1 ttl=62 time=0.480 ms
64 bytes from 10.244.2.19: icmp_seq=2 ttl=62 time=1.44 ms

--- 10.244.2.19 ping statistics ---
2 packets transmitted, 2 received, 0% packet loss, time 1001ms
rtt min/avg/max/mdev = 0.480/0.961/1.443/0.482 ms

# 查看路由
$ kubectl -n luffy exec myblog-5d9ff54d4b-n447p -- route -n
Kernel IP routing table
Destination     Gateway         Genmask         Flags Metric Ref    Use Iface
0.0.0.0         10.244.1.1      0.0.0.0         UG    0      0        0 eth0
10.244.0.0      10.244.1.1      255.255.0.0     UG    0      0        0 eth0
10.244.1.0      0.0.0.0         255.255.255.0   U     0      0        0 eth0

# 查看k8s-slave1 的veth pair 和网桥
$ brctl show
bridge name     bridge id               STP enabled     interfaces
cni0            8000.6a9a0b341d88       no              veth048cc253
                                                        veth76f8e4ce
                                                        vetha4c972e1
# 流量到了cni0后,查看slave1节点的route
$ route -n
Destination     Gateway         Genmask         Flags Metric Ref    Use Iface
0.0.0.0         192.168.136.2   0.0.0.0         UG    100    0        0 eth0
10.0.136.0      0.0.0.0         255.255.255.0   U     0      0        0 vxlan20
10.244.0.0      10.244.0.0      255.255.255.0   UG    0      0        0 flannel.1
10.244.1.0      0.0.0.0         255.255.255.0   U     0      0        0 cni0
10.244.2.0      10.244.2.0      255.255.255.0   UG    0      0        0 flannel.1
172.17.0.0      0.0.0.0         255.255.0.0     U     0      0        0 docker0
192.168.136.0   0.0.0.0         255.255.255.0   U     100    0        0 eth0

# 流量转发到了flannel.1网卡,查看该网卡,其实是vtep设备
$ ip -d link show flannel.1
4: flannel.1: <BROADCAST,MULTICAST,UP,LOWER_UP> mtu 1450 qdisc noqueue state UNKNOWN mode DEFAULT group default
    link/ether 8a:2a:89:4d:b0:31 brd ff:ff:ff:ff:ff:ff promiscuity 0
    vxlan id 1 local 172.21.51.68 dev eth0 srcport 0 0 dstport 8472 nolearning ageing 300 noudpcsum noudp6zerocsumtx noudp6zerocsumrx addrgenmode eui64 numtxqueues 1 numrxqueues 1 gso_max_size 65536 gso_max_segs 65535

# 该转发到哪里,通过etcd查询数据,然后本地缓存,流量不用走多播发送
$ bridge fdb show dev flannel.1
4a:4d:9d:3a:c5:f0 dst 172.21.51.68 self permanent
76:e7:98:9f:5b:e9 dst 172.21.51.67 self permanent

# 对端的vtep设备接收到请求后做解包,取出源payload内容,查看k8s-slave2的路由
$ route -n
Destination     Gateway         Genmask         Flags Metric Ref    Use Iface
0.0.0.0         172.21.50.140   0.0.0.0         UG    0      0        0 eth0
10.244.0.0      0.0.0.0         255.255.255.0   U     0      0        0 cni0
10.244.1.0      10.244.1.0      255.255.255.0   UG    0      0        0 flannel.1
10.244.2.0      10.244.2.0      255.255.255.0   UG    0      0        0 flannel.1
169.254.0.0     0.0.0.0         255.255.0.0     U     1002   0        0 eth0
172.17.0.0      0.0.0.0         255.255.0.0     U     0      0        0 docker0
172.21.0.0      0.0.0.0         255.255.0.0     U     0      0        0 eth0

#根据路由规则转发到cni0网桥,然后由网桥转到具体的Pod中
实际的请求图:
- k8s-slave1 节点中的 pod-a(10.244.2.19)当中的 IP 包通过 pod-a 内的路由表被发送到eth0,进一步通过veth pair转到宿主机中的网桥
cni0 - 到达
cni0当中的 IP 包通过匹配节点 k8s-slave1 的路由表发现通往 10.244.2.19 的 IP 包应该交给flannel.1接口 flannel.1作为一个 VTEP 设备,收到报文后将按照VTEP的配置进行封包,第一次会发送ARP请求,知道10.244.2.19的vtep设备是k8s-slave2机器,IP地址是172.21.51.67,拿到MAC 地址进行 VXLAN 封包。- 通过节点 k8s-slave2 跟 k8s-slave1之间的网络连接,VXLAN 包到达 k8s-slave2 的 eth0 接口
- 通过端口 8472,VXLAN 包被转发给 VTEP 设备
flannel.1进行解包 - 解封装后的 IP 包匹配节点 k8s-slave2 当中的路由表(10.244.2.0),内核将 IP 包转发给
cni0 cni0将 IP 包转发给连接在cni0上的 pod-b
利用host-gw模式提升集群网络性能
vxlan模式适用于三层可达的网络环境,对集群的网络要求很宽松,但是同时由于会通过VTEP设备进行额外封包和解包,因此给性能带来了额外的开销。
网络插件的目的其实就是将本机的cni0网桥的流量送到目的主机的cni0网桥。实际上有很多集群是部署在同一二层网络环境下的,可以直接利用二层的主机当作流量转发的网关。这样的话,可以不用进行封包解包,直接通过路由表去转发流量。
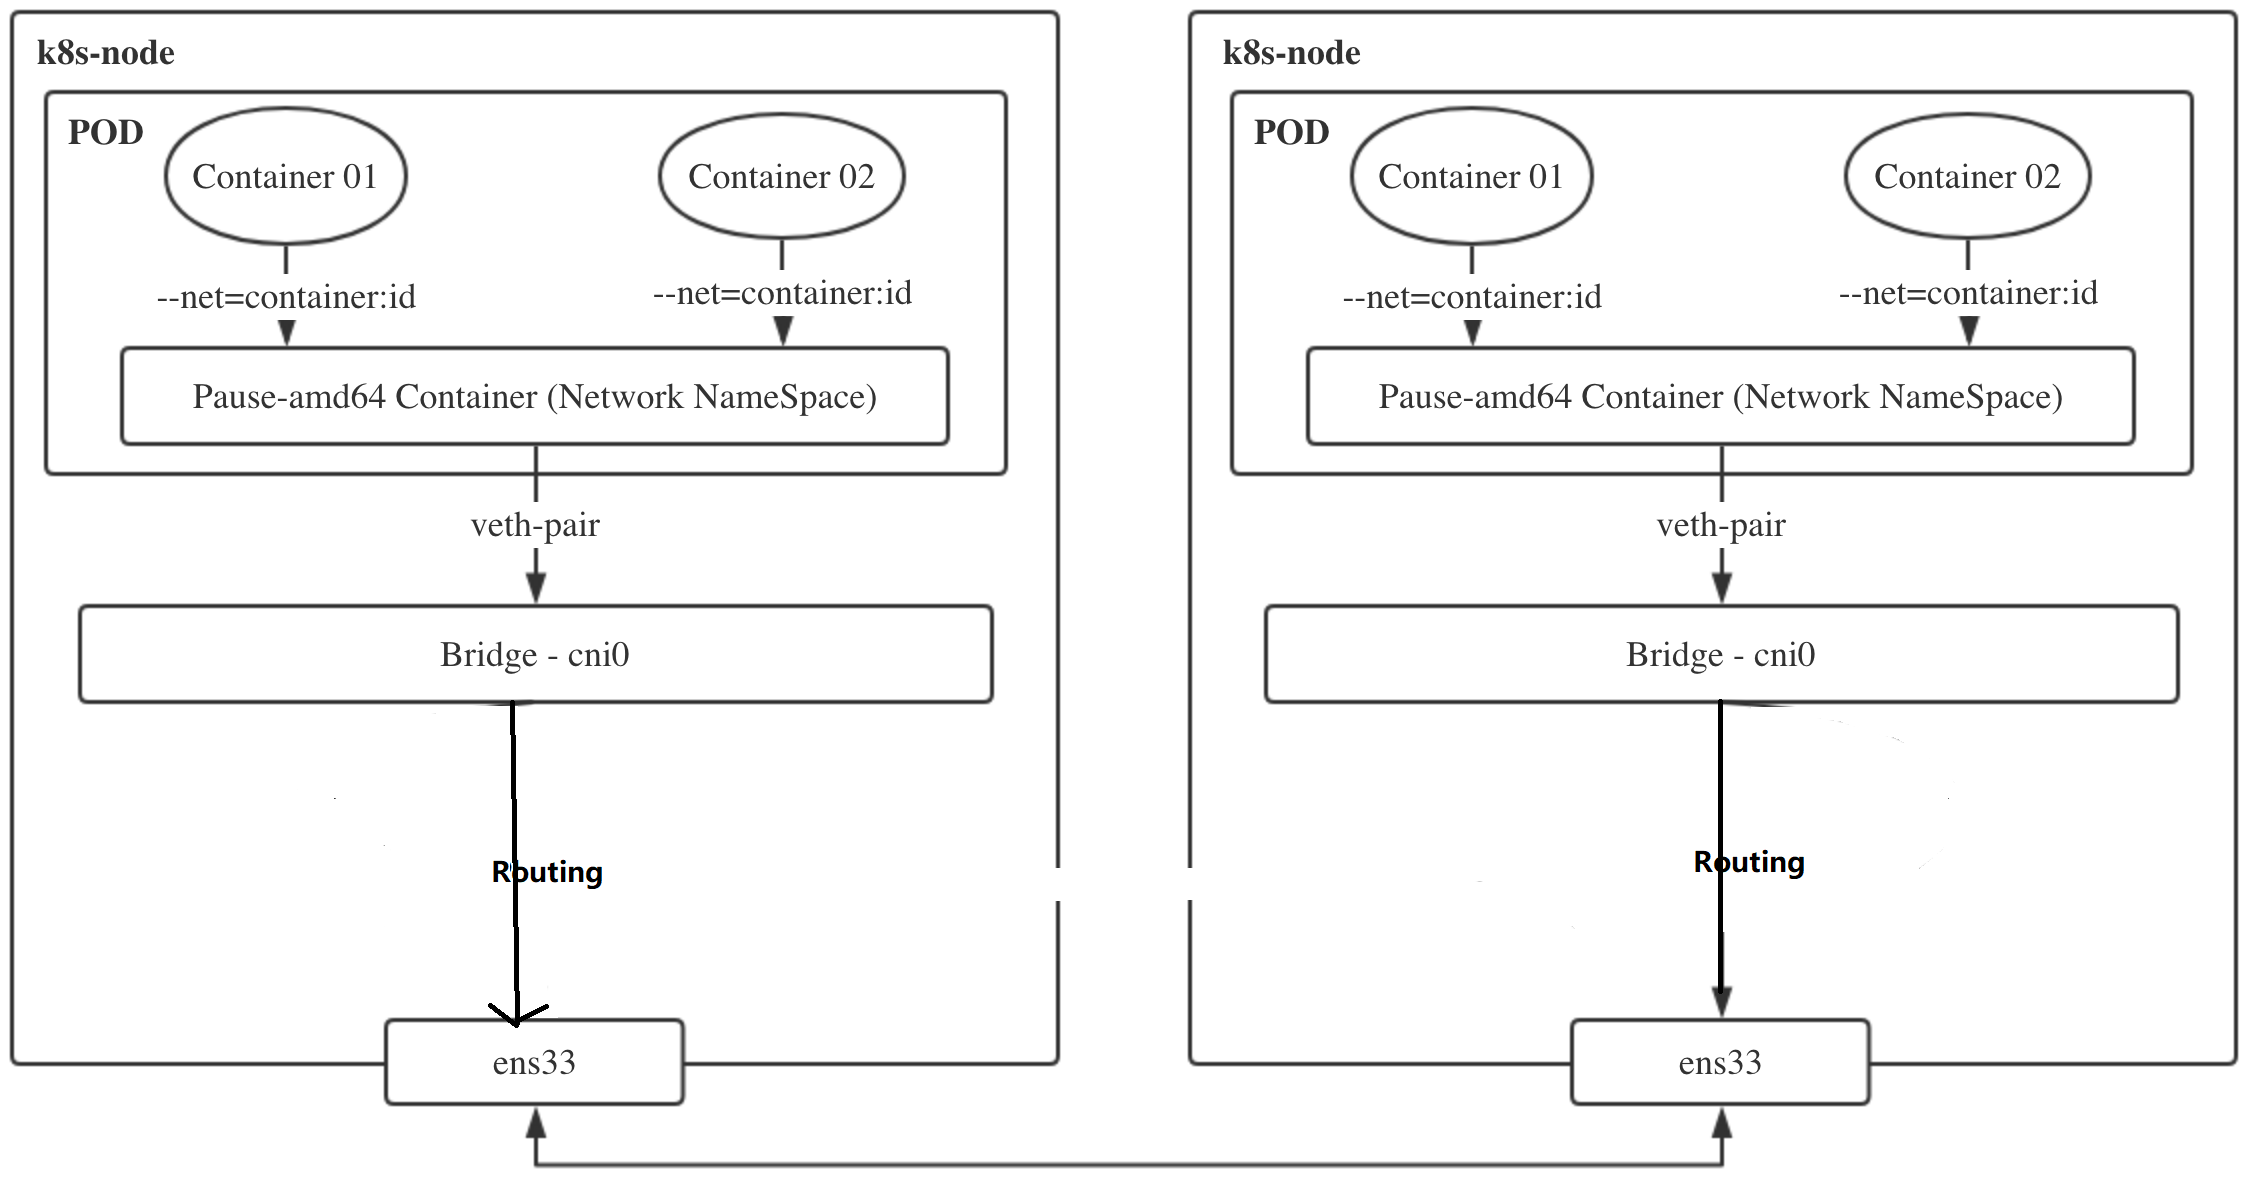
为什么三层可达的网络不直接利用网关转发流量?
修改flannel的网络后端:
$ kubectl edit cm kube-flannel-cfg -n kube-system
...
net-conf.json: |
    {
      "Network": "10.244.0.0/16",
      "Backend": {
        "Type": "host-gw"   #修改
      }
    }
kind: ConfigMap
...
重建Flannel的Pod
$ kubectl -n kube-system get po |grep flannel
kube-flannel-ds-amd64-5dgb8          1/1     Running   0          15m
kube-flannel-ds-amd64-c2gdc          1/1     Running   0          14m
kube-flannel-ds-amd64-t2jdd          1/1     Running   0          15m

$ kubectl -n kube-system delete po kube-flannel-ds-amd64-5dgb8 kube-flannel-ds-amd64-c2gdc kube-flannel-ds-amd64-t2jdd

# 等待Pod新启动后,查看日志,出现Backend type: host-gw字样
$  kubectl -n kube-system logs -f kube-flannel-ds-amd64-4hjdw
I0704 01:18:11.916374       1 kube.go:126] Waiting 10m0s for node controller to sync
I0704 01:18:11.916579       1 kube.go:309] Starting kube subnet manager
I0704 01:18:12.917339       1 kube.go:133] Node controller sync successful
I0704 01:18:12.917848       1 main.go:247] Installing signal handlers
I0704 01:18:12.918569       1 main.go:386] Found network config - Backend type: host-gw
I0704 01:18:13.017841       1 main.go:317] Wrote subnet file to /run/flannel/subnet.env
查看节点路由表:
$ route -n
Destination     Gateway         Genmask         Flags Metric Ref    Use Iface
0.0.0.0         192.168.136.2   0.0.0.0         UG    100    0        0 eth0
10.244.0.0      0.0.0.0         255.255.255.0   U     0      0        0 cni0
10.244.1.0      172.21.51.68  255.255.255.0   UG    0      0        0 eth0
10.244.2.0      172.21.51.55  255.255.255.0   UG    0      0        0 eth0
172.17.0.0      0.0.0.0         255.255.0.0     U     0      0        0 docker0
192.168.136.0   0.0.0.0         255.255.255.0   U     100    0        0 eth0
- k8s-slave1 节点中的 pod-a(10.244.2.19)当中的 IP 包通过 pod-a 内的路由表被发送到eth0,进一步通过veth pair转到宿主机中的网桥
cni0 - 到达
cni0当中的 IP 包通过匹配节点 k8s-slave1 的路由表发现通往 10.244.2.19 的 IP 包应该使用172.21.51.55这个网关进行转发 - 包到达k8s-slave2节点(172.21.51.55)节点的eth0网卡,根据该节点的路由规则,转发给cni0网卡
cni0将 IP 包转发给连接在cni0上的 pod-b
kube-flannel v0.19.2版本操作记录
[root@k8s-master ~]# vi kube-flannel.yml
     82   net-conf.json: |
     83     {
     84       "Network": "10.244.0.0/16",
     85       "Backend": {
     86         "Type": "host-gw"  #修改
     87       }
     88     }
[root@k8s-master ~]# kubectl apply -f kube-flannel.yml

# 重建Flannel的Pod
[root@k8s-master ~]# kubectl -n kube-flannel get po
NAME                    READY   STATUS    RESTARTS   AGE
kube-flannel-ds-dsjmv   1/1     Running   9          9d
kube-flannel-ds-m5ktm   1/1     Running   8          9d
kube-flannel-ds-t6mrz   1/1     Running   6          9d
[root@k8s-master ~]# kubectl -n kube-flannel delete po kube-flannel-ds-dsjmv kube-flannel-ds-m5ktm kube-flannel-ds-t6mrz
[root@k8s-master ~]# kubectl -n kube-flannel logs -f kube-flannel-ds-bp7tm
I1020 02:47:11.776468       1 main.go:207] CLI flags config: {etcdEndpoints:http://127.0.0.1:4001,http://127.0.0.1:2379 etcdPrefix:/coreos.com/network etcdKeyfile: etcdCertfile: etcdCAFile: etcdUsername: etcdPassword: version:false kubeSubnetMgr:true kubeApiUrl: kubeAnnotationPrefix:flannel.alpha.coreos.com kubeConfigFile: iface:[eth0] ifaceRegex:[] ipMasq:true ifaceCanReach: subnetFile:/run/flannel/subnet.env publicIP: publicIPv6: subnetLeaseRenewMargin:60 healthzIP:0.0.0.0 healthzPort:0 iptablesResyncSeconds:5 iptablesForwardRules:true netConfPath:/etc/kube-flannel/net-conf.json setNodeNetworkUnavailable:true}
W1020 02:47:11.776579       1 client_config.go:614] Neither --kubeconfig nor --master was specified.  Using the inClusterConfig.  This might not work.
I1020 02:47:11.883481       1 kube.go:120] Waiting 10m0s for node controller to sync
I1020 02:47:11.883521       1 kube.go:401] Starting kube subnet manager
I1020 02:47:12.976013       1 kube.go:127] Node controller sync successful
I1020 02:47:12.976081       1 main.go:227] Created subnet manager: Kubernetes Subnet Manager - k8s-slave1
I1020 02:47:12.976093       1 main.go:230] Installing signal handlers
I1020 02:47:12.976455       1 main.go:467] Found network config - Backend type: host-gw
I1020 02:47:12.978362       1 match.go:259] Using interface with name eth0 and address 10.211.55.26
I1020 02:47:12.978393       1 match.go:281] Defaulting external address to interface address (10.211.55.26)
I1020 02:47:13.074899       1 kube.go:350] Setting NodeNetworkUnavailable
I1020 02:47:13.082687       1 main.go:345] Setting up masking rules
I1020 02:47:13.283635       1 main.go:366] Changing default FORWARD chain policy to ACCEPT
I1020 02:47:13.283814       1 main.go:379] Wrote subnet file to /run/flannel/subnet.env
I1020 02:47:13.283825       1 main.go:383] Running backend.
I1020 02:47:13.284439       1 main.go:404] Waiting for all goroutines to exit
I1020 02:47:13.284495       1 route_network.go:55] Watching for new subnet leases
W1020 02:47:13.285026       1 route_network.go:87] Ignoring non-host-gw subnet: type=vxlan
I1020 02:47:13.285040       1 route_network.go:92] Subnet added: 10.244.0.0/24 via 10.211.55.25
W1020 02:47:13.285272       1 route_network.go:151] Replacing existing route to {Ifindex: 4 Dst: 10.244.0.0/24 Src: <nil> Gw: 10.244.0.0 Flags: [onlink] Table: 254 Realm: 0} with {Ifindex: 2 Dst: 10.244.0.0/24 Src: <nil> Gw: 10.211.55.25 Flags: [] Table: 0 Realm: 0}
I1020 02:47:13.576997       1 iptables.go:177] bootstrap done
I1020 02:47:13.578330       1 iptables.go:177] bootstrap done
I1020 02:47:19.624118       1 route_network.go:92] Subnet added: 10.244.2.0/24 via 10.211.55.27
W1020 02:47:19.624715       1 route_network.go:151] Replacing existing route to {Ifindex: 4 Dst: 10.244.2.0/24 Src: <nil> Gw: 10.244.2.0 Flags: [onlink] Table: 254 Realm: 0} with {Ifindex: 2 Dst: 10.244.2.0/24 Src: <nil> Gw: 10.211.55.27 Flags: [] Table: 0 Realm: 0}
[root@k8s-master ~]# route -n
Kernel IP routing table
Destination     Gateway         Genmask         Flags Metric Ref    Use Iface
0.0.0.0         10.211.55.1     0.0.0.0         UG    100    0        0 eth0
10.211.55.0     0.0.0.0         255.255.255.0   U     100    0        0 eth0
10.244.0.0      0.0.0.0         255.255.255.0   U     0      0        0 cni0
10.244.1.0      10.211.55.26    255.255.255.0   UG    0      0        0 eth0   #节点1ip
10.244.2.0      10.211.55.27    255.255.255.0   UG    0      0        0 eth0   #节点2ip
172.17.0.0      0.0.0.0         255.255.0.0     U     0      0        0 docker0
[root@k8s-master ~]# kubectl -n luffy get po -owide
NAME                      READY   STATUS    RESTARTS   AGE    IP            NODE         NOMINATED NODE   READINESS GATES
myblog-76d54c49b6-26br5   1/1     Running   2          20h    10.244.1.37   k8s-slave1   <none>           <none>
myblog-76d54c49b6-bfkvf   1/1     Running   0          16h    10.244.1.42   k8s-slave1   <none>           <none>
myblog-76d54c49b6-grlw2   1/1     Running   0          153m   10.244.2.28   k8s-slave2   <none>           <none>
myblog-76d54c49b6-ll2cr   1/1     Running   0          153m   10.244.2.29   k8s-slave2   <none>           <none>
myblog-76d54c49b6-rrxfr   1/1     Running   0          153m   10.244.2.30   k8s-slave2   <none>           <none>
mysql-864b4c85b5-9cdds    1/1     Running   0          20h    10.244.1.40   k8s-slave1   <none>           <none>
[root@k8s-master ~]# kubectl exec myblog-76d54c49b6-26br5 -- ping 10.244.2.28
Error from server (NotFound): pods "myblog-76d54c49b6-26br5" not found
[root@k8s-master ~]# kubectl -n luffy exec myblog-76d54c49b6-26br5 -- ping 10.244.2.28
PING 10.244.2.28 (10.244.2.28) 56(84) bytes of data.
64 bytes from 10.244.2.28: icmp_seq=1 ttl=62 time=0.460 ms
Helm部署应用
使用Helm3管理复杂应用的部署
认识Helm
-
为什么有helm?
-
Helm是什么?
kubernetes的包管理器,“可以将Helm看作Linux系统下的apt-get/yum”。
- 对于应用发布者而言,可以通过Helm打包应用,管理应用依赖关系,管理应用版本并发布应用到软件仓库。
- 对于使用者而言,使用Helm后不用需要了解Kubernetes的Yaml语法并编写应用部署文件,可以通过Helm下载并在kubernetes上安装需要的应用。
除此以外,Helm还提供了kubernetes上的软件部署,删除,升级,回滚应用的强大功能。
- Helm的版本
-
helm2
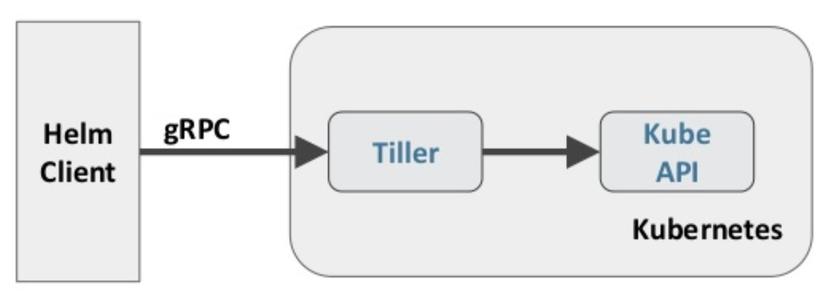
C/S架构,helm通过Tiller与k8s交互
-
helm3
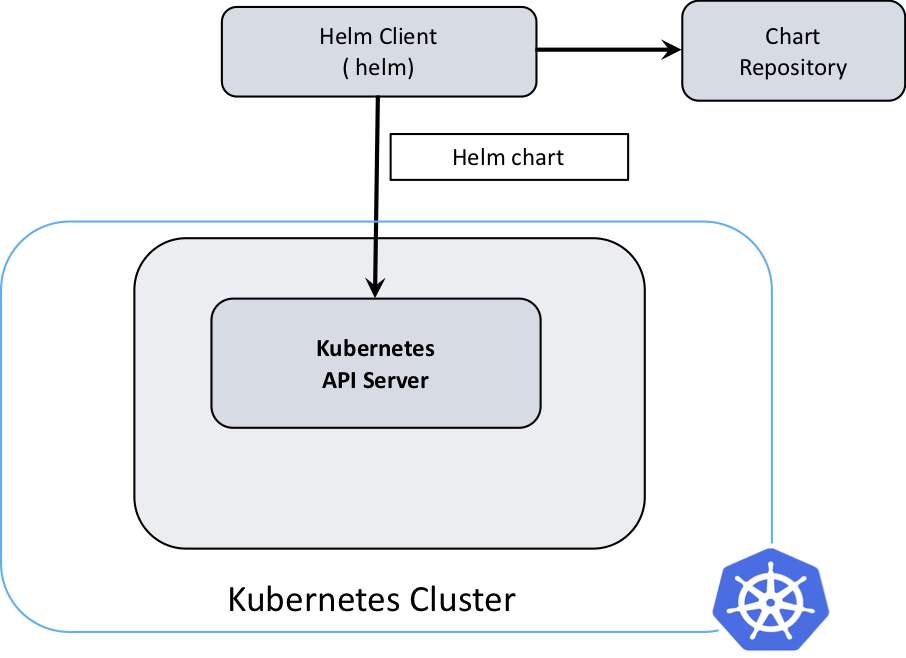
-
从安全性和易用性方面考虑,移除了Tiller服务端,helm3直接使用kubeconfig文件鉴权访问APIServer服务器
-
由二路合并升级成为三路合并补丁策略( 旧的配置,线上状态,新的配置 )
这个应用的副本数量设置为 3 。现在,如果有人不小心执行了
kubectl edit或:然后,团队中的某个人发现 very_important_app 莫名其妙宕机了,尝试执行命令:
在 Helm 2 中,这个操作将比较旧的配置与新的配置,然后生成一个更新补丁。由于,误操作的人仅修改了应用的线上状态(旧的配置并未更新)。Helm 在回滚时,什么事情也不会做。因为旧的配置与新的配置没有差别(都是 3 个副本)。然后,Helm 不执行回滚,副本数继续保持为 0
-
移除了helm server本地repo仓库
-
创建应用时必须指定名字(或者--generate-name随机生成)
-
- Helm的重要概念
- chart,应用的信息集合,包括各种对象的配置模板、参数定义、依赖关系、文档说明等
- Repoistory,chart仓库,存储chart的地方,并且提供了一个该 Repository 的 Chart 包的清单文件以供查询。Helm 可以同时管理多个不同的 Repository。
- release, 当 chart 被安装到 kubernetes 集群,就生成了一个 release , 是 chart 的运行实例,代表了一个正在运行的应用
helm 是包管理工具,包就是指 chart,helm 能够:
- 从零创建chart
- 与仓库交互,拉取、保存、更新 chart
- 在kubernetes集群中安装、卸载 release
- 更新、回滚、测试 release
安装与快速入门实践
下载最新的稳定版本:https://get.helm.sh/helm-v3.2.4-linux-amd64.tar.gz
更多版本可以参考: https://github.com/helm/helm/releases
# k8s-master节点
$ wget https://get.helm.sh/helm-v3.2.4-linux-amd64.tar.gz
$ tar -zxf helm-v3.2.4-linux-amd64.tar.gz

$ cp linux-amd64/helm /usr/local/bin/

# 验证安装
$ helm version
version.BuildInfo{Version:"v3.2.4", GitCommit:"0ad800ef43d3b826f31a5ad8dfbb4fe05d143688", GitTreeState:"clean", GoVersion:"go1.13.12"}
$ helm env

# 添加仓库
$ helm repo add stable https://charts.bitnami.com/bitnami
# 同步最新charts信息到本地
$ helm repo update
快速入门实践:
示例一:使用helm安装wordpress应用
# helm 搜索chart包
$ helm search repo wordpress

$ kubectl create namespace wordpress
# 从仓库安装
$ helm -n wordpress install wordpress stable/wordpress --set mariadb.primary.persistence.enabled=false --set service.type=ClusterIP --set ingress.enabled=true --set persistence.enabled=false --set ingress.hostname=wordpress.luffy.com

$ helm -n wordpress ls
[root@k8s-master helm3]# helm -n wordpress ls  # 一条信息就是release   chart的一次部署就一条release
NAME        NAMESPACE   REVISION    UPDATED                                 STATUS      CHART               APP VERSION
wordpress   wordpress   1           2022-10-21 13:41:45.706167389 +0800 CST deployed    wordpress-15.2.6    6.0.3

$ kubectl -n wordpress get all

[root@k8s-master helm3]# kubectl -n wordpress get po
NAME                        READY   STATUS    RESTARTS   AGE
wordpress-745967ff4-cmnj9   1/1     Running   0          16m
wordpress-mariadb-0         1/1     Running   0          16m
[root@k8s-master helm3]# kubectl -n wordpress get svc
NAME                TYPE        CLUSTER-IP       EXTERNAL-IP   PORT(S)          AGE
wordpress           ClusterIP   10.101.126.165   <none>        80/TCP,443/TCP   17m
wordpress-mariadb   ClusterIP   10.102.7.97      <none>        3306/TCP         17m
[root@k8s-master helm3]# kubectl -n wordpress get ing
NAME        CLASS    HOSTS                 ADDRESS   PORTS   AGE
wordpress   <none>   wordpress.luffy.com             80      17m
[root@k8s-master helm3]# kubectl -n wordpress get cm
NAME                DATA   AGE
kube-root-ca.crt    1      18m
wordpress-mariadb   1      18m
[root@k8s-master helm3]# kubectl -n wordpress get secrets
NAME                              TYPE                                  DATA   AGE
default-token-ck95p               kubernetes.io/service-account-token   3      19m
sh.helm.release.v1.wordpress.v1   helm.sh/release.v1                    1      18m
wordpress                         Opaque                                1      18m
wordpress-mariadb                 Opaque                                2      18m
wordpress-mariadb-token-tbllp     kubernetes.io/service-account-token   3      18m


# 从chart仓库中把chart包下载到本地
$ helm pull stable/wordpress
$ tree mysql
示例二:新建nginx的chart并安装
$ helm create nginx

# 从本地安装
$ helm install nginx ./nginx

# 安装到别的命名空间luffy
$ helm -n luffy install nginx ./nginx --set replicaCount=2 --set image.tag=alpine

# 查看
$ helm ls
$ helm -n luffy ls

#
$ kubectl -n luffy get all

# 卸载
# helm -n luffy uninstall nginx
Chart的模板语法及开发
nginx的chart实现分析
格式:
$ tree nginx/
nginx/
├── charts                        # 存放子chart
├── Chart.yaml                    # 该chart的全局定义信息
├── templates                     # chart运行所需的资源清单模板,用于和values做渲染
│   ├── deployment.yaml
│   ├── _helpers.tpl              # 定义全局的命名模板,方便在其他模板中引入使用
│   ├── hpa.yaml
│   ├── ingress.yaml
│   ├── NOTES.txt                 # helm安装完成后终端的提示信息
│   ├── serviceaccount.yaml
│   ├── service.yaml
│   └── tests
│       └── test-connection.yaml
└── values.yaml                    # 模板使用的默认值信息
很明显,资源清单都在templates中,数据来源于values.yaml,安装的过程就是将模板与数据融合成k8s可识别的资源清单,然后部署到k8s环境中。
分析模板文件的实现:
- 引用命名模板并传递作用域
include从_helpers.tpl中引用命名模板,并传递顶级作用域.
- 内置对象
-
Release:该对象描述了 release 本身的相关信息,它内部有几个对象:
Release.Name:release 名称Release.Namespace:release 安装到的命名空间Release.IsUpgrade:如果当前操作是升级或回滚,则该值为 trueRelease.IsInstall:如果当前操作是安装,则将其设置为 trueRelease.Revision:release 的 revision 版本号,在安装的时候,值为1,每次升级或回滚都会增加Release.Service:渲染当前模板的服务,在 Helm 上,实际上该值始终为 Helm
-
Values:从values.yaml文件和用户提供的 values 文件传递到模板的 Values 值 -
Chart:获取Chart.yaml文件的内容,该文件中的任何数据都可以访问,例如{{ .Chart.Name }}-{{ .Chart.Version}}可以渲染成mychart-0.1.0 -
模板定义。 _helpers.tpl
{{- define "nginx.fullname" -}}
{{- if .Values.fullnameOverride }}
{{- .Values.fullnameOverride | trunc 63 | trimSuffix "-" }}
{{- else }}
{{- $name := default .Chart.Name .Values.nameOverride }}
{{- if contains $name .Release.Name }}
{{- .Release.Name | trunc 63 | trimSuffix "-" }}
{{- else }}
{{- printf "%s-%s" .Release.Name $name | trunc 63 | trimSuffix "-" }}
{{- end }}
{{- end }}
{{- end }}
-
{{- 去掉左边的空格及换行,-}} 去掉右侧的空格及换行
-
示例
apiVersion: v1
kind: ConfigMap
metadata:
  name: {{ .Release.Name }}-configmap
data:
  myvalue: "Hello World"
  drink: {{ .Values.favorite.drink | default "tea" | quote }}
  food: {{ .Values.favorite.food | upper | quote }}
  {{ if eq .Values.favorite.drink "coffee" }}
  mug: true
  {{ end }}
渲染完后是:
-
管道及方法
-
trunc表示字符串截取,63作为参数传递给trunc方法,trimSuffix表示去掉
-后缀 -
nindent表示前面的空格数
-
lower表示将内容小写,quote表示用双引号引起来
-
条件判断语句每个if对应一个end
通常用来根据values.yaml中定义的开关来控制模板中的显示:
- 定义变量,模板中可以通过变量名字去引用
- 遍历values的数据
toYaml处理值中的转义及特殊字符, "kubernetes.io/role"=master , name="value1,value2" 类似的情况
- default设置默认值
Helm template
hpa.yaml
{{- if .Values.autoscaling.enabled }}
apiVersion: autoscaling/v2beta1
kind: HorizontalPodAutoscaler
metadata:
  name: {{ include "nginx.fullname" . }}
  labels:
    {{- include "nginx.labels" . | nindent 4 }}
spec:
  scaleTargetRef:
    apiVersion: apps/v1
    kind: Deployment
    name: {{ include "nginx.fullname" . }}
  minReplicas: {{ .Values.autoscaling.minReplicas }}
  maxReplicas: {{ .Values.autoscaling.maxReplicas }}
  metrics:
  {{- if .Values.autoscaling.targetCPUUtilizationPercentage }}
    - type: Resource
      resource:
        name: cpu
        targetAverageUtilization: {{ .Values.autoscaling.targetCPUUtilizationPercentage }}
  {{- end }}
  {{- if .Values.autoscaling.targetMemoryUtilizationPercentage }}
    - type: Resource
      resource:
        name: memory
        targetAverageUtilization: {{ .Values.autoscaling.targetMemoryUtilizationPercentage }}
  {{- end }}
{{- end }}
创建Release的时候赋值
- set的方式
# 改变副本数和resource值
$ helm install nginx-2 ./nginx --set replicaCount=2 --set resources.limits.cpu=200m --set resources.limits.memory=256Mi
- value文件的方式
$ cat nginx-values.yaml
resources:
  limits:
    cpu: 100m
    memory: 128Mi
  requests:
    cpu: 100m
    memory: 128Mi
autoscaling:
  enabled: true
  minReplicas: 1
  maxReplicas: 3
  targetCPUUtilizationPercentage: 80
ingress:
  enabled: true
  hosts:
    - host: chart-example.luffy.com
      paths:
      - /

$ helm install -f nginx-values.yaml nginx-3 ./nginx
使用helm template查看渲染模板
$ helm -n luffy template nginx ./nginx --set replicaCount=2 --set image.tag=alpine --set autoscaling.enabled=true
更多语法参考:
https://helm.sh/docs/topics/charts/
实战:使用Helm部署Harbor镜像及chart仓库
harbor部署
架构 https://github.com/goharbor/harbor/wiki/Architecture-Overview-of-Harbor
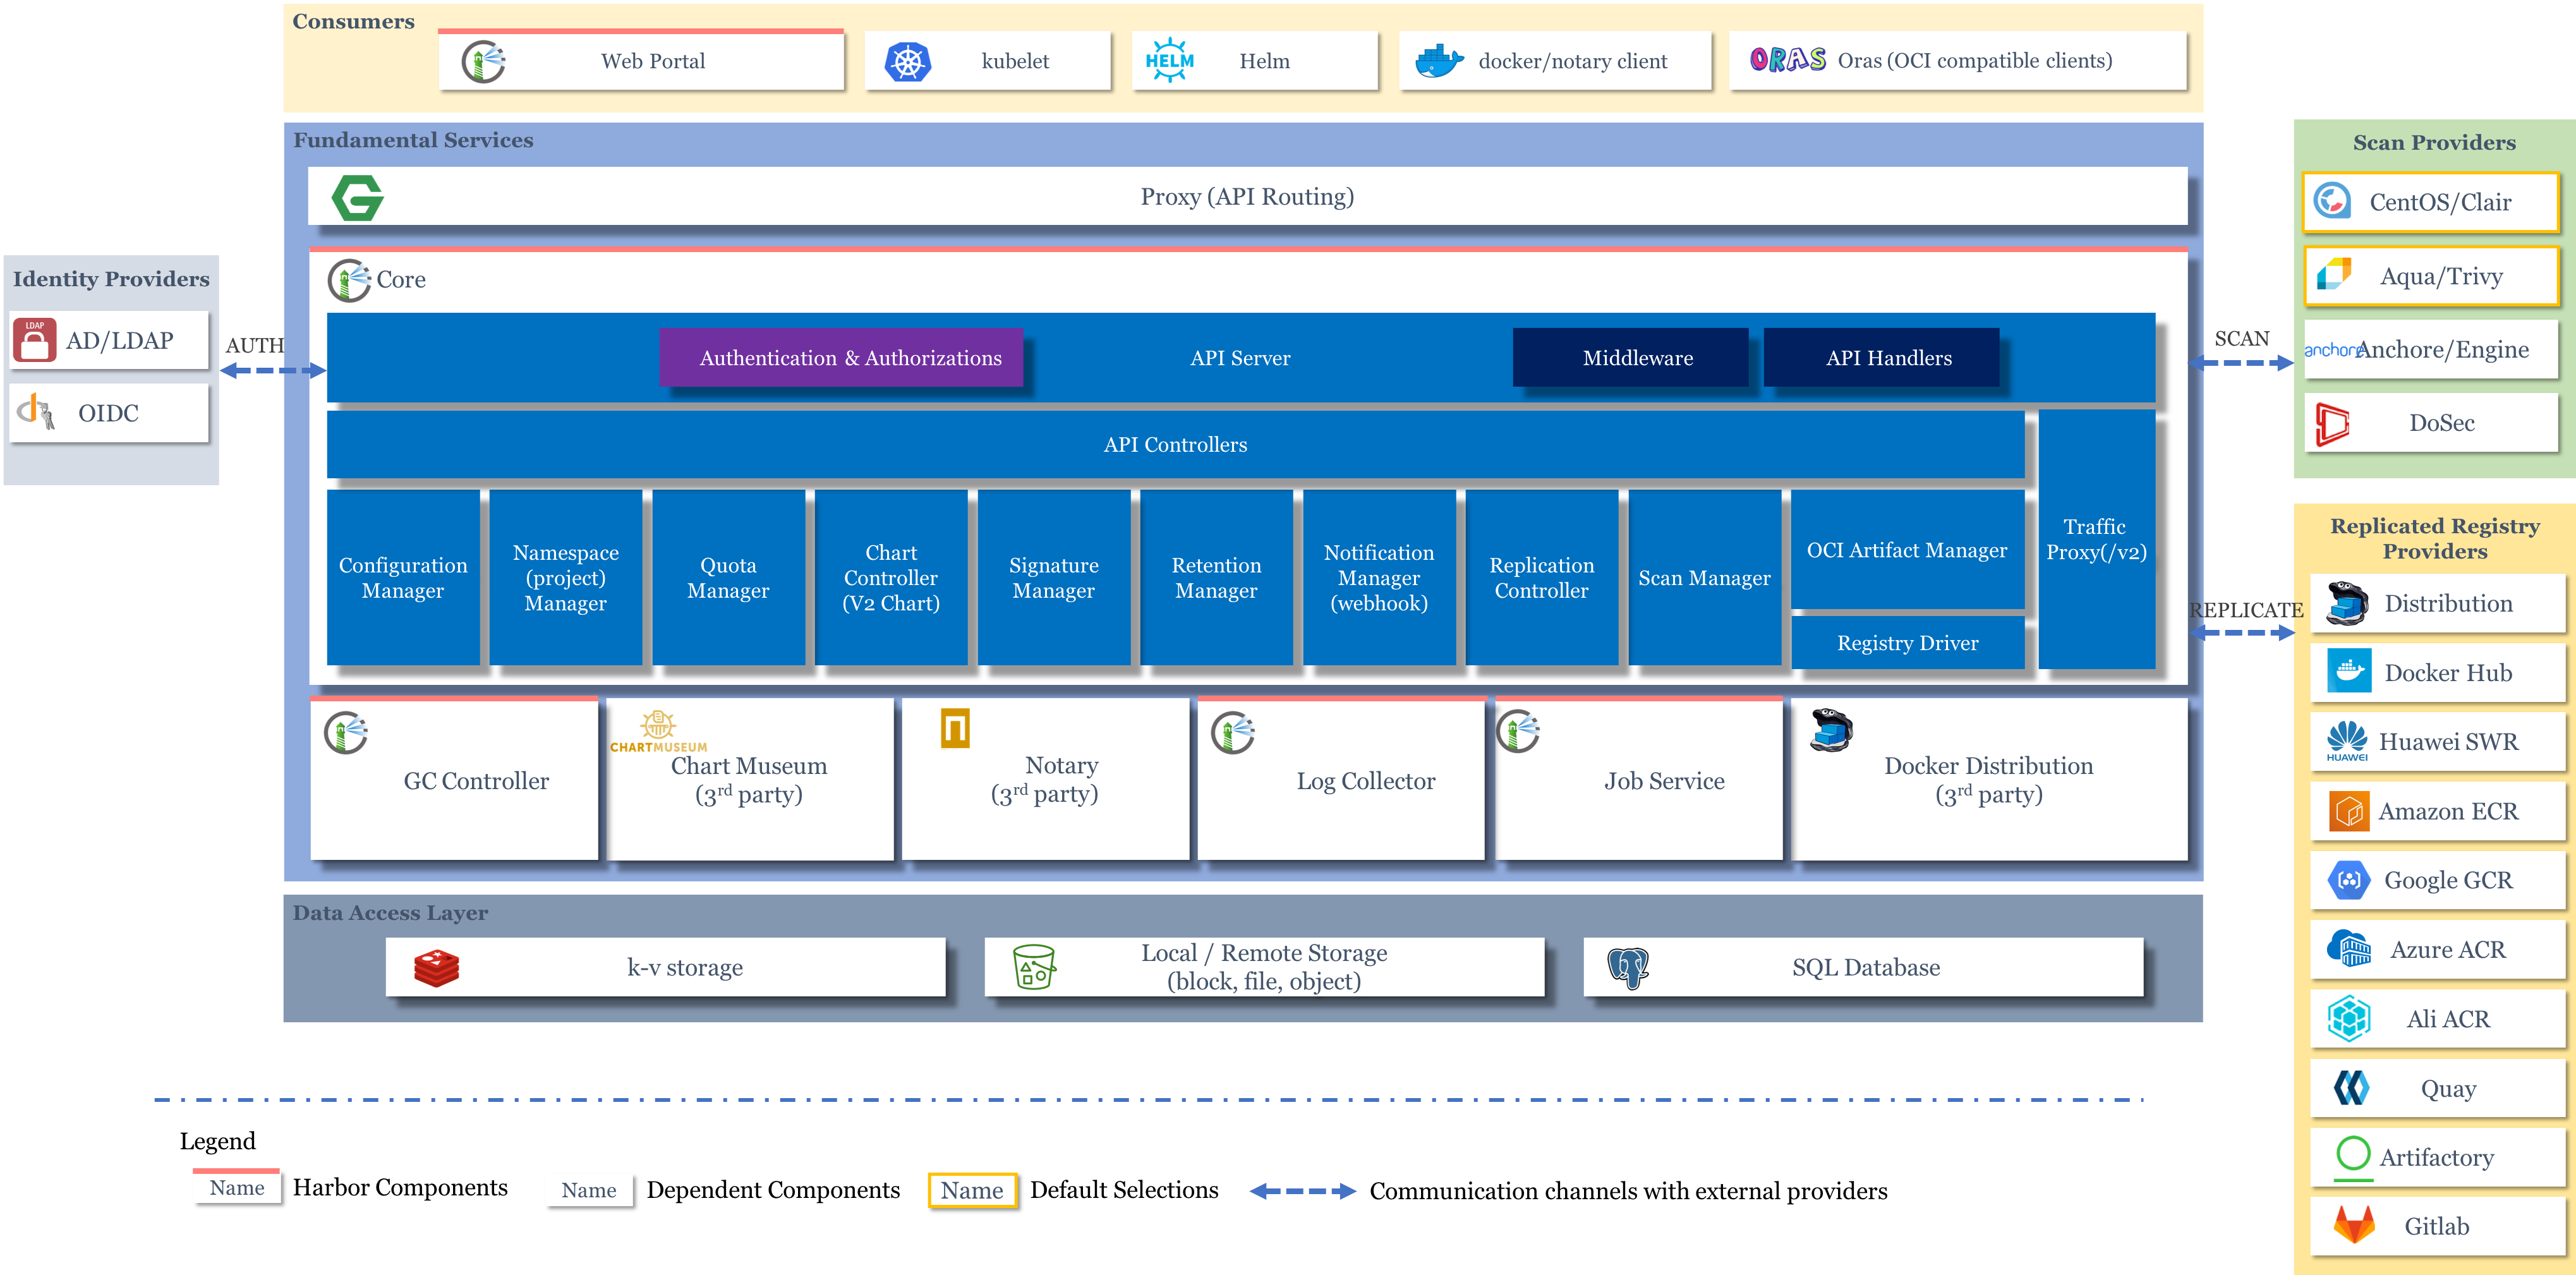
- Core,核心组件
- API Server,接收处理用户请求
- Config Manager :所有系统的配置,比如认证、邮件、证书配置等
- Project Manager:项目管理
- Quota Manager :配额管理
- Chart Controller:chart管理
- Replication Controller :镜像副本控制器,可以与不同类型的仓库实现镜像同步
- Distribution (docker registry)
- Docker Hub
- ...
- Scan Manager :扫描管理,引入第三方组件,进行镜像安全扫描
- Registry Driver :镜像仓库驱动,目前使用docker registry
- Job Service,执行异步任务,如同步镜像信息
- Log Collector,统一日志收集器,收集各模块日志
- GC Controller
- Chart Museum,chart仓库服务,第三方
- Docker Registry,镜像仓库服务
- kv-storage,redis缓存服务,job service使用,存储job metadata
- local/remote storage,存储服务,比较镜像存储
- SQL Database,postgresl,存储用户、项目等元数据
通常用作企业级镜像仓库服务,实际功能强大很多。
组件众多,因此使用helm部署
# 添加harbor chart仓库
$ helm repo add harbor https://helm.goharbor.io

# 搜索harbor的chart
$ helm search repo harbor

# 不知道如何部署,因此拉到本地
$ helm pull harbor/harbor

# tar zxvf harbor-1.10.1.tgz
创建pvc
$ kubectl create namespace harbor
# cp ../pvc/test_pvc.yaml harbor-pvc.yaml
$ cat harbor-pvc.yaml
apiVersion: v1
kind: PersistentVolumeClaim
metadata:
  name: harbor-data
  namespace: harbor
spec:
  accessModes:
  - ReadWriteMany
  resources:
    requests:
      storage: 20Gi
 ----
# kubectl create ns harbor
# kubectl apply -f harbor-pvc.yaml
[root@k8s-master helm3]# kubectl -n harbor get pvc
NAME          STATUS   VOLUME                                     CAPACITY   ACCESS MODES   STORAGECLASS   AGE
harbor-data   Bound    pvc-addd1633-78c4-4924-b007-90657d5ecd20   20Gi       RWX            nfs            2m8s
[root@k8s-master helm3]# ls
harbor  harbor-1.10.1.tgz  harbor-pvc.yaml  helm-v3.2.4-linux-amd64.tar.gz  linux-amd64  nginx
[root@k8s-master helm3]# cd harbor/
[root@k8s-master harbor]# ls
cert  Chart.yaml  conf  LICENSE  README.md  templates  values.yaml
[root@k8s-master harbor]# vi values.yaml  #修改内容放在结尾


[root@k8s-master helm3]# helm -n harbor install harbor ./harbor
NAME: harbor
LAST DEPLOYED: Sun Oct 23 12:52:30 2022
NAMESPACE: harbor
STATUS: deployed
REVISION: 1
TEST SUITE: None
NOTES:
Please wait for several minutes for Harbor deployment to complete.
Then you should be able to visit the Harbor portal at https://harbor.luffy.com
For more details, please visit https://github.com/goharbor/harbor
[root@k8s-master helm3]# kubectl -n harbor get po -owide
NAME                                    READY   STATUS    RESTARTS   AGE     IP            NODE         NOMINATED NODE   READINESS GATES
harbor-chartmuseum-77fdb67674-lh8zs     1/1     Running   0          8m37s   10.244.2.38   k8s-slave2   <none>           <none>
harbor-core-5bf4c44df9-npx2k            1/1     Running   3          8m37s   10.244.1.58   k8s-slave1   <none>           <none>
harbor-database-0                       1/1     Running   0          8m37s   10.244.0.39   k8s-master   <none>           <none>
harbor-jobservice-c88d95f6f-n7xpp       1/1     Running   6          8m37s   10.244.1.60   k8s-slave1   <none>           <none>
harbor-notary-server-6c6b8c6557-g4t4r   1/1     Running   5          8m37s   10.244.2.39   k8s-slave2   <none>           <none>
harbor-notary-signer-696578f88f-ksvbq   1/1     Running   5          8m37s   10.244.0.38   k8s-master   <none>           <none>
harbor-portal-766b6fb764-h7vnn          1/1     Running   0          8m37s   10.244.0.40   k8s-master   <none>           <none>
harbor-redis-0                          1/1     Running   0          8m37s   10.244.1.59   k8s-slave1   <none>           <none>
harbor-registry-5c9489d7cc-nff2s        1/2     Running   0          8m37s   10.244.0.37   k8s-master   <none>           <none>

[root@k8s-slave1 ~]# ll /data/k8s/  # 查看harbor是存储在一个目录上的
总用量 0
drwxrwxrwx. 2 root root 20 10月 21 03:17 default-test-claim-pvc-fa871a75-406d-4584-81ba-a39e0970da10
drwxrwxrwx. 7 root root 88 10月 23 12:58 harbor-harbor-data-pvc-addd1633-78c4-4924-b007-90657d5ecd20
drwxrwxrwx. 3 root root 29 10月 23 12:55 harbor-harbor-jobservice-scandata-pvc-40b313d0-de1f-43c3-8471-9cec2d8c1cbf
[root@k8s-slave1 ~]# ll /data/k8s/harbor-harbor-data-pvc-addd1633-78c4-4924-b007-90657d5ecd20
总用量 0
drwxrwxrwx. 2 root root  6 10月 23 12:53 chartmuseum
drwxrwxrwx. 3 root root 20 10月 23 12:58 database
drwxrwxrwx. 2 root root  6 10月 23 12:55 jobservice
drwxrwxrwx. 2 root root 22 10月 23 12:59 redis
drwxrwxrwx. 2 root root  6 10月 23 12:52 registry

[root@k8s-master helm3]# kubectl -n harbor get ing
NAME                    CLASS    HOSTS              ADDRESS   PORTS     AGE
harbor-ingress          <none>   harbor.luffy.com             80, 443   14m
harbor-ingress-notary   <none>   notary.luffy.com             80, 443   14m

# 宿主机访问
vi /etc/hosts
10.211.55.25 wordpress.luffy.com harbor.luffy.com
登录账号默认。admin Harbor12345
修改harbor配置:
- 开启ingress访问
- externalURL,web访问入口,和ingress的域名相同
- 持久化,使用PVC对接的cephfs
- harborAdminPassword: "Harbor12345",管理员默认账户 admin/Harbor12345
- 开启chartmuseum
- clair和trivy漏洞扫描组件,暂不启用
helm创建:
数据权限问题:
- 数据库目录初始化无权限
- redis持久化数据目录权限导致无法登录
- registry组件的镜像存储目录权限导致镜像推送失败
- chartmuseum存储目录权限,导致chart推送失败
解决: (没有碰到这个问题 )
$ mount -t ceph 172.21.51.55:6789:/ /mnt/cephfs -o name=admin,secret=AQBPTstgc078NBAA78D1/KABglIZHKh7+G2X8w==

$ chown -R 999:999 database
$ chown -R 999:999 redis
$ chown -R 10000:10000 chartmuseum
$ chown -R 10000:10000 registry
$ chown -R 10000:10000 jobservice
推送镜像到Harbor仓库
配置hosts及docker非安全仓库:
$ cat /etc/hosts
...
172.21.51.143 k8s-master harbor.luffy.com
...

$ cat /etc/docker/daemon.json
{
  "insecure-registries": [
    "172.21.51.143:5000",
    "harbor.luffy.com"
  ],
  "registry-mirrors" : [
    "https://8xpk5wnt.mirror.aliyuncs.com"
  ]
}

#
$ systemctl restart docker

# 使用账户密码登录admin/Harbor12345
$ docker login harbor.luffy.com    # 退出时 docker logout

$ docker tag nginx:alpine harbor.luffy.com/library/nginx:alpine
$ docker push harbor.luffy.com/library/nginx:alpine
推送chart到Harbor仓库
helm3默认没有安装helm push插件,需要手动安装。插件地址 https://github.com/chartmuseum/helm-push
安装插件:
离线安装:
$ mkdir helm-push
$ wget https://github.com/chartmuseum/helm-push/releases/download/v0.8.1/helm-push_0.8.1_linux_amd64.tar.gz
$ tar zxf helm-push_0.8.1_linux_amd64.tar.gz -C helm-push
$ helm plugin install ./helm-push
添加repo
$ helm repo add myharbor https://harbor.luffy.com/chartrepo/luffy
# x509错误
[root@k8s-master helm3]# ls harbor.ca.crt
# 添加证书信任,根证书为配置给ingress使用的证书
$ kubectl get secret harbor-ingress -n harbor -o jsonpath="{.data.ca\.crt}" | base64 -d >harbor.ca.crt

$ cp harbor.ca.crt /etc/pki/ca-trust/source/anchors   #哪台机器要传 就copy过去
$ update-ca-trust enable; update-ca-trust extract

# 再次添加
$ helm repo add luffy https://harbor.luffy.com/chartrepo/luffy --ca-file=harbor.ca.crt  --username admin --password Harbor12345

$ helm repo ls
推送chart到仓库:
$ helm push harbor luffy --ca-file=harbor.ca.crt -u admin -p Harbor12345

# 0.10.3版本 使用cm-push
# harbor 是当前目录下 chart文件包解压的目录。  ca-file也是当前目录下的文件
[root@k8s-master helm3]# helm cm-push harbor luffy --ca-file=harbor.ca.crt -u admin -p Harbor12345
Pushing harbor-1.10.1.tgz to luffy...
Done.
小结
课程小结
使用k8s的进阶内容。
-
学习k8s在etcd中数据的存储,掌握etcd的基本操作命令
-
理解k8s调度的过程,预选及优先。影响调度策略的设置
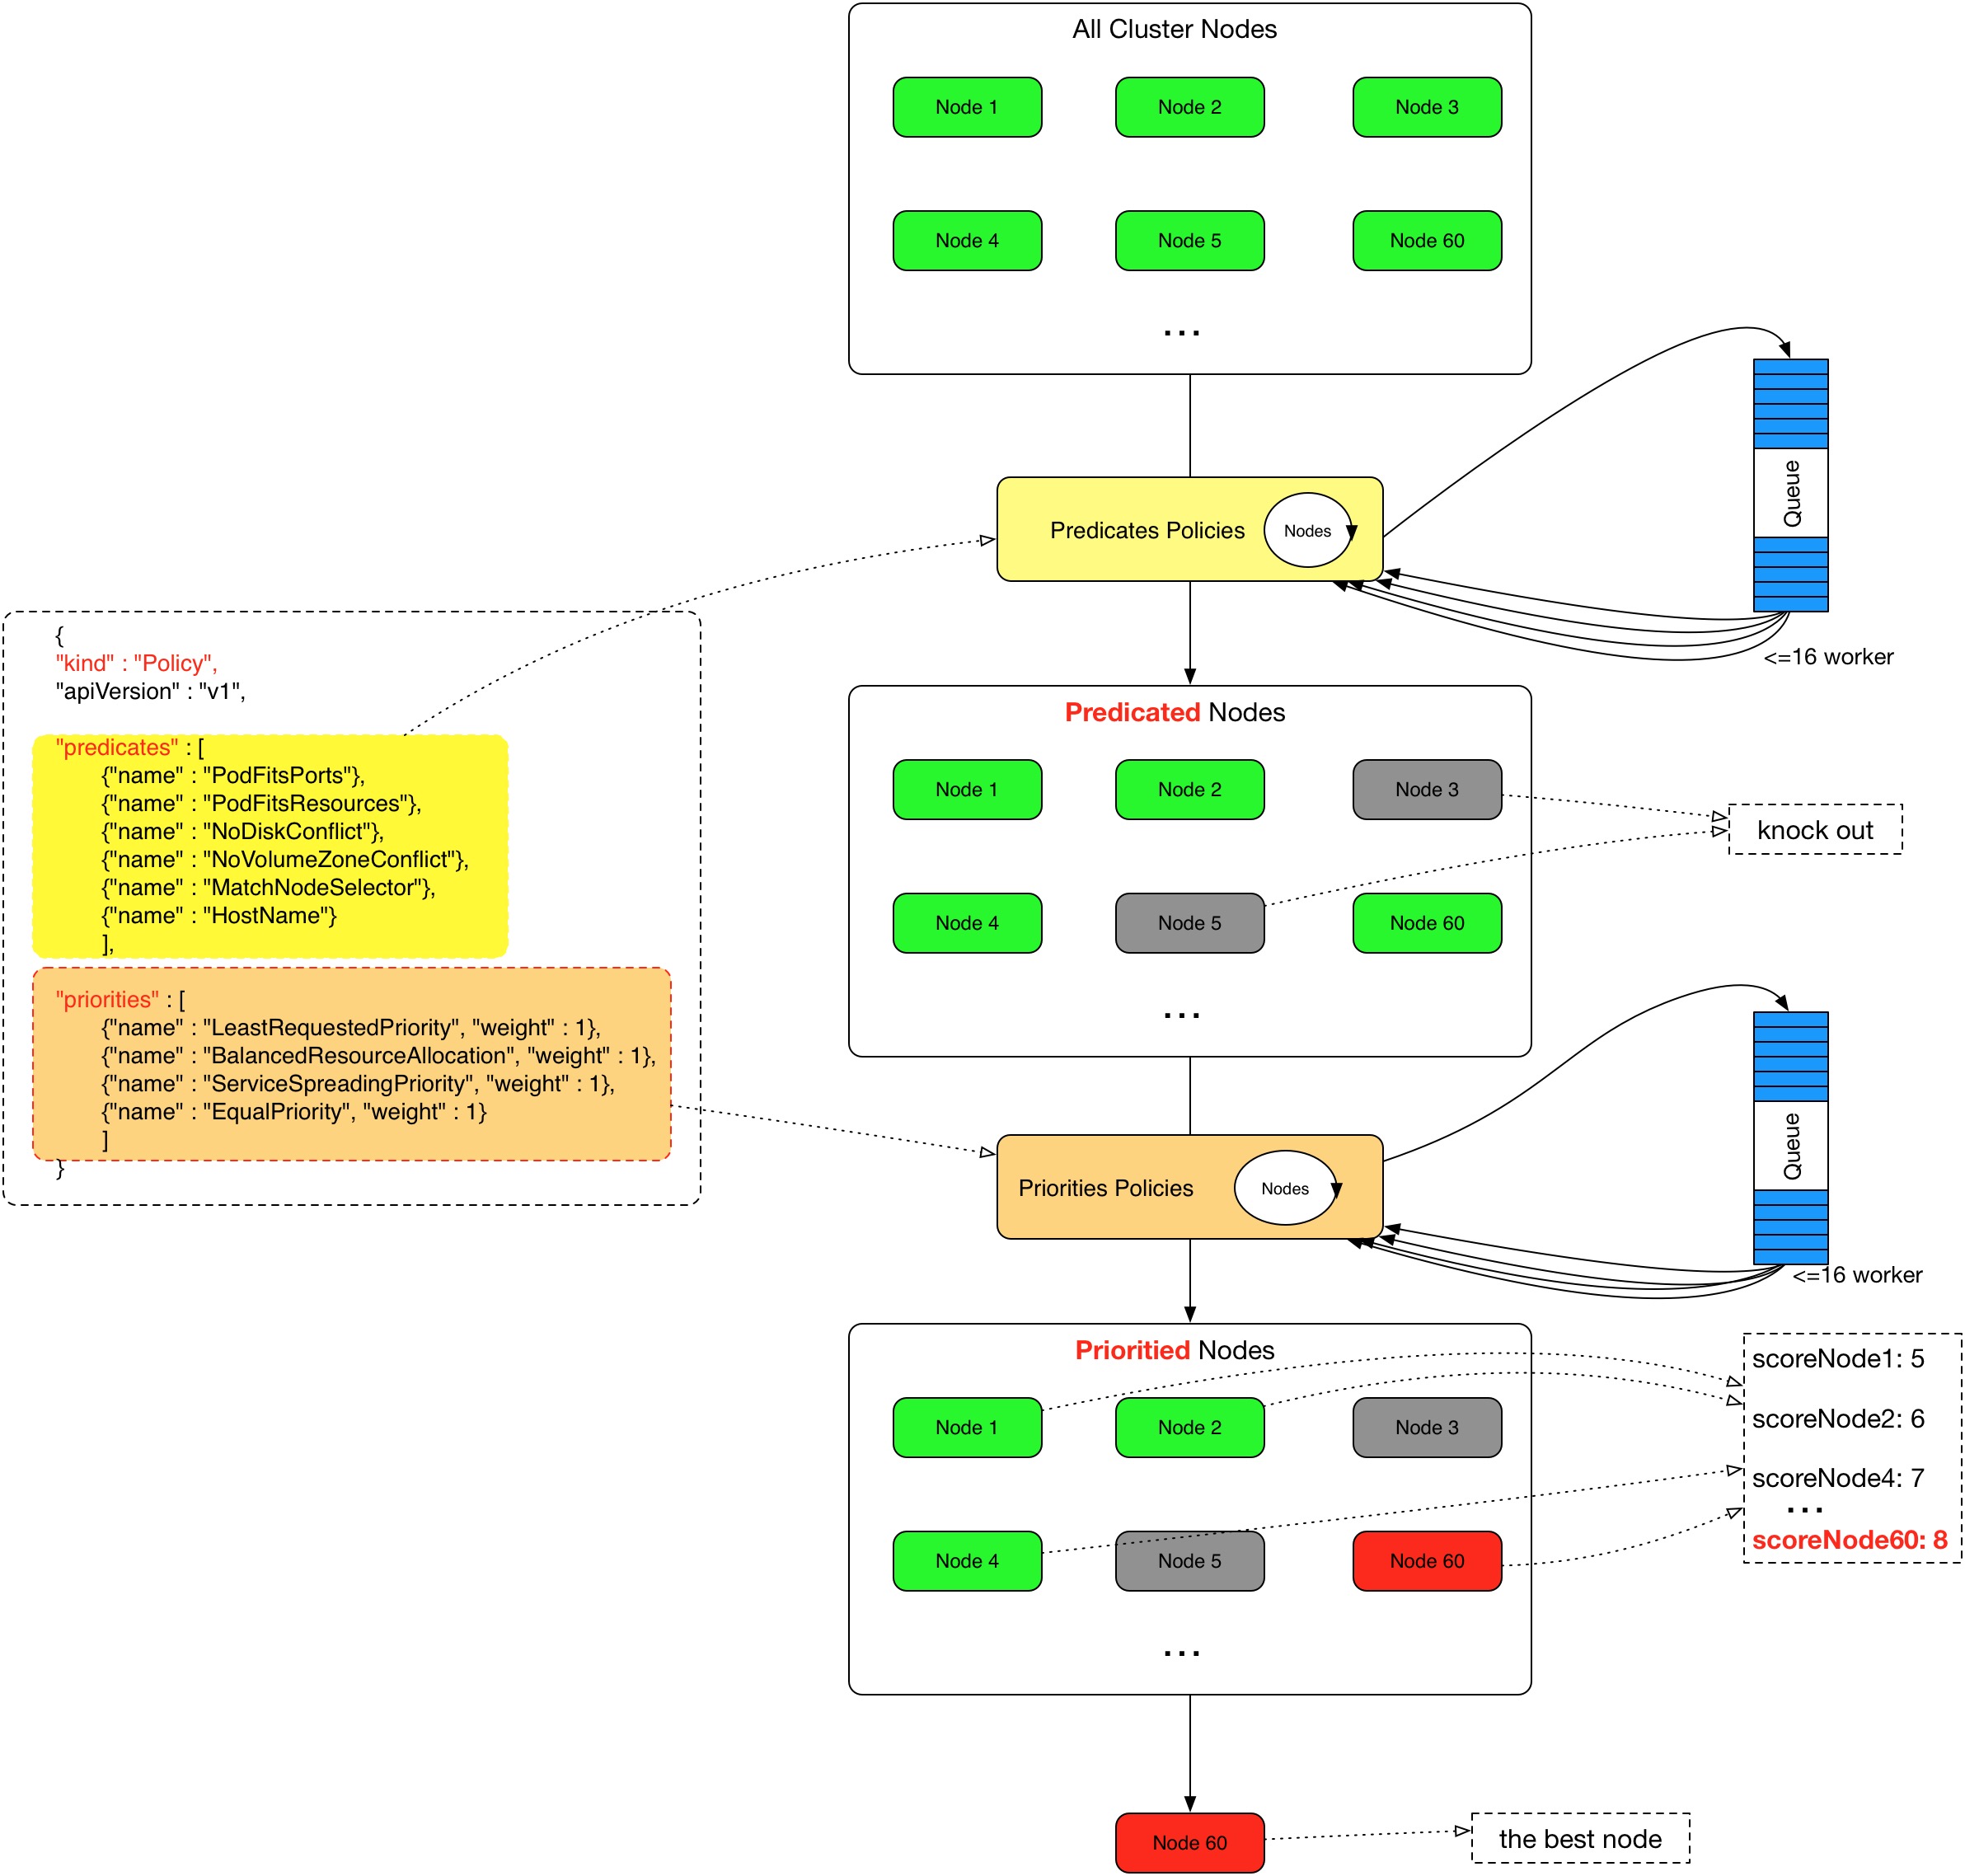
- Flannel网络的原理学习,了解网络的流向,帮助定位问题
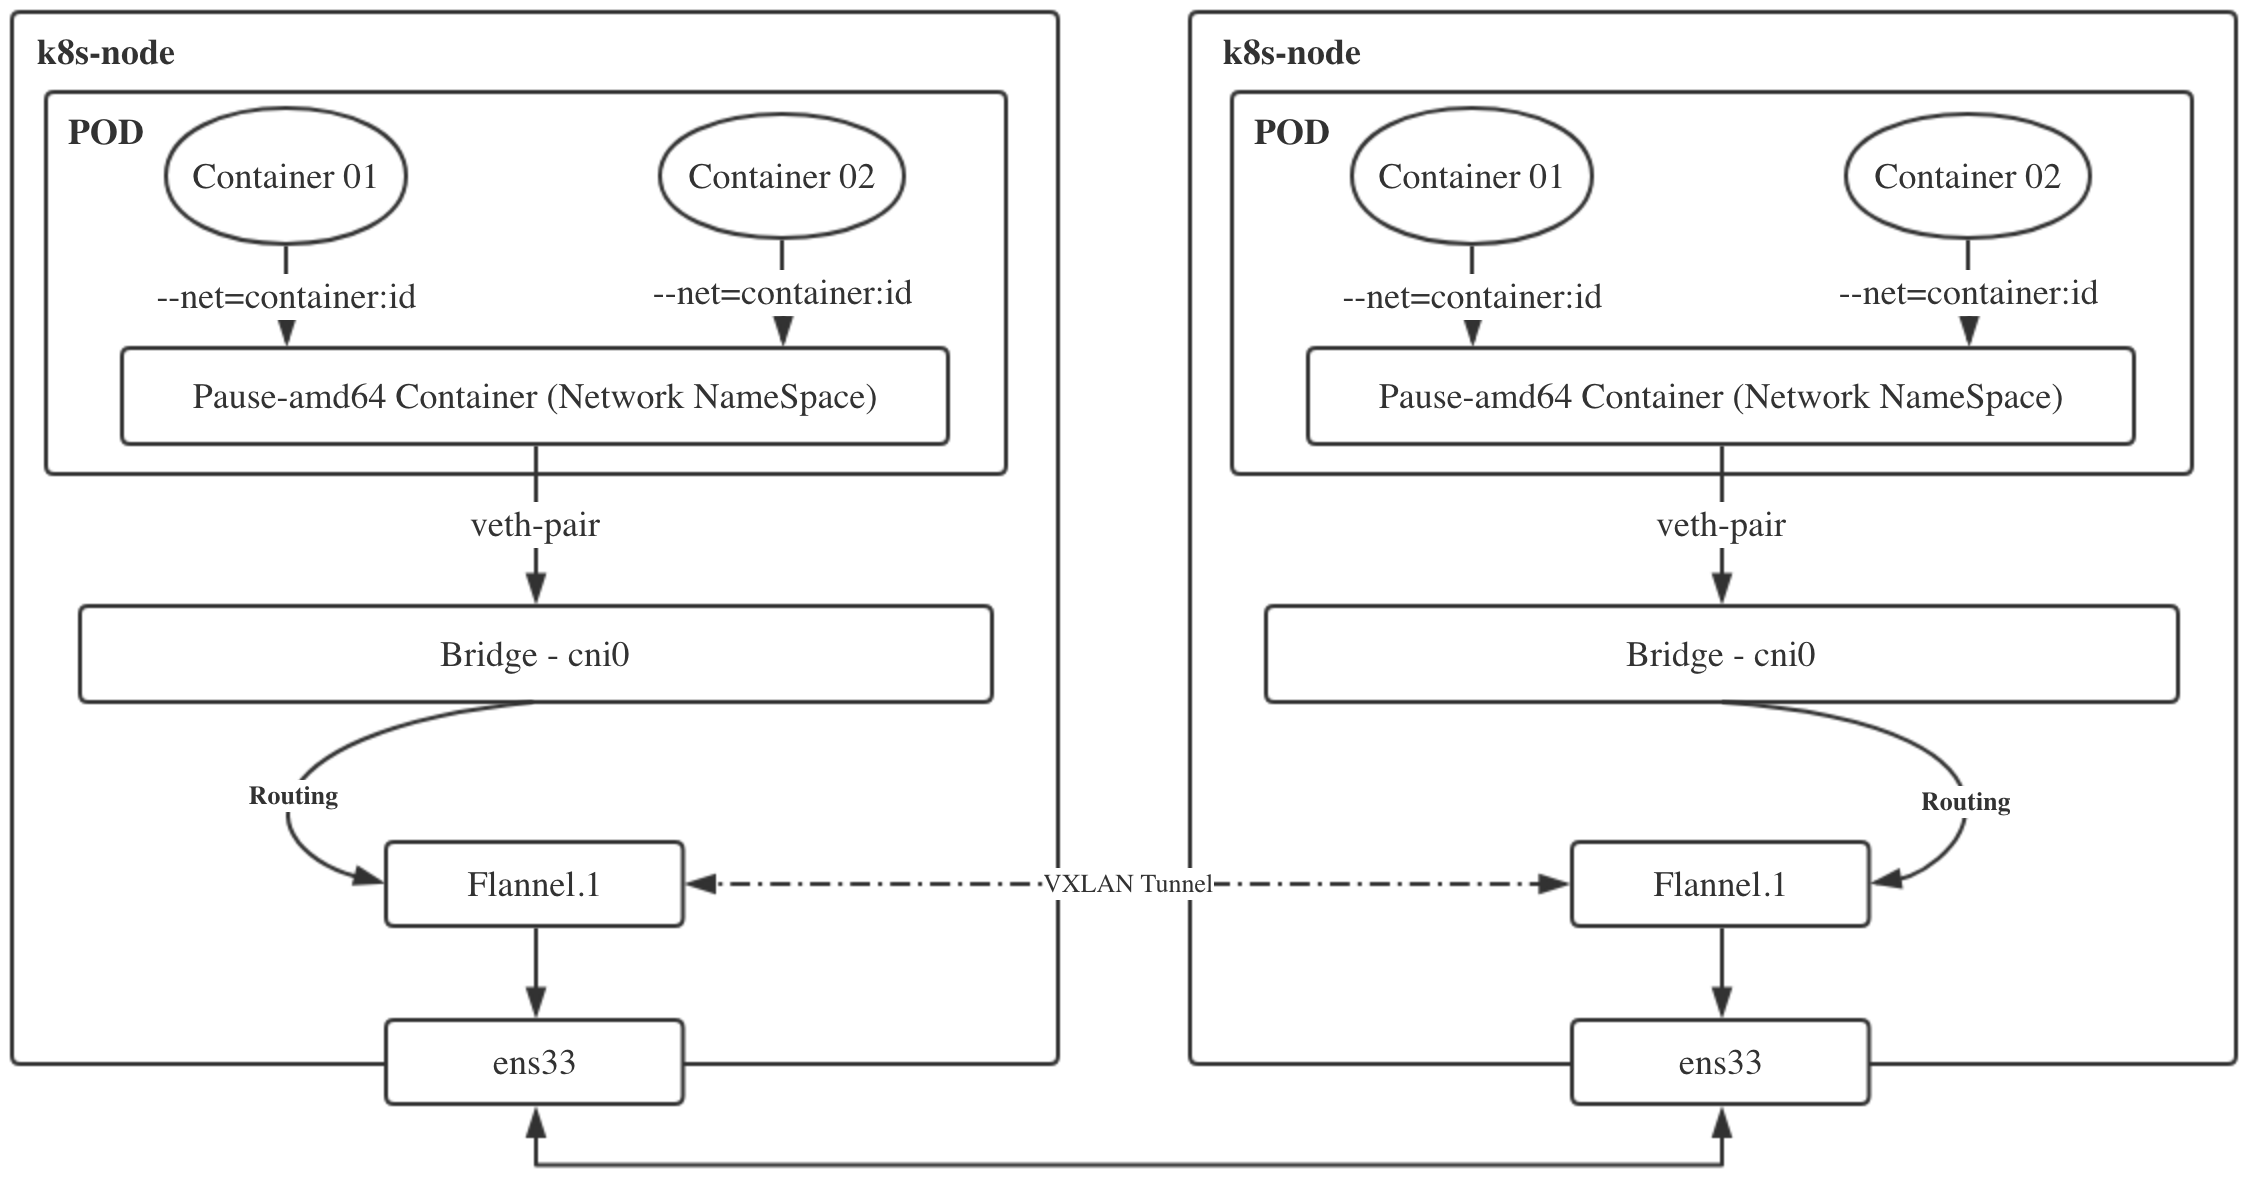
- 认证与授权,掌握kubectl、kubelet、rbac及二次开发如何调度API
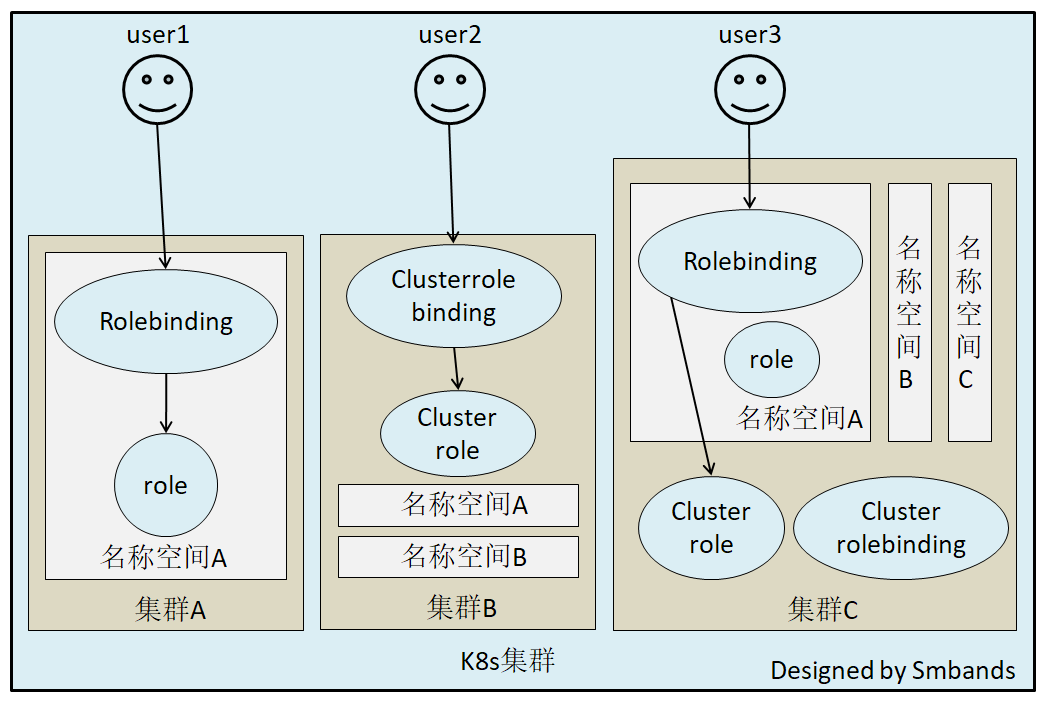
- 利用HPA进行业务动态扩缩容,通过metrics-server了解整个k8s的监控体系
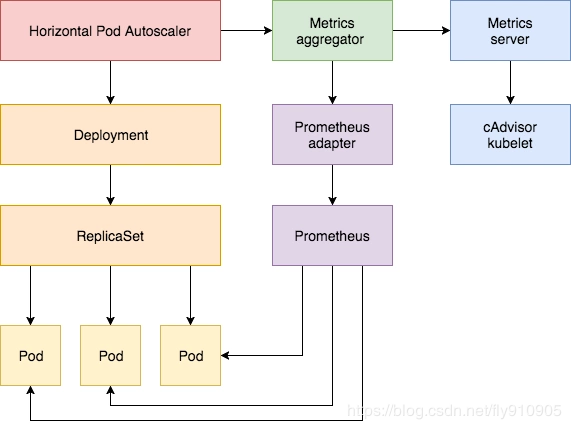
- PV + PVC
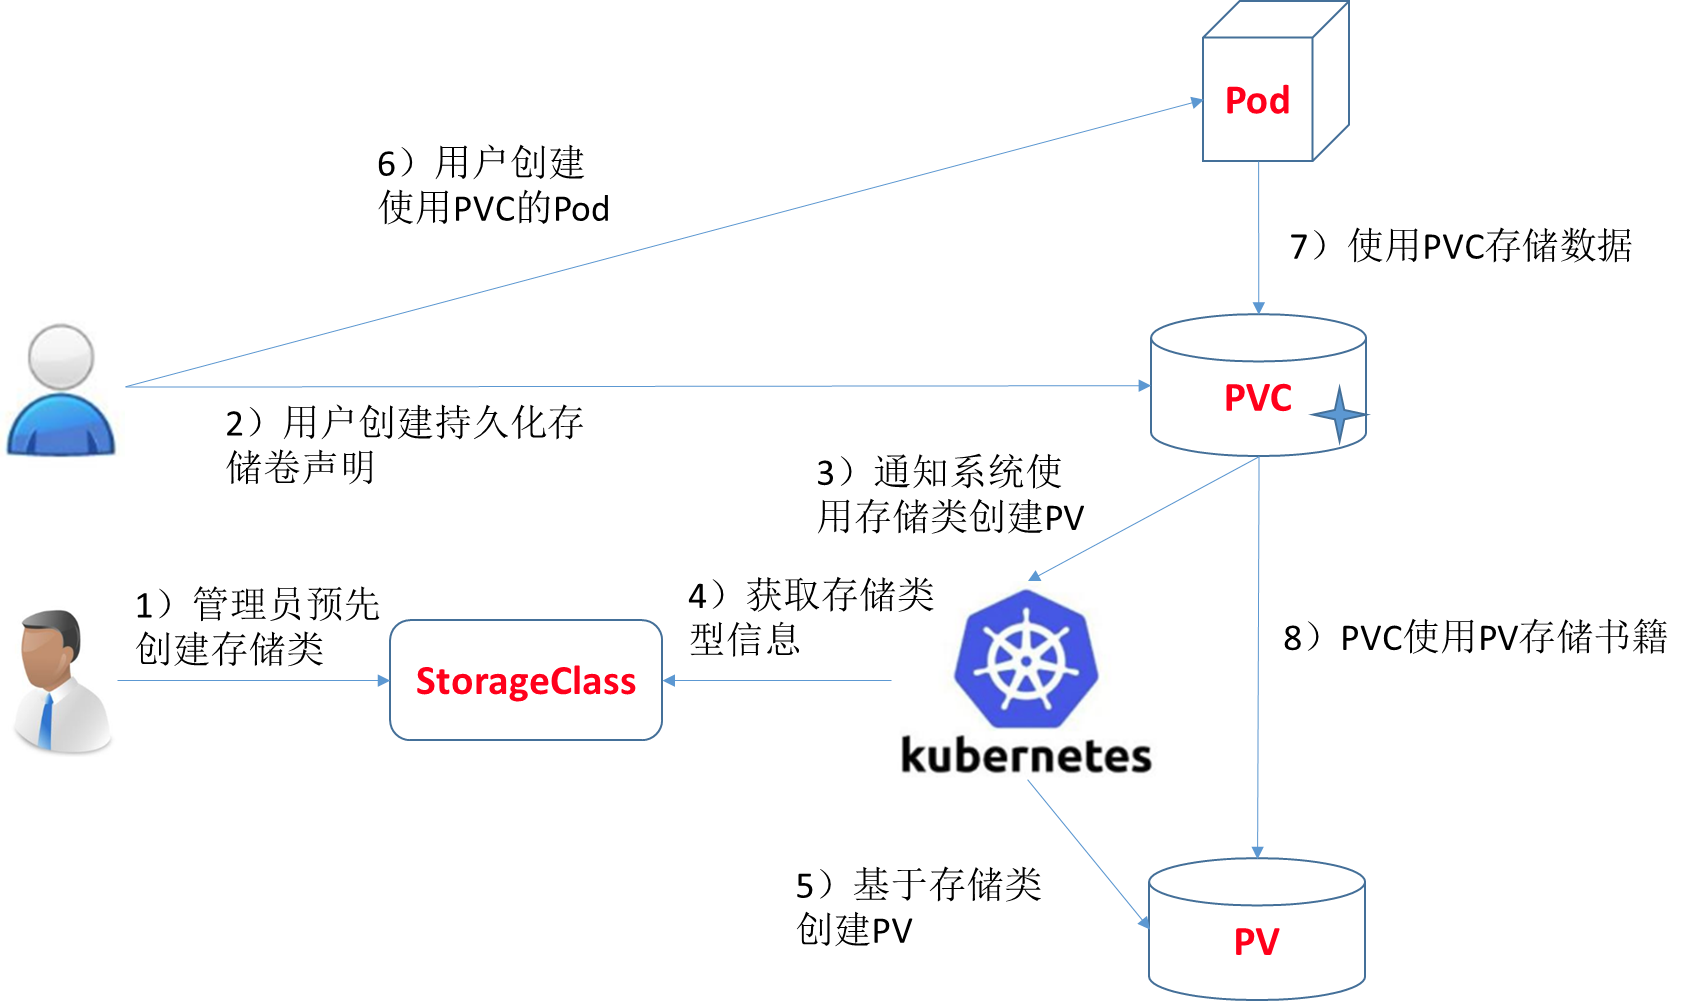
- Helm
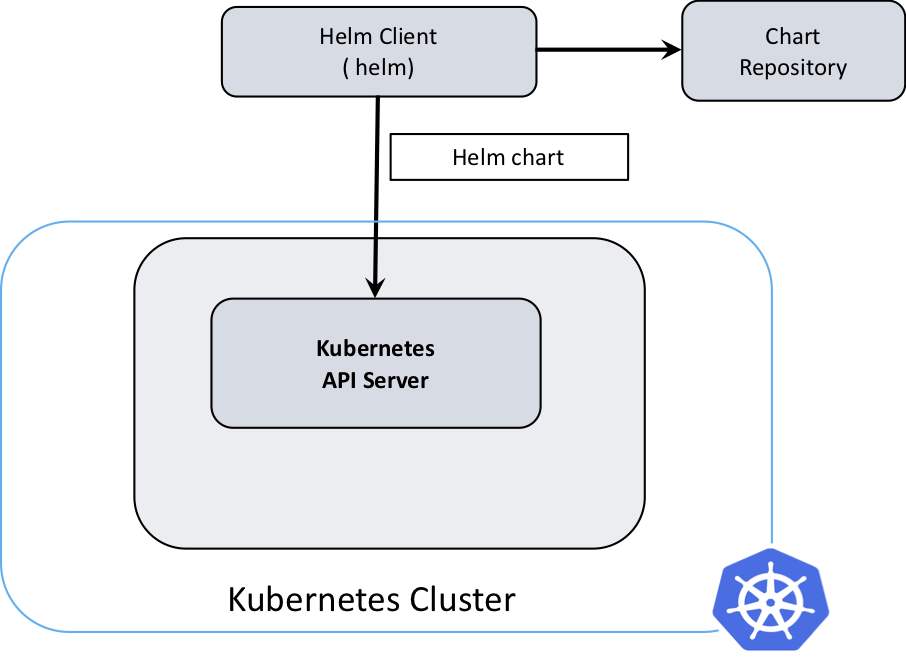
harbor/values.yaml
expose:
  # Set how to expose the service. Set the type as "ingress", "clusterIP", "nodePort" or "loadBalancer"
  # and fill the information in the corresponding section
  type: ingress
  tls:
    # Enable TLS or not.
    # Delete the "ssl-redirect" annotations in "expose.ingress.annotations" when TLS is disabled and "expose.type" is "ingress"
    # Note: if the "expose.type" is "ingress" and TLS is disabled,
    # the port must be included in the command when pulling/pushing images.
    # Refer to https://github.com/goharbor/harbor/issues/5291 for details.
    enabled: true
    # The source of the tls certificate. Set as "auto", "secret"
    # or "none" and fill the information in the corresponding section
    # 1) auto: generate the tls certificate automatically
    # 2) secret: read the tls certificate from the specified secret.
    # The tls certificate can be generated manually or by cert manager
    # 3) none: configure no tls certificate for the ingress. If the default
    # tls certificate is configured in the ingress controller, choose this option
    certSource: auto
    auto:
      # The common name used to generate the certificate, it's necessary
      # when the type isn't "ingress"
      commonName: ""
    secret:
      # The name of secret which contains keys named:
      # "tls.crt" - the certificate
      # "tls.key" - the private key
      secretName: ""
      # The name of secret which contains keys named:
      # "tls.crt" - the certificate
      # "tls.key" - the private key
      # Only needed when the "expose.type" is "ingress".
      notarySecretName: ""
  ingress:
    hosts:
      core: harbor.luffy.com    # 修改域名
      notary: notary.luffy.com  # 修改
    # set to the type of ingress controller if it has specific requirements.
    # leave as `default` for most ingress controllers.
    # set to `gce` if using the GCE ingress controller
    # set to `ncp` if using the NCP (NSX-T Container Plugin) ingress controller
    # set to `alb` if using the ALB ingress controller
    controller: default
    ## Allow .Capabilities.KubeVersion.Version to be overridden while creating ingress
    kubeVersionOverride: ""
    className: ""
    annotations:
      # note different ingress controllers may require a different ssl-redirect annotation
      # for Envoy, use ingress.kubernetes.io/force-ssl-redirect: "true" and remove the nginx lines below
      ingress.kubernetes.io/ssl-redirect: "true"
      ingress.kubernetes.io/proxy-body-size: "0"
      nginx.ingress.kubernetes.io/ssl-redirect: "true"
      nginx.ingress.kubernetes.io/proxy-body-size: "0"
    notary:
      # notary ingress-specific annotations
      annotations: {}
      # notary ingress-specific labels
      labels: {}
    harbor:
      # harbor ingress-specific annotations
      annotations: {}
      # harbor ingress-specific labels
      labels: {}
  clusterIP:
    # The name of ClusterIP service
    name: harbor
    # Annotations on the ClusterIP service
    annotations: {}
    ports:
      # The service port Harbor listens on when serving HTTP
      httpPort: 80
      # The service port Harbor listens on when serving HTTPS
      httpsPort: 443
      # The service port Notary listens on. Only needed when notary.enabled
      # is set to true
      notaryPort: 4443
  nodePort:
    # The name of NodePort service
    name: harbor
    ports:
      http:
        # The service port Harbor listens on when serving HTTP
        port: 80
        # The node port Harbor listens on when serving HTTP
        nodePort: 30002
      https:
        # The service port Harbor listens on when serving HTTPS
        port: 443
        # The node port Harbor listens on when serving HTTPS
        nodePort: 30003
      # Only needed when notary.enabled is set to true
      notary:
        # The service port Notary listens on
        port: 4443
        # The node port Notary listens on
        nodePort: 30004
  loadBalancer:
    # The name of LoadBalancer service
    name: harbor
    # Set the IP if the LoadBalancer supports assigning IP
    IP: ""
    ports:
      # The service port Harbor listens on when serving HTTP
      httpPort: 80
      # The service port Harbor listens on when serving HTTPS
      httpsPort: 443
      # The service port Notary listens on. Only needed when notary.enabled
      # is set to true
      notaryPort: 4443
    annotations: {}
    sourceRanges: []

# The external URL for Harbor core service. It is used to
# 1) populate the docker/helm commands showed on portal
# 2) populate the token service URL returned to docker/notary client
#
# Format: protocol://domain[:port]. Usually:
# 1) if "expose.type" is "ingress", the "domain" should be
# the value of "expose.ingress.hosts.core"
# 2) if "expose.type" is "clusterIP", the "domain" should be
# the value of "expose.clusterIP.name"
# 3) if "expose.type" is "nodePort", the "domain" should be
# the IP address of k8s node
#
# If Harbor is deployed behind the proxy, set it as the URL of proxy
externalURL: https://harbor.luffy.com #修改。对外暴漏的url

# The internal TLS used for harbor components secure communicating. In order to enable https
# in each components tls cert files need to provided in advance.
internalTLS:
  # If internal TLS enabled
  enabled: false
  # There are three ways to provide tls
  # 1) "auto" will generate cert automatically
  # 2) "manual" need provide cert file manually in following value
  # 3) "secret" internal certificates from secret
  certSource: "auto"
  # The content of trust ca, only available when `certSource` is "manual"
  trustCa: ""
  # core related cert configuration
  core:
    # secret name for core's tls certs
    secretName: ""
    # Content of core's TLS cert file, only available when `certSource` is "manual"
    crt: ""
    # Content of core's TLS key file, only available when `certSource` is "manual"
    key: ""
  # jobservice related cert configuration
  jobservice:
    # secret name for jobservice's tls certs
    secretName: ""
    # Content of jobservice's TLS key file, only available when `certSource` is "manual"
    crt: ""
    # Content of jobservice's TLS key file, only available when `certSource` is "manual"
    key: ""
  # registry related cert configuration
  registry:
    # secret name for registry's tls certs
    secretName: ""
    # Content of registry's TLS key file, only available when `certSource` is "manual"
    crt: ""
    # Content of registry's TLS key file, only available when `certSource` is "manual"
    key: ""
  # portal related cert configuration
  portal:
    # secret name for portal's tls certs
    secretName: ""
    # Content of portal's TLS key file, only available when `certSource` is "manual"
    crt: ""
    # Content of portal's TLS key file, only available when `certSource` is "manual"
    key: ""
  # chartmuseum related cert configuration
  chartmuseum:
    # secret name for chartmuseum's tls certs
    secretName: ""
    # Content of chartmuseum's TLS key file, only available when `certSource` is "manual"
    crt: ""
    # Content of chartmuseum's TLS key file, only available when `certSource` is "manual"
    key: ""
  # trivy related cert configuration
  trivy:
    # secret name for trivy's tls certs
    secretName: ""
    # Content of trivy's TLS key file, only available when `certSource` is "manual"
    crt: ""
    # Content of trivy's TLS key file, only available when `certSource` is "manual"
    key: ""

ipFamily:
  # ipv6Enabled set to true if ipv6 is enabled in cluster, currently it affected the nginx related component
  ipv6:
    enabled: true
  # ipv4Enabled set to true if ipv4 is enabled in cluster, currently it affected the nginx related component
  ipv4:
    enabled: true

# The persistence is enabled by default and a default StorageClass
# is needed in the k8s cluster to provision volumes dynamically.
# Specify another StorageClass in the "storageClass" or set "existingClaim"
# if you already have existing persistent volumes to use
#
# For storing images and charts, you can also use "azure", "gcs", "s3",
# "swift" or "oss". Set it in the "imageChartStorage" section
persistence:
  enabled: true
  # Setting it to "keep" to avoid removing PVCs during a helm delete
  # operation. Leaving it empty will delete PVCs after the chart deleted
  # (this does not apply for PVCs that are created for internal database
  # and redis components, i.e. they are never deleted automatically)
  resourcePolicy: "keep"
  persistentVolumeClaim:
    registry:
      # Use the existing PVC which must be created manually before bound,
      # and specify the "subPath" if the PVC is shared with other components
      existingClaim: "harbor-data" # 指定创建好的pvc
      # Specify the "storageClass" used to provision the volume. Or the default
      # StorageClass will be used (the default).
      # Set it to "-" to disable dynamic provisioning
      storageClass: ""
      subPath: "registry"   #设置存储子路径
      accessMode: ReadWriteOnce
      size: 5Gi
      annotations: {}
    chartmuseum:
      existingClaim: "harbor-data" # 指定创建好的pvc
      storageClass: ""
      subPath: "chartmuseum"
      accessMode: ReadWriteOnce
      size: 5Gi
      annotations: {}
    jobservice:
      jobLog:
        existingClaim: "harbor-data" # 指定创建好的pvc
        storageClass: ""
        subPath: "jobservice"
        accessMode: ReadWriteOnce
        size: 1Gi
        annotations: {}
      scanDataExports:
        existingClaim: ""
        storageClass: ""
        subPath: "scanDataExports"
        accessMode: ReadWriteOnce
        size: 1Gi
        annotations: {}
    # If external database is used, the following settings for database will
    # be ignored
    database:
      existingClaim: "harbor-data" # 指定创建好的pvc
      storageClass: ""
      subPath: "database"
      accessMode: ReadWriteOnce
      size: 1Gi
      annotations: {}
    # If external Redis is used, the following settings for Redis will
    # be ignored
    redis:
      existingClaim: "harbor-data" # 指定创建好的pvc
      storageClass: ""
      subPath: "redis"
      accessMode: ReadWriteOnce
      size: 1Gi
      annotations: {}
    trivy:
      existingClaim: "harbor-data" # 指定创建好的pvc
      storageClass: ""
      subPath: "trivy"
      accessMode: ReadWriteOnce
      size: 5Gi
      annotations: {}
  # Define which storage backend is used for registry and chartmuseum to store
  # images and charts. Refer to
  # https://github.com/docker/distribution/blob/master/docs/configuration.md#storage
  # for the detail.
  imageChartStorage:
    # Specify whether to disable `redirect` for images and chart storage, for
    # backends which not supported it (such as using minio for `s3` storage type), please disable
    # it. To disable redirects, simply set `disableredirect` to `true` instead.
    # Refer to
    # https://github.com/docker/distribution/blob/master/docs/configuration.md#redirect
    # for the detail.
    disableredirect: false
    # Specify the "caBundleSecretName" if the storage service uses a self-signed certificate.
    # The secret must contain keys named "ca.crt" which will be injected into the trust store
    # of registry's and chartmuseum's containers.
    # caBundleSecretName:

    # Specify the type of storage: "filesystem", "azure", "gcs", "s3", "swift",
    # "oss" and fill the information needed in the corresponding section. The type
    # must be "filesystem" if you want to use persistent volumes for registry
    # and chartmuseum
    type: filesystem
    filesystem:
      rootdirectory: /storage
      #maxthreads: 100
    azure:
      accountname: accountname
      accountkey: base64encodedaccountkey
      container: containername
      #realm: core.windows.net
      # To use existing secret, the key must be AZURE_STORAGE_ACCESS_KEY
      existingSecret: ""
    gcs:
      bucket: bucketname
      # The base64 encoded json file which contains the key
      encodedkey: base64-encoded-json-key-file
      #rootdirectory: /gcs/object/name/prefix
      #chunksize: "5242880"
      # To use existing secret, the key must be gcs-key.json
      existingSecret: ""
      useWorkloadIdentity: false
    s3:
      # Set an existing secret for S3 accesskey and secretkey
      # keys in the secret should be AWS_ACCESS_KEY_ID and AWS_SECRET_ACCESS_KEY for chartmuseum
      # keys in the secret should be REGISTRY_STORAGE_S3_ACCESSKEY and REGISTRY_STORAGE_S3_SECRETKEY for registry
      #existingSecret: ""
      region: us-west-1
      bucket: bucketname
      #accesskey: awsaccesskey
      #secretkey: awssecretkey
      #regionendpoint: http://myobjects.local
      #encrypt: false
      #keyid: mykeyid
      #secure: true
      #skipverify: false
      #v4auth: true
      #chunksize: "5242880"
      #rootdirectory: /s3/object/name/prefix
      #storageclass: STANDARD
      #multipartcopychunksize: "33554432"
      #multipartcopymaxconcurrency: 100
      #multipartcopythresholdsize: "33554432"
    swift:
      authurl: https://storage.myprovider.com/v3/auth
      username: username
      password: password
      container: containername
      #region: fr
      #tenant: tenantname
      #tenantid: tenantid
      #domain: domainname
      #domainid: domainid
      #trustid: trustid
      #insecureskipverify: false
      #chunksize: 5M
      #prefix:
      #secretkey: secretkey
      #accesskey: accesskey
      #authversion: 3
      #endpointtype: public
      #tempurlcontainerkey: false
      #tempurlmethods:
    oss:
      accesskeyid: accesskeyid
      accesskeysecret: accesskeysecret
      region: regionname
      bucket: bucketname
      #endpoint: endpoint
      #internal: false
      #encrypt: false
      #secure: true
      #chunksize: 10M
      #rootdirectory: rootdirectory

imagePullPolicy: IfNotPresent

# Use this set to assign a list of default pullSecrets
imagePullSecrets:
#  - name: docker-registry-secret
#  - name: internal-registry-secret

# The update strategy for deployments with persistent volumes(jobservice, registry
# and chartmuseum): "RollingUpdate" or "Recreate"
# Set it as "Recreate" when "RWM" for volumes isn't supported
updateStrategy:
  type: RollingUpdate

# debug, info, warning, error or fatal
logLevel: info

# The initial password of Harbor admin. Change it from portal after launching Harbor
harborAdminPassword: "Harbor12345"

# The name of the secret which contains key named "ca.crt". Setting this enables the
# download link on portal to download the CA certificate when the certificate isn't
# generated automatically
caSecretName: ""

# The secret key used for encryption. Must be a string of 16 chars.
secretKey: "not-a-secure-key"
# If using existingSecretSecretKey, the key must be sercretKey
existingSecretSecretKey: ""

# The proxy settings for updating trivy vulnerabilities from the Internet and replicating
# artifacts from/to the registries that cannot be reached directly
proxy:
  httpProxy:
  httpsProxy:
  noProxy: 127.0.0.1,localhost,.local,.internal
  components:
    - core
    - jobservice
    - trivy

# Run the migration job via helm hook
enableMigrateHelmHook: false

# The custom ca bundle secret, the secret must contain key named "ca.crt"
# which will be injected into the trust store for chartmuseum, core, jobservice, registry, trivy components
# caBundleSecretName: ""

## UAA Authentication Options
# If you're using UAA for authentication behind a self-signed
# certificate you will need to provide the CA Cert.
# Set uaaSecretName below to provide a pre-created secret that
# contains a base64 encoded CA Certificate named `ca.crt`.
# uaaSecretName:

# If service exposed via "ingress", the Nginx will not be used
nginx:
  image:
    repository: goharbor/nginx-photon
    tag: v2.6.1
  # set the service account to be used, default if left empty
  serviceAccountName: ""
  # mount the service account token
  automountServiceAccountToken: false
  replicas: 1
  revisionHistoryLimit: 10
  # resources:
  #  requests:
  #    memory: 256Mi
  #    cpu: 100m
  nodeSelector: {}
  tolerations: []
  affinity: {}
  ## Additional deployment annotations
  podAnnotations: {}
  ## The priority class to run the pod as
  priorityClassName:

portal:
  image:
    repository: goharbor/harbor-portal
    tag: v2.6.1
  # set the service account to be used, default if left empty
  serviceAccountName: ""
  # mount the service account token
  automountServiceAccountToken: false
  replicas: 1
  revisionHistoryLimit: 10
  # resources:
  #  requests:
  #    memory: 256Mi
  #    cpu: 100m
  nodeSelector: {}
  tolerations: []
  affinity: {}
  ## Additional deployment annotations
  podAnnotations: {}
  ## The priority class to run the pod as
  priorityClassName:

core:
  image:
    repository: goharbor/harbor-core
    tag: v2.6.1
  # set the service account to be used, default if left empty
  serviceAccountName: ""
  # mount the service account token
  automountServiceAccountToken: false
  replicas: 1
  revisionHistoryLimit: 10
  ## Startup probe values
  startupProbe:
    enabled: true
    initialDelaySeconds: 10
  # resources:
  #  requests:
  #    memory: 256Mi
  #    cpu: 100m
  nodeSelector: {}
  tolerations: []
  affinity: {}
  ## Additional deployment annotations
  podAnnotations: {}
  # Secret is used when core server communicates with other components.
  # If a secret key is not specified, Helm will generate one.
  # Must be a string of 16 chars.
  secret: ""
  # Fill the name of a kubernetes secret if you want to use your own
  # TLS certificate and private key for token encryption/decryption.
  # The secret must contain keys named:
  # "tls.crt" - the certificate
  # "tls.key" - the private key
  # The default key pair will be used if it isn't set
  secretName: ""
  # The XSRF key. Will be generated automatically if it isn't specified
  xsrfKey: ""
  ## The priority class to run the pod as
  priorityClassName:
  # The time duration for async update artifact pull_time and repository
  # pull_count, the unit is second. Will be 10 seconds if it isn't set.
  # eg. artifactPullAsyncFlushDuration: 10
  artifactPullAsyncFlushDuration:
  gdpr:
    deleteUser: false

jobservice:
  image:
    repository: goharbor/harbor-jobservice
    tag: v2.6.1
  replicas: 1
  revisionHistoryLimit: 10
  # set the service account to be used, default if left empty
  serviceAccountName: ""
  # mount the service account token
  automountServiceAccountToken: false
  maxJobWorkers: 10
  # The logger for jobs: "file", "database" or "stdout"
  jobLoggers:
    - file
    # - database
    # - stdout
  # The jobLogger sweeper duration (ignored if `jobLogger` is `stdout`)
  loggerSweeperDuration: 14 #days

  # resources:
  #   requests:
  #     memory: 256Mi
  #     cpu: 100m
  nodeSelector: {}
  tolerations: []
  affinity: {}
  ## Additional deployment annotations
  podAnnotations: {}
  # Secret is used when job service communicates with other components.
  # If a secret key is not specified, Helm will generate one.
  # Must be a string of 16 chars.
  secret: ""
  ## The priority class to run the pod as
  priorityClassName:

registry:
  # set the service account to be used, default if left empty
  serviceAccountName: ""
  # mount the service account token
  automountServiceAccountToken: false
  registry:
    image:
      repository: goharbor/registry-photon
      tag: v2.6.1
    # resources:
    #  requests:
    #    memory: 256Mi
    #    cpu: 100m
  controller:
    image:
      repository: goharbor/harbor-registryctl
      tag: v2.6.1

    # resources:
    #  requests:
    #    memory: 256Mi
    #    cpu: 100m
  replicas: 1
  revisionHistoryLimit: 10
  nodeSelector: {}
  tolerations: []
  affinity: {}
  ## Additional deployment annotations
  podAnnotations: {}
  ## The priority class to run the pod as
  priorityClassName:
  # Secret is used to secure the upload state from client
  # and registry storage backend.
  # See: https://github.com/docker/distribution/blob/master/docs/configuration.md#http
  # If a secret key is not specified, Helm will generate one.
  # Must be a string of 16 chars.
  secret: ""
  # If true, the registry returns relative URLs in Location headers. The client is responsible for resolving the correct URL.
  relativeurls: false
  credentials:
    username: "harbor_registry_user"
    password: "harbor_registry_password"
    # If using existingSecret, the key must be REGISTRY_PASSWD and REGISTRY_HTPASSWD
    existingSecret: ""
    # Login and password in htpasswd string format. Excludes `registry.credentials.username`  and `registry.credentials.password`. May come in handy when integrating with tools like argocd or flux. This allows the same line to be generated each time the template is rendered, instead of the `htpasswd` function from helm, which generates different lines each time because of the salt.
    # htpasswdString: $apr1$XLefHzeG$Xl4.s00sMSCCcMyJljSZb0 # example string
  middleware:
    enabled: false
    type: cloudFront
    cloudFront:
      baseurl: example.cloudfront.net
      keypairid: KEYPAIRID
      duration: 3000s
      ipfilteredby: none
      # The secret key that should be present is CLOUDFRONT_KEY_DATA, which should be the encoded private key
      # that allows access to CloudFront
      privateKeySecret: "my-secret"
  # enable purge _upload directories
  upload_purging:
    enabled: true
    # remove files in _upload directories which exist for a period of time, default is one week.
    age: 168h
    # the interval of the purge operations
    interval: 24h
    dryrun: false

chartmuseum:
  enabled: true
  # set the service account to be used, default if left empty
  serviceAccountName: ""
  # mount the service account token
  automountServiceAccountToken: false
  # Harbor defaults ChartMuseum to returning relative urls, if you want using absolute url you should enable it by change the following value to 'true'
  absoluteUrl: false
  image:
    repository: goharbor/chartmuseum-photon
    tag: v2.6.1
  replicas: 1
  revisionHistoryLimit: 10
  # resources:
  #  requests:
  #    memory: 256Mi
  #    cpu: 100m
  nodeSelector: {}
  tolerations: []
  affinity: {}
  ## Additional deployment annotations
  podAnnotations: {}
  ## The priority class to run the pod as
  priorityClassName:
  ## limit the number of parallel indexers
  indexLimit: 0

trivy:
  # enabled the flag to enable Trivy scanner
  enabled: false   # 关闭
  image:
    # repository the repository for Trivy adapter image
    repository: goharbor/trivy-adapter-photon
    # tag the tag for Trivy adapter image
    tag: v2.6.1
  # set the service account to be used, default if left empty
  serviceAccountName: ""
  # mount the service account token
  automountServiceAccountToken: false
  # replicas the number of Pod replicas
  replicas: 1
  # debugMode the flag to enable Trivy debug mode with more verbose scanning log
  debugMode: false
  # vulnType a comma-separated list of vulnerability types. Possible values are `os` and `library`.
  vulnType: "os,library"
  # severity a comma-separated list of severities to be checked
  severity: "UNKNOWN,LOW,MEDIUM,HIGH,CRITICAL"
  # ignoreUnfixed the flag to display only fixed vulnerabilities
  ignoreUnfixed: false
  # insecure the flag to skip verifying registry certificate
  insecure: false
  # gitHubToken the GitHub access token to download Trivy DB
  #
  # Trivy DB contains vulnerability information from NVD, Red Hat, and many other upstream vulnerability databases.
  # It is downloaded by Trivy from the GitHub release page https://github.com/aquasecurity/trivy-db/releases and cached
  # in the local file system (`/home/scanner/.cache/trivy/db/trivy.db`). In addition, the database contains the update
  # timestamp so Trivy can detect whether it should download a newer version from the Internet or use the cached one.
  # Currently, the database is updated every 12 hours and published as a new release to GitHub.
  #
  # Anonymous downloads from GitHub are subject to the limit of 60 requests per hour. Normally such rate limit is enough
  # for production operations. If, for any reason, it's not enough, you could increase the rate limit to 5000
  # requests per hour by specifying the GitHub access token. For more details on GitHub rate limiting please consult
  # https://developer.github.com/v3/#rate-limiting
  #
  # You can create a GitHub token by following the instructions in
  # https://help.github.com/en/github/authenticating-to-github/creating-a-personal-access-token-for-the-command-line
  gitHubToken: ""
  # skipUpdate the flag to disable Trivy DB downloads from GitHub
  #
  # You might want to set the value of this flag to `true` in test or CI/CD environments to avoid GitHub rate limiting issues.
  # If the value is set to `true` you have to manually download the `trivy.db` file and mount it in the
  # `/home/scanner/.cache/trivy/db/trivy.db` path.
  skipUpdate: false
  # The offlineScan option prevents Trivy from sending API requests to identify dependencies.
  #
  # Scanning JAR files and pom.xml may require Internet access for better detection, but this option tries to avoid it.
  # For example, the offline mode will not try to resolve transitive dependencies in pom.xml when the dependency doesn't
  # exist in the local repositories. It means a number of detected vulnerabilities might be fewer in offline mode.
  # It would work if all the dependencies are in local.
  # This option doesn’t affect DB download. You need to specify skipUpdate as well as offlineScan in an air-gapped environment.
  offlineScan: false
  # The duration to wait for scan completion
  timeout: 5m0s
  resources:
    requests:
      cpu: 200m
      memory: 512Mi
    limits:
      cpu: 1
      memory: 1Gi
  nodeSelector: {}
  tolerations: []
  affinity: {}
  ## Additional deployment annotations
  podAnnotations: {}
  ## The priority class to run the pod as
  priorityClassName:

notary:
  enabled: true
  server:
    # set the service account to be used, default if left empty
    serviceAccountName: ""
    # mount the service account token
    automountServiceAccountToken: false
    image:
      repository: goharbor/notary-server-photon
      tag: v2.6.1
    replicas: 1
    # resources:
    #  requests:
    #    memory: 256Mi
    #    cpu: 100m
    nodeSelector: {}
    tolerations: []
    affinity: {}
    ## Additional deployment annotations
    podAnnotations: {}
    ## The priority class to run the pod as
    priorityClassName:
  signer:
    # set the service account to be used, default if left empty
    serviceAccountName: ""
    # mount the service account token
    automountServiceAccountToken: false
    image:
      repository: goharbor/notary-signer-photon
      tag: v2.6.1
    replicas: 1
    # resources:
    #  requests:
    #    memory: 256Mi
    #    cpu: 100m
    nodeSelector: {}
    tolerations: []
    affinity: {}
    ## Additional deployment annotations
    podAnnotations: {}
    ## The priority class to run the pod as
    priorityClassName:
  # Fill the name of a kubernetes secret if you want to use your own
  # TLS certificate authority, certificate and private key for notary
  # communications.
  # The secret must contain keys named ca.crt, tls.crt and tls.key that
  # contain the CA, certificate and private key.
  # They will be generated if not set.
  secretName: ""

database:
  # if external database is used, set "type" to "external"
  # and fill the connection informations in "external" section
  type: internal
  internal:
    # set the service account to be used, default if left empty
    serviceAccountName: ""
    # mount the service account token
    automountServiceAccountToken: false
    image:
      repository: goharbor/harbor-db
      tag: v2.6.1
    # The initial superuser password for internal database
    password: "changeit"
    # The size limit for Shared memory, pgSQL use it for shared_buffer
    # More details see:
    # https://github.com/goharbor/harbor/issues/15034
    shmSizeLimit: 512Mi
    # resources:
    #  requests:
    #    memory: 256Mi
    #    cpu: 100m
    nodeSelector: {}
    tolerations: []
    affinity: {}
    ## The priority class to run the pod as
    priorityClassName:
    initContainer:
      migrator: {}
      # resources:
      #  requests:
      #    memory: 128Mi
      #    cpu: 100m
      permissions: {}
      # resources:
      #  requests:
      #    memory: 128Mi
      #    cpu: 100m
  external:
    host: "192.168.0.1"
    port: "5432"
    username: "user"
    password: "password"
    coreDatabase: "registry"
    notaryServerDatabase: "notary_server"
    notarySignerDatabase: "notary_signer"
    # if using existing secret, the key must be "password"
    existingSecret: ""
    # "disable" - No SSL
    # "require" - Always SSL (skip verification)
    # "verify-ca" - Always SSL (verify that the certificate presented by the
    # server was signed by a trusted CA)
    # "verify-full" - Always SSL (verify that the certification presented by the
    # server was signed by a trusted CA and the server host name matches the one
    # in the certificate)
    sslmode: "disable"
  # The maximum number of connections in the idle connection pool per pod (core+exporter).
  # If it <=0, no idle connections are retained.
  maxIdleConns: 100
  # The maximum number of open connections to the database per pod (core+exporter).
  # If it <= 0, then there is no limit on the number of open connections.
  # Note: the default number of connections is 1024 for postgre of harbor.
  maxOpenConns: 900
  ## Additional deployment annotations
  podAnnotations: {}

redis:
  # if external Redis is used, set "type" to "external"
  # and fill the connection informations in "external" section
  type: internal
  internal:
    # set the service account to be used, default if left empty
    serviceAccountName: ""
    # mount the service account token
    automountServiceAccountToken: false
    image:
      repository: goharbor/redis-photon
      tag: v2.6.1
    # resources:
    #  requests:
    #    memory: 256Mi
    #    cpu: 100m
    nodeSelector: {}
    tolerations: []
    affinity: {}
    ## The priority class to run the pod as
    priorityClassName:
  external:
    # support redis, redis+sentinel
    # addr for redis: <host_redis>:<port_redis>
    # addr for redis+sentinel: <host_sentinel1>:<port_sentinel1>,<host_sentinel2>:<port_sentinel2>,<host_sentinel3>:<port_sentinel3>
    addr: "192.168.0.2:6379"
    # The name of the set of Redis instances to monitor, it must be set to support redis+sentinel
    sentinelMasterSet: ""
    # The "coreDatabaseIndex" must be "0" as the library Harbor
    # used doesn't support configuring it
    coreDatabaseIndex: "0"
    jobserviceDatabaseIndex: "1"
    registryDatabaseIndex: "2"
    chartmuseumDatabaseIndex: "3"
    trivyAdapterIndex: "5"
    password: ""
    # If using existingSecret, the key must be REDIS_PASSWORD
    existingSecret: ""
  ## Additional deployment annotations
  podAnnotations: {}

exporter:
  replicas: 1
  revisionHistoryLimit: 10
  # resources:
  #  requests:
  #    memory: 256Mi
  #    cpu: 100m
  podAnnotations: {}
  serviceAccountName: ""
  # mount the service account token
  automountServiceAccountToken: false
  image:
    repository: goharbor/harbor-exporter
    tag: v2.6.1
  nodeSelector: {}
  tolerations: []
  affinity: {}
  cacheDuration: 23
  cacheCleanInterval: 14400
  ## The priority class to run the pod as
  priorityClassName:

metrics:
  enabled: false
  core:
    path: /metrics
    port: 8001
  registry:
    path: /metrics
    port: 8001
  jobservice:
    path: /metrics
    port: 8001
  exporter:
    path: /metrics
    port: 8001
  ## Create prometheus serviceMonitor to scrape harbor metrics.
  ## This requires the monitoring.coreos.com/v1 CRD. Please see
  ## https://github.com/prometheus-operator/prometheus-operator/blob/master/Documentation/user-guides/getting-started.md
  ##
  serviceMonitor:
    enabled: false
    additionalLabels: {}
    # Scrape interval. If not set, the Prometheus default scrape interval is used.
    interval: ""
    # Metric relabel configs to apply to samples before ingestion.
    metricRelabelings:
      []
      # - action: keep
      #   regex: 'kube_(daemonset|deployment|pod|namespace|node|statefulset).+'
      #   sourceLabels: [__name__]
    # Relabel configs to apply to samples before ingestion.
    relabelings:
      []
      # - sourceLabels: [__meta_kubernetes_pod_node_name]
      #   separator: ;
      #   regex: ^(.*)$
      #   targetLabel: nodename
      #   replacement: $1
      #   action: replace

trace:
  enabled: false
  # trace provider: jaeger or otel
  # jaeger should be 1.26+
  provider: jaeger
  # set sample_rate to 1 if you wanna sampling 100% of trace data; set 0.5 if you wanna sampling 50% of trace data, and so forth
  sample_rate: 1
  # namespace used to differentiate different harbor services
  # namespace:
  # attributes is a key value dict contains user defined attributes used to initialize trace provider
  # attributes:
  #   application: harbor
  jaeger:
    # jaeger supports two modes:
    #   collector mode(uncomment endpoint and uncomment username, password if needed)
    #   agent mode(uncomment agent_host and agent_port)
    endpoint: http://hostname:14268/api/traces
    # username:
    # password:
    # agent_host: hostname
    # export trace data by jaeger.thrift in compact mode
    # agent_port: 6831
  otel:
    endpoint: hostname:4318
    url_path: /v1/traces
    compression: false
    insecure: true
    timeout: 10s

# cache layer configurations
# if this feature enabled, harbor will cache the resource
# `project/project_metadata/repository/artifact/manifest` in the redis
# which help to improve the performance of high concurrent pulling manifest.
cache:
  # default is not enabled.
  enabled: false
  # default keep cache for one day.
  expireHours: 24